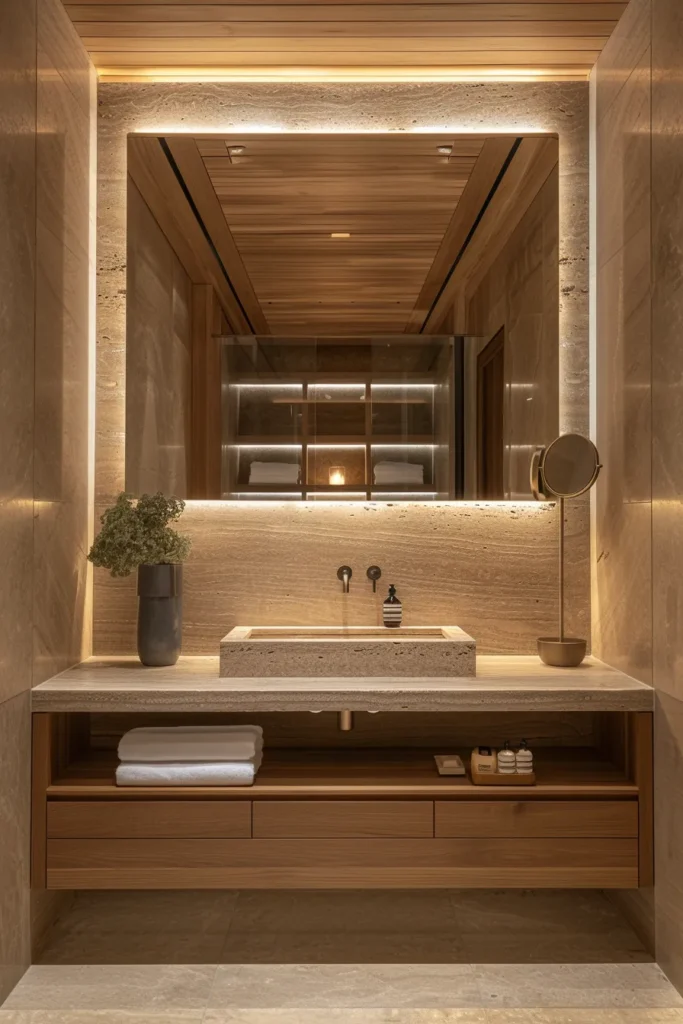
The 2026 vanity room aesthetic abandons compartmentalized “getting ready” spaces in favor of architecturally integrated beauty sanctuaries where monolithic stone surfaces, programmable circadian lighting, and warm-toned brass fixtures create continuous spatial flow between dressing, grooming, and contemplation.
This transformation reflects a fundamental shift in how we conceptualize personal care environments. Where previous decades treated vanity rooms as utilitarian appendages to master suites, today’s approach positions them as primary architectural features deserving the same material investment as statement kitcheng or spa bathrooms. The result is a space that functions equally as morning preparation zone, evening wind-down ritual area, and meditative refuge throughout the day.
1. Monolithic Carrara Marble Vanity Walls
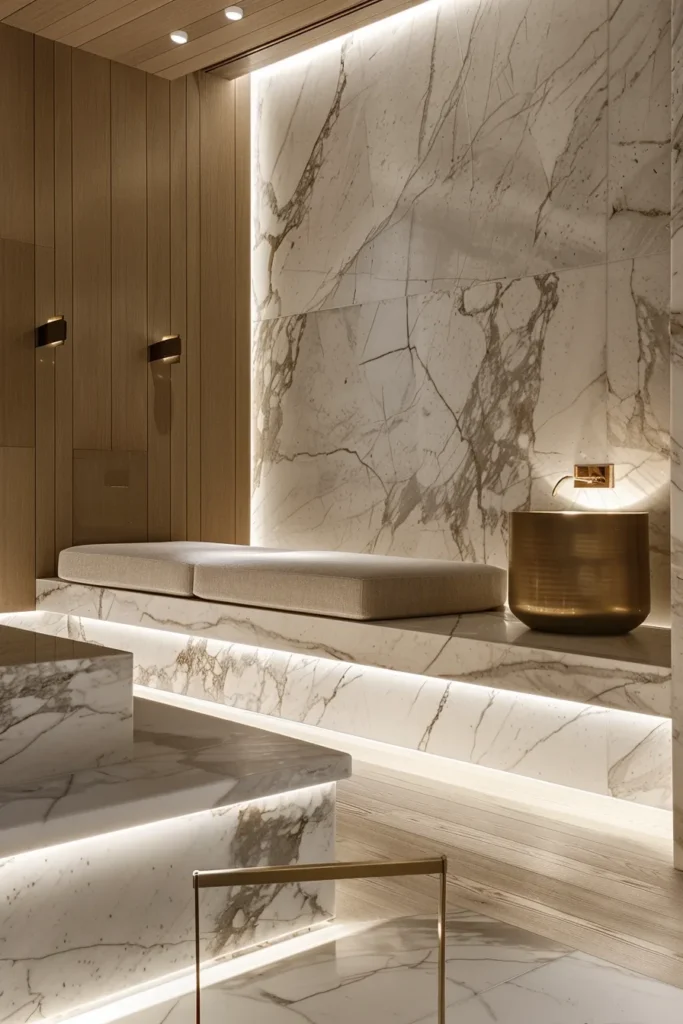
Full-height bookmatched Carrara marble slabs create uninterrupted vertical planes that eliminate grout lines and visual fragmentation. This approach uses 3cm thickness stone panels extending from floor to ceiling, with veining patterns mirror-matched at center seams to create symmetrical organic compositions. The honed finish, specified at 20-30 gloss units rather than polished marble’s 70+ units, provides tactile warmth while reducing harsh light reflection that can distort makeup application.
The monolithic installation technique borrows from gallery and museum design vocabulary, where continuous surfaces create contemplative environments. By treating the vanity wall as a singular architectural element rather than assembled tile work, the space gains immediate gravitas. Natural stone’s thermal mass also regulates ambient temperature, creating the subtle coolness associated with European spa experiences.
Designer’s Secret: Specify bookmatching vertically rather than horizontally to emphasize ceiling height and create the illusion of expanded volume. The human eye reads vertical veining as upward movement, making standard 9-foot ceilings feel 10-11 feet tall. Request slabs from the same quarry block cut within three sequential positions to ensure vein continuity across panels.
Design Breakdown:
- Material: Carrara Gioia or Statuario grade marble in honed finish (25 gloss units)
- Panel Dimensions: 140cm x 300cm minimum to reduce seam quantity
- Installation: Mechanical anchoring system with 12mm rear ventilation gap
- Seam Treatment: Invisible epoxy joint with vein-matched alignment
- Lighting Accent: Grazing uplights at baseboard (2700K, 15° beam angle) to highlight natural texture
Best For: Collectors and design purists who value material authenticity over pattern maximalism. Ideal for vanity rooms with 10+ foot ceilings where vertical drama can be fully appreciated.
2. Programmable Circadian Lighting Systems
Vanity lighting in 2026 abandons static overhead fixtures for dynamic circadian systems that shift color temperature throughout the day, mimicking natural daylight patterns from warm 2700K dawn tones through neutral 3500K midday clarity, then back to amber evening hues. These programmable LED systems integrate with smart home platforms to automate transitions, supporting cortisol regulation and reducing the jarring contrast between artificially lit grooming sessions and natural bedroom lighting.
The biological impact is substantial. Research demonstrates that exposure to appropriate color temperatures at specific times enhances alertness during morning routines while promoting melatonin production during evening skincare rituals. By eliminating the traditional 5000K+ “daylight” bulbs that flatten complexions and create institutional atmospheres, circadian systems make makeup application more accurate while preserving the room’s sanctuary quality.
Designer’s Secret: Position your brightest task lighting at 3200K maximum, not the 5000K+ “makeup artist” bulbs commonly recommended. Professional makeup artists work under controlled studio lighting that doesn’t translate to residential environments. The 3200K range provides sufficient color accuracy for foundation matching while maintaining warm undertones that complement skin rather than competing with it. Install dimmers on every circuit so clients can manually override automated schedules when needed.
Design Breakdown:
- Primary System: Lutron Ketra S38 LED tape in concealed ceiling coves (20W per linear foot)
- Color Temperature Range: 2700K (sunrise) to 3500K (peak productivity) to 2200K (evening wind-down)
- Control Interface: Wall-mounted keypad with preset scenes plus smartphone app integration
- Backup Task Lighting: Symmetric sconces at 60 inches above finished floor, each with independent dimming
- Mirror Integration: Backlit LED perimeter at 3000K constant temperature for close-up work
Best For: High-functioning professionals and wellness-focused individuals who understand lighting’s circadian impact. Particularly effective for vanity rooms without abundant natural light where artificial sources must compensate for missing daylight cues.
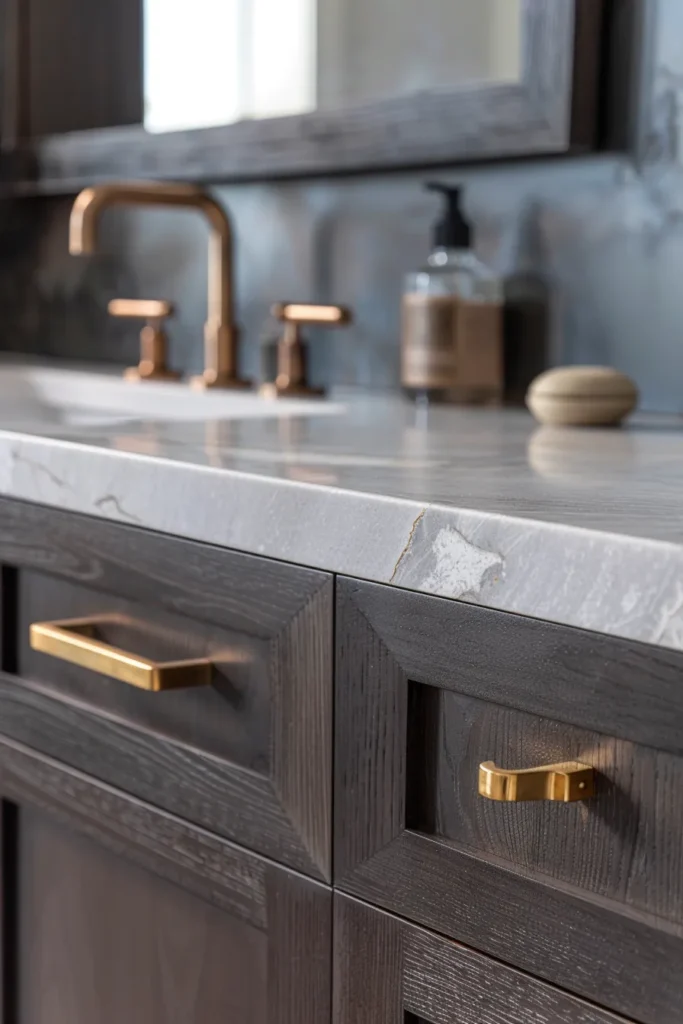
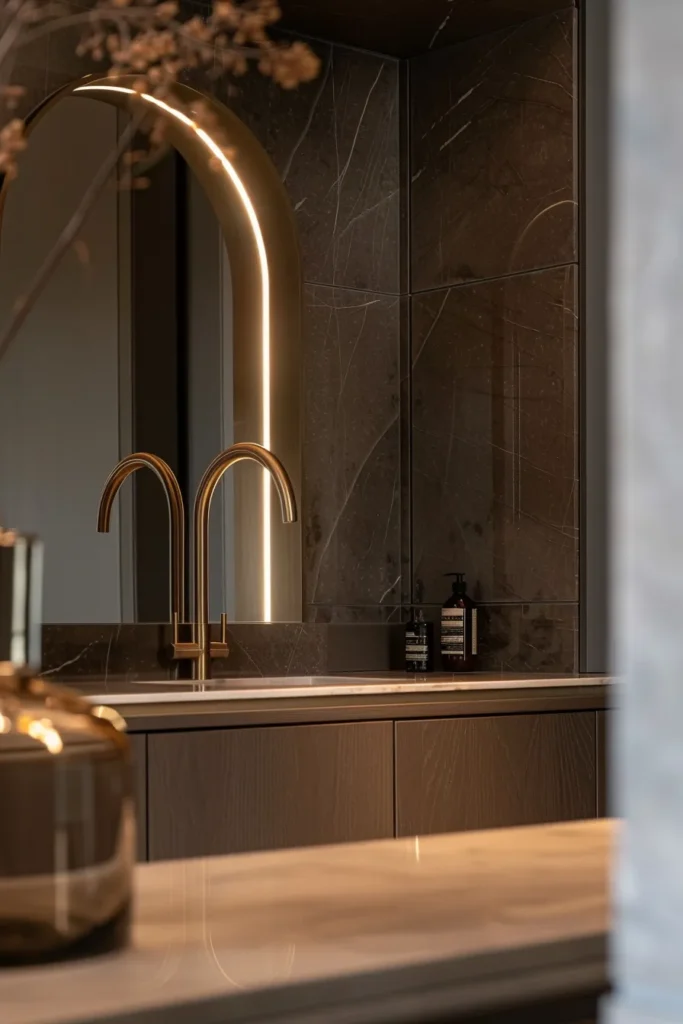
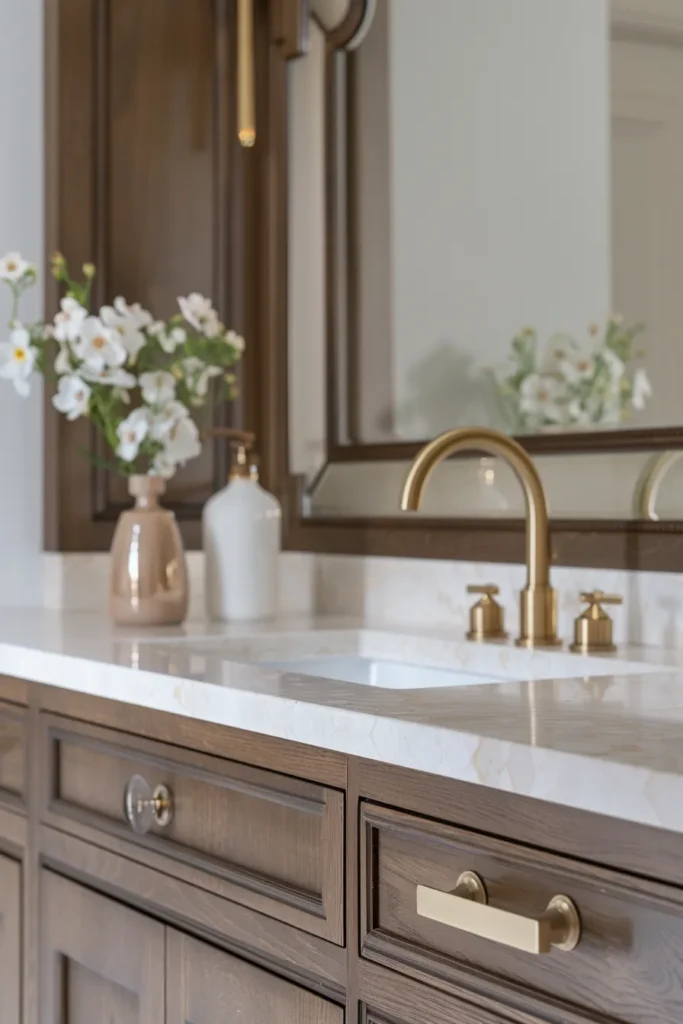
3. Aged Brass Hardware Patination
Unlacquered brass fixtures develop living patinas that darken to rich tobacco and cognac tones over 6-18 months of use, creating hardware that feels collected rather than installed. This finish contrasts sharply with the bright, sealed brass that dominated the 2010s, rejecting permanent “showroom” perfection in favor of materials that acquire character through interaction. Faucet bodies, drawer pulls, towel bars, and mirror frames specified in raw brass alloys gradually oxidize, with hand-contact areas developing darker burnished zones while recessed details retain lighter golden tones.
The appeal lies in authenticity signaling. As luxury markets increasingly value provenance and material honesty, finishes that reveal their composition and age become status markers. Unlacquered brass telegraphs confidence—an indication that the designer prioritizes long-term character development over maintenance-free convenience. The warm metallic tones also create visual continuity with natural wood grains and earth-toned stone, anchoring the vanity room’s palette in organic rather than industrial references.
Designer’s Secret: Accelerate patina development in the first 30 days by applying household white vinegar with a spray bottle, letting it sit for 20 minutes, then buffing with a soft cotton cloth. This controlled oxidation creates even aging rather than random spotting, giving new brass the appearance of 6-month natural patina immediately. Educate clients that the darkest patina appears at high-touch zones like faucet handles—this asymmetry is the desired outcome, not a defect requiring correction.
Design Breakdown:
- Faucet Specification: Waterworks Easton or Kohler Purist in unlacquered brass (no protective coating)
- Hardware Alloy: 70% copper, 30% zinc composition for optimal patina development
- Pull Style: Knurled cylindrical or leather-wrapped brass bar pulls (minimal engraving that traps tarnish)
- Maintenance Protocol: Never use metal polish; clean with pH-neutral soap and soft microfiber only
- Companion Materials: Pair with honed marble or matte painted surfaces to avoid competing sheen levels
Best For: Clients who embrace wabi-sabi principles and understand that luxury can include imperfection. Not appropriate for high-anxiety personalities who require pristine, unchanging surfaces.
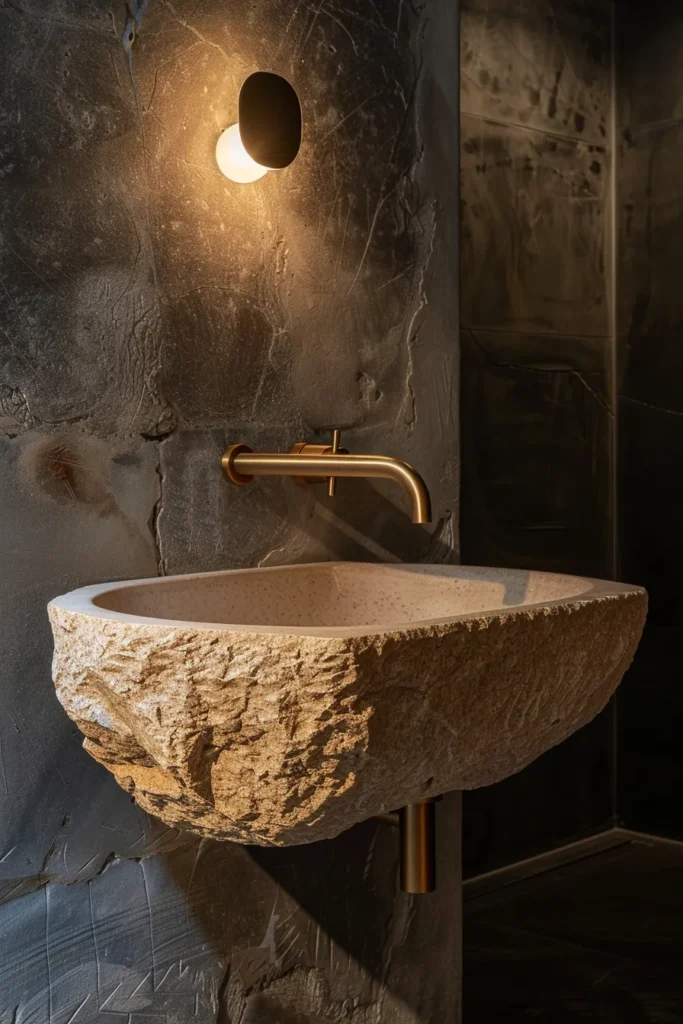
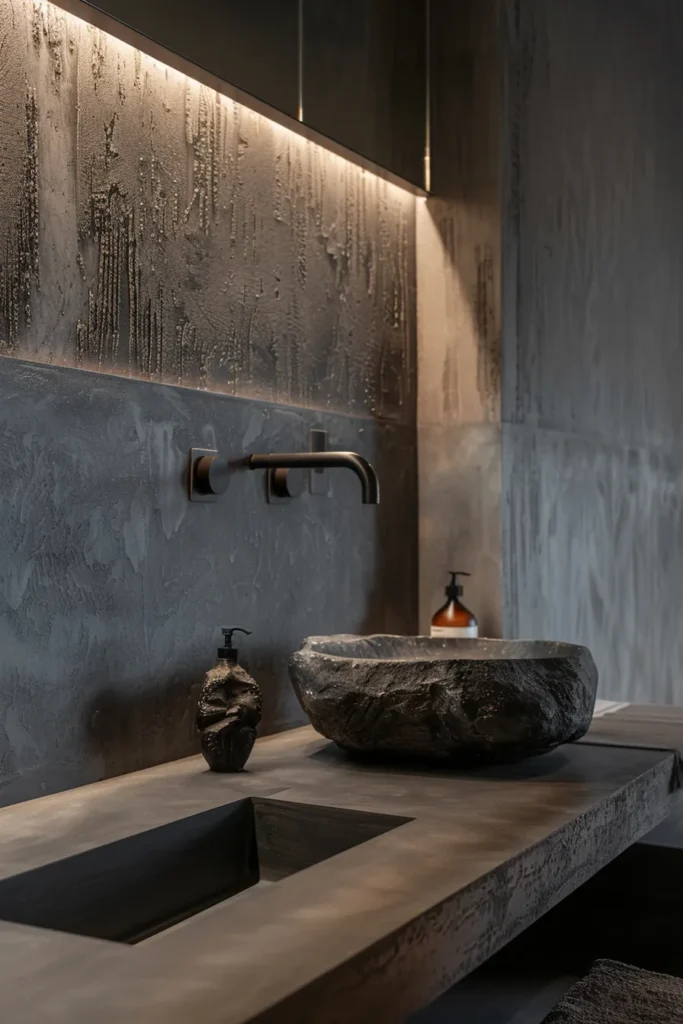
4. Sculptural Curved Basin Forms
Organic, asymmetrical basin silhouettes carved from single stone blocks or cast in textured concrete replace the geometric vessel sinks of previous eras. These sculptural forms feature irregular rim heights, rounded volumetric bowls, and hand-carved interior surfaces that prioritize tactile experience over mathematical precision. The aesthetic references ancient stone mortars and hand-formed ceramics, positioning the basin as art object rather than mere plumbing fixture. Interior depths of 6-8 inches create substantial water volume capacity while curved walls prevent splash-back during use.
The manufacturing process for high-end versions involves CNC roughing followed by hand-finishing with pneumatic carvers and diamond polishing pads, resulting in surfaces that show deliberate tool marks and natural stone movement. This labor-intensive approach yields basins with 5-8 week lead times and price points reflecting artisan involvement. Less expensive alternatives use composite materials like crushed marble bound with resin polymers, molded into organic shapes that mimic stone’s weight and texture at reduced cost.
Designer’s Secret: Specify the basin with an integrated overflow channel carved into the rear interior wall rather than using conventional round overflow openings. This technique, common in high-end European fixtures, maintains the sculptural form’s purity while providing essential drainage safety. The channel should be 10-12mm wide and positioned 20mm below the lowest rim point to prevent accidental flooding during basin filling.
Design Breakdown:
- Material Options: Absolute black granite, creamy limestone, or terrazzo composite in curved-pour molds
- Dimensions: 500-600mm diameter, 150-200mm depth for single-person vanities
- Drain Assembly: Pop-up mechanism in matching material finish or exposed brass grid
- Placement: Asymmetric positioning offset 200mm from countertop edge to create dynamic visual weight
- Faucet Pairing: Wall-mounted spout positioned 200mm above rim to showcase basin profile
Best For: Artistic personalities and clients who prioritize form-as-function philosophy. Works beautifully in powder rooms where guests can appreciate the sculptural statement without practical daily-use concerns about uniform bowl depth.
5. Integrated Stone Vanity Countertops
Continuous stone surfaces with undermount or carved integral basins eliminate the visual and hygienic break between countertop and sink, creating unified horizontal planes that appear carved from single slabs. This approach uses 3cm (1.25-inch) thick stone specified in lengths up to 3 meters for double vanity configurations, with CNC-cut basin openings finished to perfectly mate with undermount fixtures. The result is a monolithic surface where water flows from countertop directly into basin without encountering raised lips or caulk lines that trap moisture and develop mildew.
Advanced fabrication now allows true integral basins carved directly into stone slabs, though this technique requires 6cm (2.5-inch) material thickness to maintain structural integrity around the bowl walls. The investment yields a surface with zero seams or joints—countertop, backsplash, and basin become a single sculptural element. Honed or leathered finishes on natural stone prevent water spotting while maintaining the matte aesthetic central to quiet luxury principles.
Designer’s Secret: Specify the countertop with a 5mm recessed drip edge along the front profile rather than a traditional rounded or beveled edge. This subtle detail creates a shadow line that prevents water from traveling underneath the overhang and ensures drips fall directly to the floor rather than running back toward cabinetry. The recessed channel should begin 30mm from the front edge and angle inward at 15 degrees.
Design Breakdown:
- Stone Selection: Travertine, honed marble, or quartzite in 3cm minimum thickness
- Edge Profile: Straight-cut with 2mm eased top and bottom (no decorative ogees or bevels)
- Basin Integration: Undermount with epoxy adhesion plus mechanical clips every 150mm
- Surface Treatment: Apply penetrating sealer rated for 12+ month water resistance
- Overhang Depth: 25-40mm beyond cabinet face for comfortable standing position
Best For: Practical luxury seekers who want spa-quality materials without high-maintenance polished finishes. The continuous surface streamlines morning routines by eliminating crevices where cotton swabs, bobby pins, and product residue accumulate.
6. Wet Room Continuous Floor Plane
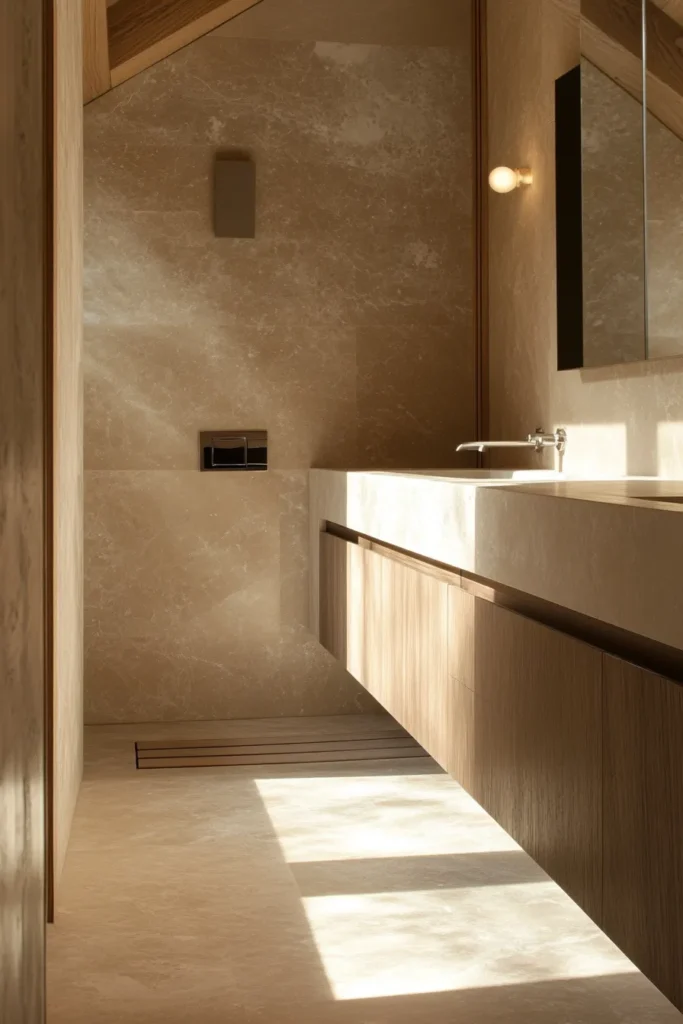
Eliminating thresholds and transitions between vanity area, shower enclosure, and dressing zone creates barrier-free wet rooms where large-format stone tiles or continuous resin floors flow seamlessly throughout the space. This European-inspired approach uses subtle floor slope engineering—typically 1:50 gradient directing water toward linear drains—to manage moisture without visible curbs or changes in elevation. The result is spatial continuity that makes even modest 80-square-foot vanity rooms feel twice their actual size while providing aging-in-place accessibility.
Installation requires precision waterproofing with sheet membranes extending 200mm up all wall surfaces, plus structural slab preparation to achieve consistent slope without creating drainage puddles in low spots. Heated floor systems embedded beneath 10mm stone tiles maintain comfortable foot contact temperature year-round, addressing the primary complaint about stone flooring in bathrooms. Strategic placement of floor drains every 3 meters ensures water management even during shower overflow scenarios.
Designer’s Secret: Use matte-finish large-format tiles (1200mm x 600mm minimum) laid in running bond pattern rather than stacked grid. The offset joint pattern camouflages the subtle floor slope that guests might otherwise perceive as installation error. Specify rectified tiles with 2mm grout joints in matching color to minimize visual interruption—the goal is to create the illusion of monolithic stone rather than assembled pieces.
Design Breakdown:
- Flooring Material: Honed limestone or porcelain in 12mm thickness for embedded heating compatibility
- Waterproofing System: Schluter KERDI membrane with bonded seam overlaps and reinforced corners
- Drain Configuration: Linear channel drain (900mm length) positioned adjacent to shower zone
- Heating Specification: 150W per square meter electric radiant system on programmable thermostat
- Threshold Elimination: Floor level matches adjacent bedroom carpet/wood (use transition strips only at non-wet boundaries)
Best For: Empty nesters planning long-term residence who want to eliminate future mobility barriers. Also ideal for clients with mobility considerations who refuse to compromise aesthetic ambition for accessibility—this approach proves both can coexist beautifully.
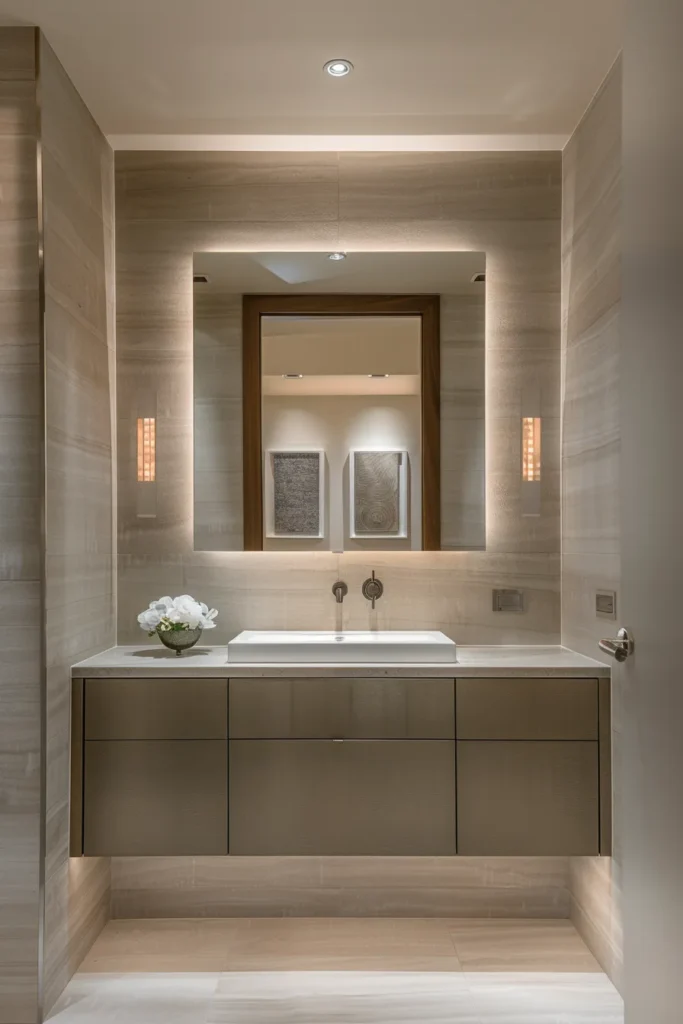
7. Warm Earth Tone Color Palettes
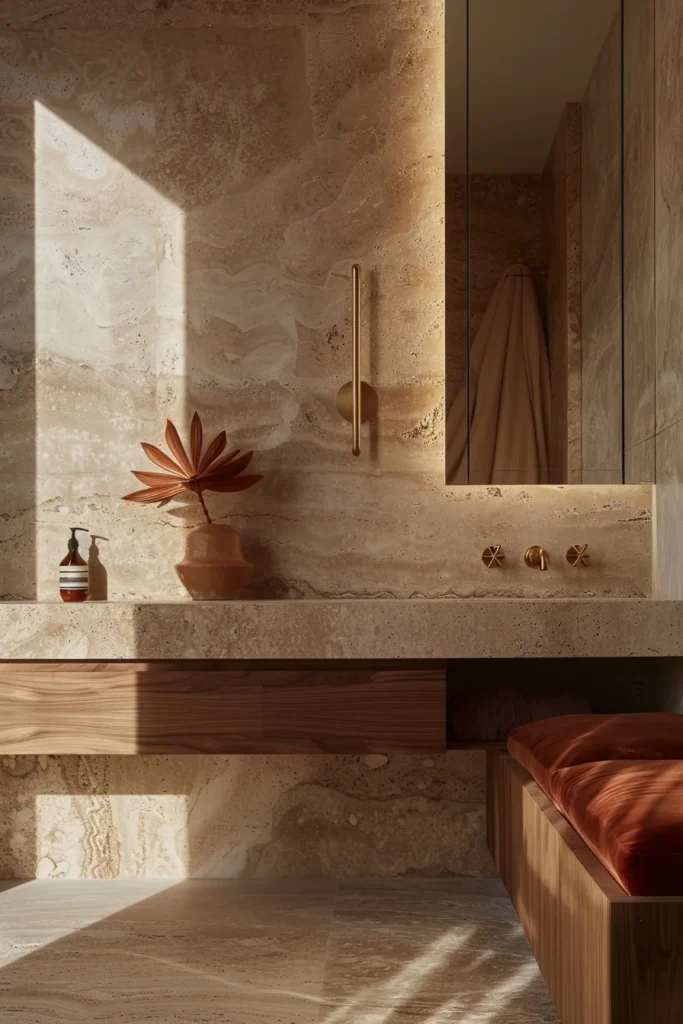
The 2026 vanity room palette abandons cool grays and stark whites for layered earth tones ranging from caramel oak and terracotta through burgundy marble and olive-gray grounding hues. This spectrum references natural clay, oxidized metals, and desert landscapes, creating cocooning environments that feel distinctly warm rather than clinical. Primary surfaces in creamy limestone or beige travertine establish neutral foundations, while accent materials in rust-toned leather, cognac brass, and chocolate walnut introduce depth without pattern complexity.
Color psychology research demonstrates that warm-toned environments reduce cortisol levels and promote parasympathetic nervous system activation—the biological “rest and digest” state. By surrounding users with hues that mimic sunset light and natural earth pigments, vanity rooms become genuine sanctuary spaces rather than brightly-lit task zones. The palette also photographs beautifully in natural and artificial light, maintaining consistent warmth across varying color temperatures where cool-toned materials often shift unflatteringly.
Designer’s Secret: Anchor your palette with a “hero” material in the 20-30% saturation range—perhaps a burgundy-veined marble or caramel onyx—then build surrounding surfaces two steps lighter in the same color family. This creates sufficient contrast for visual interest without jarring color jumps. Avoid pure white anywhere in the space; instead use warm off-whites with LRV (Light Reflectance Value) of 80-85 that read as white under 2700K lighting but retain subtle cream undertones.
Design Breakdown:
- Wall Color: Benjamin Moore “Coastal Fog” (warm gray-green) or Farrow & Ball “Setting Plaster” (pink-beige)
- Stone Selection: Travertino Romano or Spanish Crema Marfil with golden undertones
- Wood Accents: Quarter-sawn white oak with natural oil finish (no orange stains)
- Metal Finish: Aged brass, oil-rubbed bronze, or burnished copper (avoid chrome and nickel)
- Textile Accents: Rust velvet seating, oatmeal linen window treatments in 320gsm weight
Best For: Clients transitioning from minimalist white interiors who want warmth without committing to bold pattern. This palette works universally across architectural styles from traditional to contemporary.
8. Microcement Seamless Wall Application
Hand-troweled microcement creates continuous waterproof wall surfaces with subtle texture variation and zero grout lines, offering a sophisticated alternative to tile that references Venetian plaster and industrial concrete. This polymer-modified cement composite applies in 2-3mm layers directly over existing drywall or tile, building up hand-worked surfaces that show trowel marks and organic color variation. The final sealed surface resists water penetration while maintaining the matte, breathable appearance of natural plaster.
Professional application requires skilled trowel technique to achieve the desired balance between uniformity and artisan character. Inferior installations look splotchy or overly perfect, missing the “just imperfect enough” aesthetic that signals handcraft quality. Color is integrated throughout the material rather than applied as topcoat, meaning minor scratches or chips don’t reveal different underlayers. The monolithic appearance creates gallery-like backdrops for vanity fixtures and mirrors without competing for visual attention.
Designer’s Secret: Request a sample board showing three finish densities—light, medium, and heavy trowel texture—before committing to the final application technique. Most applicators default to over-smooth finishes that read as faux concrete rather than artisan plaster. The ideal texture shows directional trowel marks approximately 40% of the surface area while maintaining 60% smooth zones. This ratio provides visual interest under grazing light without creating surface irregularities that trap dust.
Design Breakdown:
- Product Specification: Microtopping or Ardex Pandomo in warm gray or putty tones
- Application Thickness: 2.5mm base coat plus 1.5mm finish layer for 4mm total build
- Texture Technique: Random multidirectional trowel strokes (avoid linear patterns)
- Sealer System: Two-part polyurethane topcoat rated for wet zone application
- Color Range: Warm concrete gray, clay beige, or custom tint matching stone selections
Best For: Design-forward clients who appreciate European material sensibility and want wet-room durability without tile’s visual busy-ness. Particularly effective in small vanity rooms where tile grout lines would create excessive pattern density.
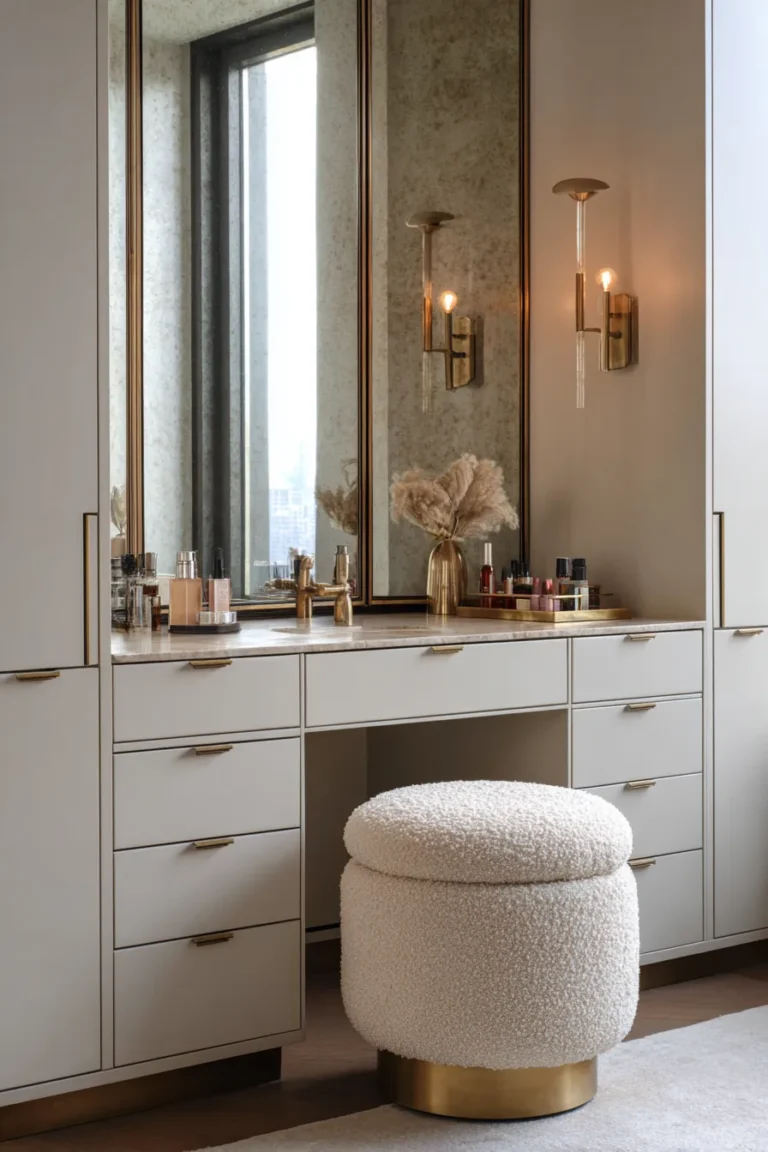
9. Statement Architectural Mirrors
Oversized mirrors with distinctive frames or silhouettes function as focal point artwork rather than mere functional reflectors. Current designs favor arched tops, asymmetric organic shapes, or bold geometric profiles in aged brass, blackened steel, or chunky natural wood frames. Proportions skew large—60 inches wide by 80+ inches tall for single vanity configurations—to maximize light reflection and create the illusion of expanded space while making an artistic statement comparable to hanging a significant painting.
Frame materials and finishes coordinate with hardware and fixture selections to create material continuity throughout the space. A 4-inch wide brass frame with visible welding marks and irregular patina pairs beautifully with unlacquered brass faucets, while a 6-inch thick reclaimed oak frame echoes floating wood shelving. The substantial frame width prevents the mirror from reading as builder-grade afterthought, instead positioning it as intentional design investment.
Designer’s Secret: Hang mirrors 6 inches lower than standard 60-inch center height recommendation if your ceiling height is 9 feet or less. This creates more usable reflective surface at standing eye level where users actually need to see themselves, rather than maximizing decorative impact. The bottom edge should sit 36-40 inches above finished floor for optimal makeup application sightlines. For double vanity configurations, use two separate mirrors rather than one continuous span to create individual zones and allow different user heights.
Design Breakdown:
- Frame Material: 2-inch thick solid brass, 4-inch wide reclaimed pine, or 3-inch powder-coated steel
- Mirror Glass: 6mm thickness with beveled edge (antiqued finish optional for aged character)
- Mounting: French cleat system rated for 150+ pounds
- Lighting Integration: LED strip concealed behind frame perimeter for halo effect (3000K)
- Proportion: Mirror surface should occupy 70% of total frame height to balance decorative/functional ratio
Best For: Clients who understand that mirrors are the vanity room’s most viewed surface and deserve material investment proportional to their visual dominance. Works beautifully as vintage or antique sourcing opportunity for those who prefer collected-over-time narratives.
10. Vintage Herringbone Tile Patterns
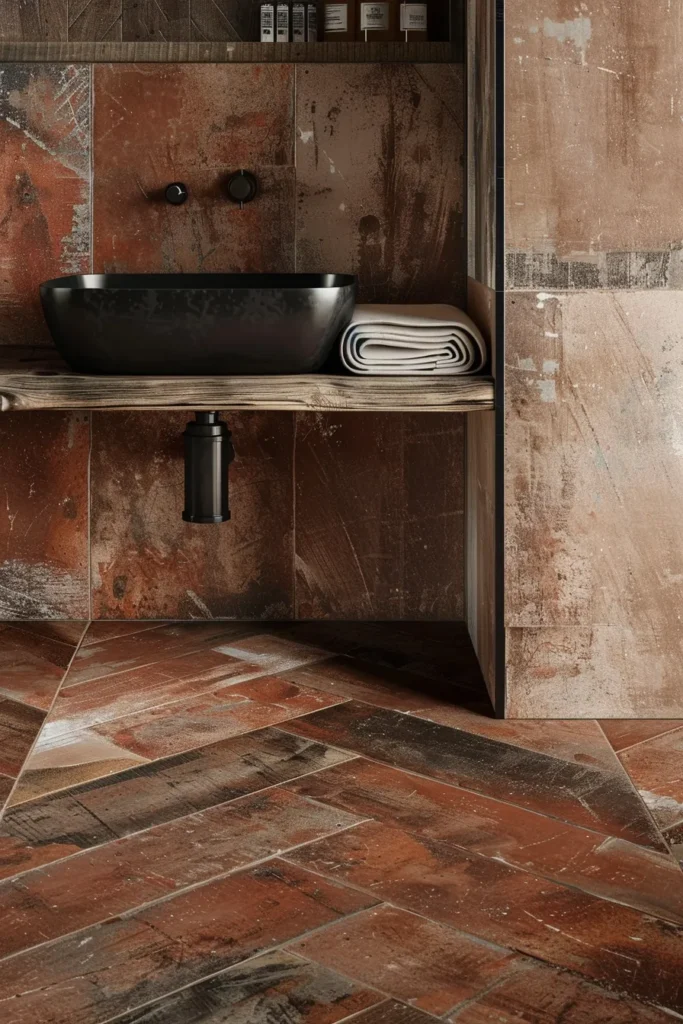
Classic herringbone-laid tile in terracotta porcelain, matte cement lookalikes, or natural clay finishes brings handcrafted warmth and visual movement to vanity room floors without contemporary geometric pattern’s busy aesthetic. The 45-degree zigzag installation uses rectangular tiles (typically 50mm x 200mm or 75mm x 300mm formats) arranged in V-shaped weaving patterns that create subtle directional flow guiding eye movement through the space. Matte or textured surface finishes prevent slipping in wet conditions while maintaining the floor’s artisan character.
Modern porcelain technology now replicates historic encaustic cement tiles and reclaimed terracotta with remarkable accuracy, offering the patina and color variation of vintage materials without the maintenance challenges of genuine antiques. These reproductions include intentional surface irregularities, edge chipping effects, and color variation across pieces that mimic decades of wear. The result reads as collected European material—perhaps salvaged from a French château or Italian villa—while providing contemporary performance standards for water resistance and durability.
Designer’s Secret: Specify “random shade variation” on your tile order to ensure the manufacturer pulls from multiple production batches rather than shipping uniform pieces from a single lot. This creates the organic color distribution essential to authentic vintage appearance. During installation, have the tile setter dry-lay each section before grouting to manually arrange pieces with noticeable color differences in an organic scatter pattern rather than clustering all dark or light tiles together.
Design Breakdown:
- Tile Selection: Matte porcelain in terracotta, ochre, or concrete gray (R10 slip rating minimum)
- Format: 60mm x 240mm planks in herringbone pattern (not straight-lay)
- Grout Specification: Warm gray or tan in 3mm joint width (avoid white or black)
- Edge Transition: Match grout color to field tile for seamless visual flow
- Area Coverage: Entire floor plane including wet zones (use same tile throughout for continuity)
Best For: Traditionalists who want pattern and texture without committing to bold color. The herringbone layout works across aesthetic styles from French country to modern industrial, making it a safe choice for clients uncertain about long-term design direction.
11. Custom Built-In Drawer Systems
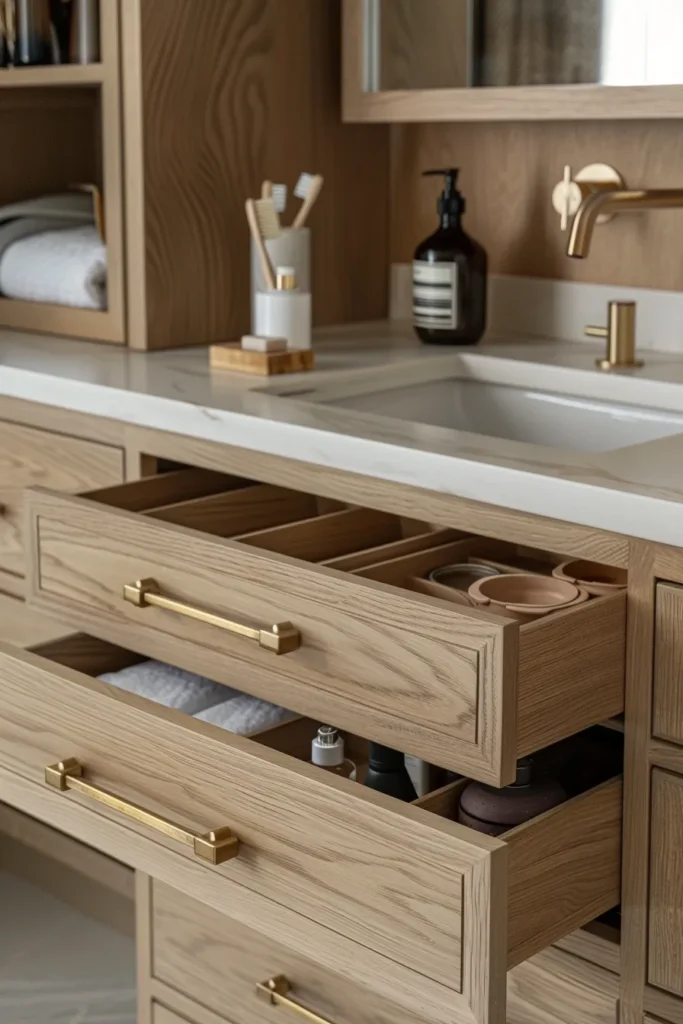
Floor-to-ceiling built-in cabinetry with deep drawer stacks eliminates the need for standalone furniture while maximizing every cubic inch of storage potential. These millwork systems typically feature 8-12 drawers in varying heights (80mm for jewelry, 120mm for cosmetics, 200mm for hair tools) with full-extension soft-close glides rated for 50+ pound loads. Interior drawer organization includes felt-lined compartments, adjustable dividers, and specialized inserts for specific items like makeup palettes, brushes, and skincare bottles.
The cabinetry face treatment ranges from handleless push-latch designs that create seamless minimal facades to exposed brass pull hardware that introduces texture and material contrast. Wood species selection should coordinate with other natural materials in the space—white oak for its neutral warm tone and subtle grain, walnut for dramatic dark contrast, or painted MDF in warm off-whites for budget-conscious projects. The key is continuity: cabinets should feel architecturally integrated rather than furniture pieces pushed against walls.
Designer’s Secret: Design drawer heights based on the products they’ll contain rather than using standard incremental sizing. Measure your client’s tallest skincare bottle (usually 240mm), hairspray can (210mm), and standing makeup mirror (180mm), then build drawer heights with 40mm clearance above those dimensions. This prevents the frustrating discovery post-installation that expensive custom drawers can’t accommodate commonly used items. Always include at least two 200mm+ deep drawers for bulky items like hair dryers and styling tools.
Design Breakdown:
- Box Construction: 19mm plywood with dovetail joinery (avoid particle board)
- Drawer Glides: Blum Tandem full-extension soft-close rated for 30kg load
- Interior Finish: Clear matte lacquer (prevents staining from product spills)
- Hardware: Recessed brass pulls or push-latch mechanisms for handleless aesthetic
- Drawer Count: Minimum 10 drawers in 2400mm height cabinet for comprehensive storage
Best For: Organizational perfectionists and beauty product enthusiasts with extensive collections requiring categorized storage. This investment makes sense for primary vanity rooms used daily, less so for powder rooms or guest suite vanities.
12. Botanical Biophilic Integration
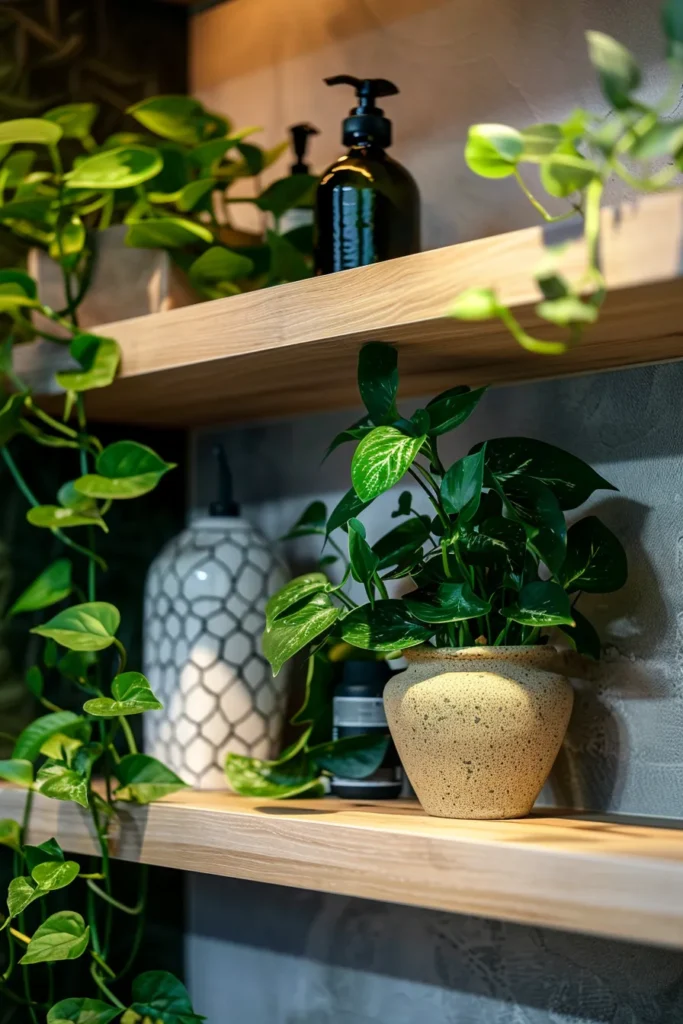
Living plants selected for low-light tolerance bring organic movement, air purification, and psychological restoration to vanity rooms. Species like pothos, snake plants, and ZZ plants thrive in bathroom humidity and indirect light conditions, requiring minimal maintenance while providing proven stress-reduction benefits. Strategic placement on floating shelves, countertop corners, and floor planters creates vertical green layers that soften hard architectural surfaces without requiring significant square footage allocation.
The biophilic design principle extends beyond decoration to genuine wellness function. Studies demonstrate that even brief exposure to living plants reduces heart rate and promotes parasympathetic nervous system activation—the biological rest state. In vanity rooms used during high-stress morning preparations, plants provide a visual counterbalance to digital devices and rushing timelines. Their irregular organic forms also create pleasing contrast against the geometric precision of tile, stone, and millwork.
Designer’s Secret: Choose ceramic or terracotta planters in warm earth tones rather than stark white or bright colors that create distracting focal points. The planters should fade into the background, allowing the foliage to dominate visually. Size planters appropriately for mature plant growth—many clients choose decorative pots too small for long-term root development, forcing replanting within six months. Allow 40% additional volume beyond current root ball size for two years of undisturbed growth.
Design Breakdown:
- Plant Selection: Epipremnum aureum (pothos), Sansevieria trifasciata (snake plant), Zamioculcas zamiifolia (ZZ plant)
- Light Requirements: Indirect or filtered light (avoid direct sun exposure)
- Watering Schedule: Weekly for pothos, bi-weekly for snake and ZZ plants
- Planter Material: Unglazed terracotta or matte ceramic with drainage holes
- Placement Strategy: Cluster three odd-numbered plants at varying heights rather than single specimens
Best For: Clients committed to minimal ongoing maintenance—these species tolerate neglect far better than fussy tropicals. Not appropriate for windowless vanity rooms with zero natural light (use preserved moss installations instead).
13. Layered Ambient & Task Lighting
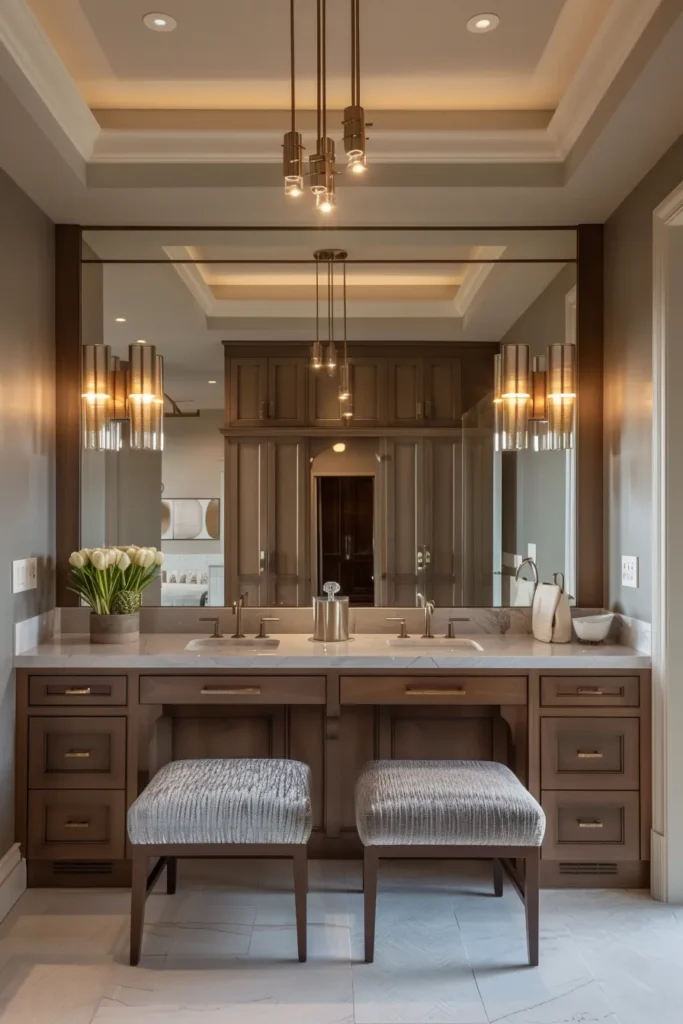
Multi-source lighting design combines recessed ambient fixtures, decorative sconces, and pendant statement pieces to create flexible illumination serving different functions and moods. Ambient lighting from recessed LEDs or architectural cove details provides general visibility, while task-specific sconces flanking mirrors deliver shadow-free light for makeup application and grooming. Decorative pendants or sculptural fixtures add visual interest and accent lighting for architectural features or artwork.
The critical principle is avoiding single-source overhead lighting that creates harsh shadows under brow bones and jawlines, distorting facial features during makeup application. Symmetric sconce placement at 60 inches above finished floor on either side of mirrors provides even cross-lighting that illuminates the face from multiple angles. All circuits should operate on independent dimmers, allowing users to dial exact light levels for different times of day and tasks—bright during morning preparations, subdued during evening wind-down routines.
Designer’s Secret: Specify all task lighting at 3000K color temperature rather than the commonly recommended 4000K+ “daylight” bulbs. While cooler temperatures technically provide better color rendering for makeup, they create institutional atmospheres that contradict the sanctuary feeling essential to luxury vanity rooms. The 3000K warmth maintains adequate color accuracy while preserving intimate ambiance. Install dimmers on every circuit—this is non-negotiable for proper lighting control.
Design Breakdown:
- Ambient Layer: Recessed 4-inch LED downlights on 1200mm centers (2700K, dimmable)
- Task Layer: Wall sconces 900mm apart flanking mirrors (3000K, 1200 lumens each)
- Accent Layer: Single pendant fixture above vanity seating or architectural feature (2700K)
- Control System: Individual dimmer switches for each lighting layer
- Emergency Backup: Battery-operated LED strip under floating vanity for nighttime navigation
Best For: Clients who use their vanity room at different times throughout the day and want lighting flexibility matching their circadian rhythms. The multi-layer approach future-proofs the space for changing needs and preferences.
14. Curved Channel-Back Seating
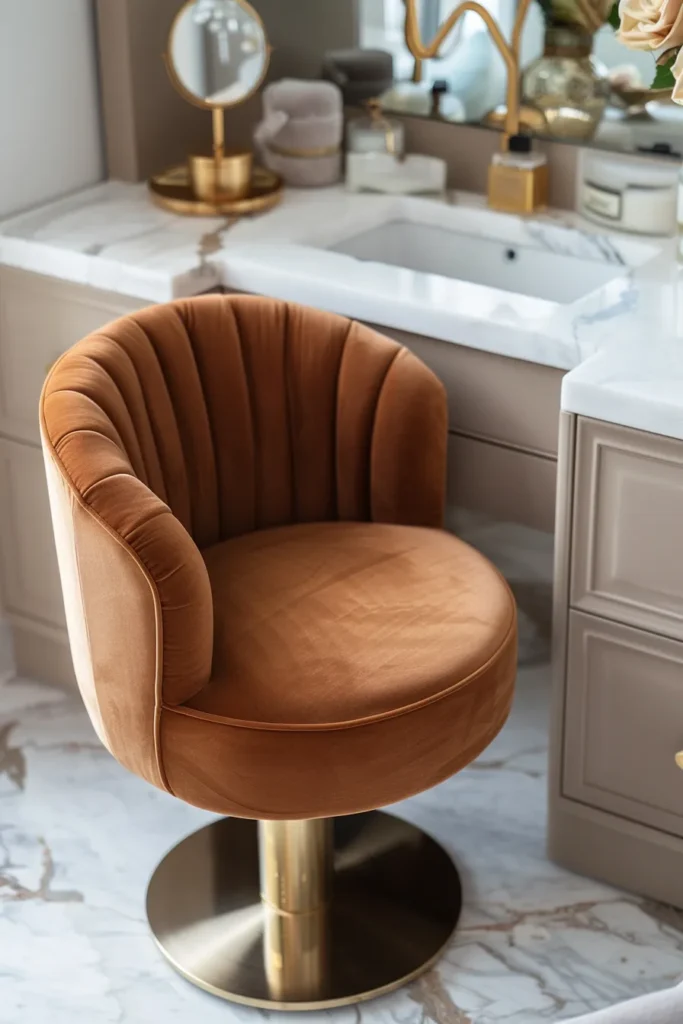
Upholstered vanity seating with curved, channeled backrests provides ergonomic support during extended grooming sessions while adding sculptural furniture presence. These pieces typically feature barrel-back silhouettes with vertical channel tufting in velvet (380gsm weight) or bouclé (360gsm) upholstery, set on brass or powder-coated steel bases. Seat height should measure 460-480mm to align with standard vanity counter heights of 860-900mm, ensuring comfortable arm positioning during makeup application.
The curved backrest shape provides lumbar support while its compact footprint fits into corner nooks or alongside double vanities where traditional benches would protrude too deeply into circulation paths. Channel tufting adds visual texture without busy pattern, complementing the quiet luxury aesthetic while hiding minor soiling better than smooth upholstery. Swivel bases enhance functionality by allowing users to rotate between mirror and storage areas without standing.
Designer’s Secret: Upholster in performance velvet rather than natural silk velvet to prevent water spotting and product staining inevitable in vanity environments. Modern performance fabrics offer identical luster and texture while providing stain resistance through nano-coating technology. Specify Crypton or Sunbrella performance velvet in warm caramel, rust, or olive tones that camouflage minor makeup smudges between professional cleanings.
Design Breakdown:
- Frame Construction: Kiln-dried hardwood with eight-way hand-tied springs
- Upholstery Fabric: Performance velvet (380gsm weight, 50,000+ double rubs)
- Seat Dimensions: 500mm width x 450mm depth x 470mm height
- Base Finish: Brushed brass or matte black powder-coated steel
- Backrest Height: 750mm total height for lumbar support without obstructing mirror view
Best For: Clients who spend significant time at their vanities for elaborate makeup or hairstyling routines. Less critical for powder rooms or vanities primarily used for quick hand-washing and tooth-brushing.
15. Art Deco Revival Accent Details
Geometric brass inlay, fluted column details, and stepped architectural profiles inject Art Deco glamour through restrained decorative moments rather than full-scale period recreation. This might manifest as brass edge banding on mirror frames, vertical fluting on cabinet door panels, or stepped hexagonal hardware knobs. The aesthetic references 1920s luxury while maintaining contemporary clean-line sensibility—enough period character to feel intentional without crossing into costume territory.
The revival trend reflects current appreciation for pre-war craftsmanship and material quality, when decorative details required skilled metalwork and joinery rather than mass production. Brass inlay strips set into wood or stone surfaces create visual interest through material contrast while their linear geometry provides organized pattern that doesn’t compete with natural stone veining or wood grain. Fluted surfaces add texture that catches light differently throughout the day as sun angles shift.
Designer’s Secret: Limit Art Deco details to three occurrences maximum within the vanity room to prevent overwhelming the space with nostalgic references. Perhaps fluted mirror frame edges, geometric brass drawer pulls, and a stepped baseboard profile—but not every surface. The goal is subtle reference that rewards close observation rather than obvious theming. Use matte or brushed brass finishes rather than polished to maintain quiet luxury restraint.
Design Breakdown:
- Brass Inlay: 3mm thick strips set flush into wood or stone surfaces (not raised overlay)
- Fluting Profile: 12mm wide x 6mm deep vertical channels at 20mm spacing
- Hardware Geometry: Hexagonal or stepped rectangular knobs in solid brass
- Proportions: Keep decorative elements at 5% or less of total surface area
- Companion Materials: Pair with honed marble and matte wood to provide finish contrast
Best For: Clients with appreciation for historical design vocabulary who want character without full period commitment. Works beautifully in homes with existing Art Deco architectural elements seeking material continuity between rooms.
Common Mistake: Over-Lighting Destroys Intimacy
The most frequent vanity room design error involves installing excessive overhead lighting with color temperatures exceeding 5000K under the misguided belief that “more light equals better grooming.” This clinical approach creates institutional environments where harsh downlighting flattens skin tones, emphasizes facial imperfections, and destroys the warm, cocooning atmosphere essential to 2026’s quiet luxury aesthetic. Professional makeup artists work under controlled studio lighting that bears no resemblance to residential contexts—attempting to recreate those conditions in your home results in spaces that feel like medical examination rooms rather than personal sanctuaries.
The corrective approach layers multiple lower-intensity sources at warm color temperatures (2700K-3200K range), providing adequate task visibility while maintaining intimate ambiance. Symmetric sconces at face height deliver shadow-free illumination for makeup application without requiring overhead fixtures that cast unflattering shadows under brow bones and jawlines. Dimmer switches on every circuit allow manual adjustment throughout the day, accommodating varying natural light levels and personal preferences.
Creating a vanity room worthy of 2026’s luxury standards requires moving beyond basic powder room thinking toward genuine architectural investment. These fifteen approaches share common principles: natural material honesty, warm color palettes, circadian lighting awareness, and sculptural forms that prioritize sensory experience alongside practical function. The result transforms daily grooming routines into restorative rituals, positioning the vanity room as sanctuary space rather than utilitarian afterthought. By selecting materials that age gracefully—unlacquered brass developing patina, natural stone acquiring subtle wear patterns, and hand-applied finishes showing their human origins—you create environments that improve with use rather than degrading toward eventual replacement. This is the essence of quiet luxury: spaces so thoughtfully conceived and expertly executed that they remain relevant and beautiful for decades rather than requiring updates to chase fleeting trends.