The 2026 closet vanity evolution prioritizes asymmetrical task lighting at 3000-3500K paired with low-reflectance matte surfaces to eliminate makeup distortion while creating a dressing ritual space that functions as both prep zone and decompression sanctuary. Gone are the days of generic vanity corners with basic mirrors and mismatched stools—today’s luxury closet design demands intentional material layering, precise light temperature calculations, and spatial flow that honors the psychology of getting ready.
This shift represents a fundamental rethinking of how we approach personal grooming spaces. Rather than treating the vanity as an afterthought squeezed into leftover closet real estate, architects now design these zones with the same rigor applied to bathroom vanity ideas and bedroom vanity setups. The result? Dressing areas that rival professional makeup studios in functionality while maintaining the warmth of residential design.
Why 2026 Closet Vanity Design Breaks From Tradition
The contemporary vanity aesthetic rejects the sterile symmetry of beauty counter installations in favor of what interior architects call “grounded asymmetry”—a deliberate imbalance that creates visual interest while preventing the eye fatigue caused by overly perfect compositions. This approach draws from spatial psychology research showing that humans relax more fully in environments with controlled irregularity.
Material authenticity drives the trend: Unlacquered brass that develops natural patina, stonewashed textiles with visible slub texture, and reclaimed woods showing authentic wear patterns replace the pristine, maintenance-intensive finishes of previous decades. Sustainability concerns fuel this shift, but so does a deeper desire for spaces that feel lived-in from day one.
Lighting science has matured: Understanding that Color Rendering Index (CRI) values above 90 are non-negotiable for accurate makeup application, designers now specify medical-grade LED systems with tunable white temperatures. The 3000-3500K range emerges as optimal—warm enough to prevent harsh shadows yet cool enough to approximate natural daylight without the blue-spectrum fatigue of 5000K+ hospital lighting.
Wellness integration transforms function: The vanity becomes a mindfulness anchor point. Morning and evening routines gain ceremonial weight when performed in thoughtfully designed environments. This explains the rise of biophilic elements, natural material palettes, and what design theorists term “temporal decompression zones”—spaces intentionally slowed down through sensory richness.
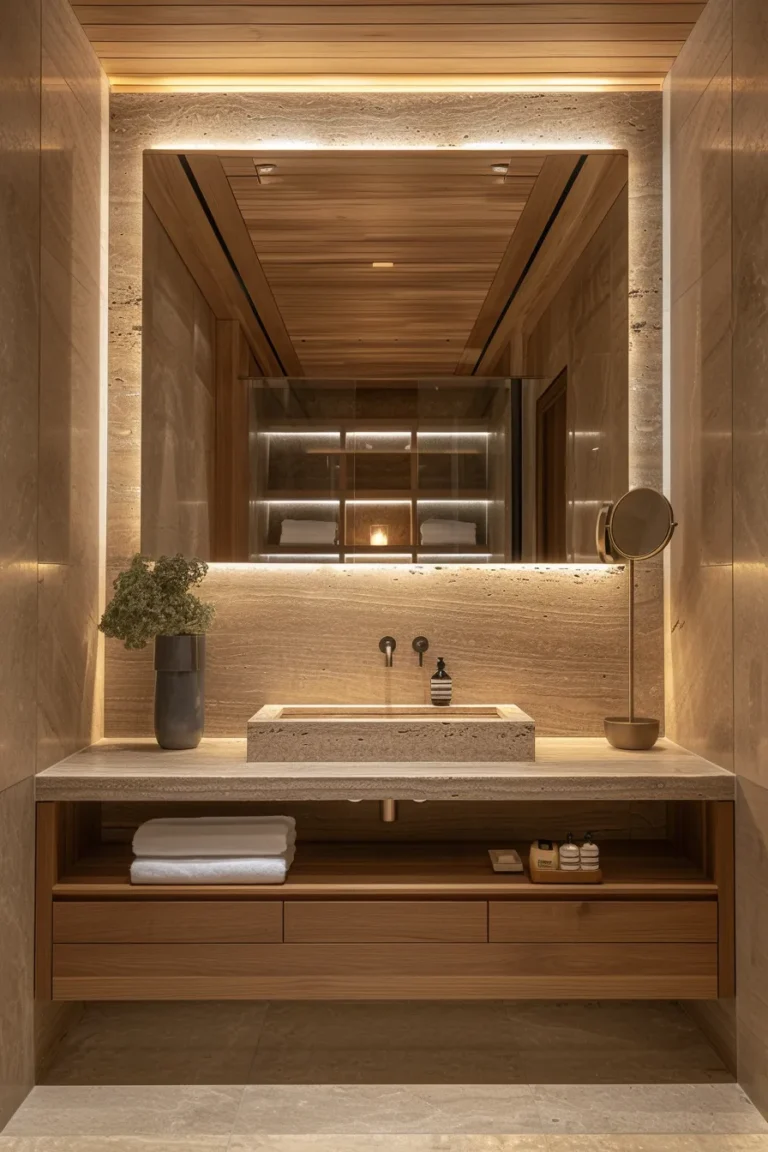
Floating Walnut Slab with Backlit Fluted Glass
The floating walnut vanity represents minimalist complexity at its finest. By cantilevering a solid 2.5″ thick live-edge slab from concealed steel brackets, you create the illusion of weightlessness while providing the structural integrity needed for daily use. The magic happens when you integrate vertical fluted glass panels behind the vanity, backlit with 3200K LED strips at 800 lumens per linear meter.
This configuration solves the perennial problem of face-forward task lighting creating unflattering shadows. The fluted glass diffuses the backlight into a soft ambient glow that wraps around the user, eliminating harsh contrast zones while the textured surface adds dimensional depth that flat mirrors cannot achieve.
Designer’s Secret: Most fabricators cut walnut slabs with the grain running horizontally, but specifying vertical grain direction creates stronger visual height and makes the space feel larger. The growth rings should run perpendicular to the wall for maximum impact.
Design Breakdown:
- Primary Surface: Book-matched American black walnut with oil-rubbed finish (avoid polyurethane—it yellows under LED)
- Backlighting: Tunable white LED strips (3000-4000K range) with CRI 95+
- Glass Specification: 12mm tempered fluted glass with 6mm flute depth for optimal light diffusion
- Hardware: Concealed soft-close drawer slides rated for 100lb capacity
- Seating: Pair with a low-profile upholstered vanity stool in complementary leather or bouclé
Best For: Minimalist modernists and professionals who prioritize clean aesthetics but need serious functional storage. The floating design maintains visual lightness even in compact closets.
Spatial Flow Consideration: Allow 42″ clearance in front of the vanity for comfortable seated posture without knee-to-wall contact. The floating design permits toe-kick space that makes the vanity feel less intrusive.
Zellige Tile Backsplash with Unlacquered Brass Sconces

Moroccan zellige tile brings controlled imperfection into contemporary closet design. Each handmade tile varies slightly in dimension and glaze thickness, creating a surface that catches light differently throughout the day. When paired with unlacquered brass wall sconces positioned asymmetrically at 60″ and 66″ heights, the effect mimics natural outdoor light patterns that our circadian systems recognize as calming.
The unlacquered brass ages beautifully, developing a living patina that darkens in high-touch areas while remaining bright where untouched. This evolutionary quality makes the vanity feel like an heirloom piece rather than a static installation. Similar principles apply whether you’re designing a vanity room or integrating vanity elements into modern luxury bedroom schemes.
Designer’s Secret: Standard zellige comes in 2×2″ or 4×4″ formats, but custom 3×6″ subway-proportioned tiles create a more contemporary read while maintaining the handcrafted irregularity. Request tiles with 15-20% color variation for authentic depth.
Design Breakdown:
- Tile Selection: Glazed zellige in celadon green or dusty terracotta with medium variation grade
- Grout: White or cream grout with 1/8″ joints to emphasize individual tile character
- Sconce Specification: Articulating arm sconces with Edison-style LED bulbs at 400 lumens, 3200K
- Mirror Integration: Frameless 3/8″ mirror with polished edges, mounted on French cleats for easy leveling
- Accent Lighting: Install adjustable LED strips above mirror to supplement sconce output
Best For: Bohemian maximalists and color enthusiasts who want personality without chaos. The organic tile variation provides visual richness that solid color surfaces lack.
Light Temperature Strategy: The 3200K sconce bulbs enhance the warm undertones in terracotta zellige while preventing celadon greens from reading too cold. Avoid 2700K—it makes makeup colors appear overly warm and inaccurate.
Curved Plaster Vanity with Integrated Seating Niche
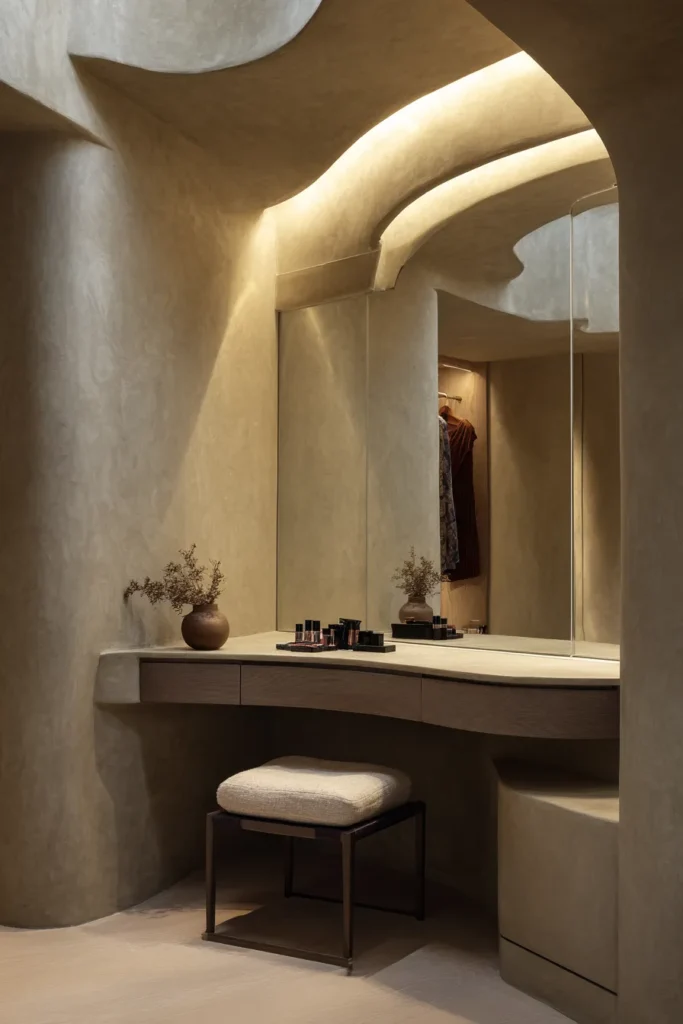
Venetian plaster applied over curved formwork creates a monolithic vanity that feels sculptural rather than furniture-like. The technique involves building a radius substrate—typically 18-24″ curve radius—then applying multiple tadelakt or marmorino plaster coats that are burnished to a subtle sheen. The integrated seating niche eliminates the need for a separate stool, with cushioning built directly into the plaster mass.
This approach works exceptionally well in small closets where every square inch matters. By curving the vanity profile, you soften the visual impact while actually gaining functional surface area compared to a straight-edge design of similar depth.
Designer’s Secret: Most plasterers apply tadelakt in light neutral tones, but specifying a medium-depth color (think warm taupe or dusty sage) at 40-50% LRV (Light Reflectance Value) provides enough contrast to define the form without creating a dark cave. Lighter surfaces disappear visually; too-dark surfaces absorb your task lighting.
Design Breakdown:
- Plaster System: Tadelakt lime plaster in custom-tinted warm gray (3-4 coat application)
- Substrate: Marine-grade plywood curved formwork with waterproof membrane
- Integrated Cushion: High-density foam core with washable linen or velvet cover
- Lighting: Recessed linear LED slot at 3500K positioned above mirror, supplemented by portable task lighting
- Surface Protection: Beeswax seal (reapply every 6-8 months for water resistance)
Best For: Organic modernists and spa-aesthetic seekers who value tactile experiences. The plaster warmth under your hands creates a sensory richness that cold stone or laminate cannot match.
Common Mistake Warning: Avoid installing plaster vanities in closets without proper HVAC—humidity fluctuations cause cracking. Maintain 40-55% relative humidity year-round.
Japandi Minimalist Console with Washi Paper Diffusers

The Japandi aesthetic—a fusion of Japanese minimalism and Scandinavian functionality—manifests perfectly in closet vanities through clean-lined wood consoles paired with shoji-inspired lighting systems. White oak or ash wood shows pronounced grain that provides visual interest without pattern chaos, while washi paper screens diffuse LED panels into the soft, directionless illumination prized in Japanese design.
This configuration eliminates the harsh shadows created by point-source sconces. Imagine standing before a light source that seems to emanate from everywhere and nowhere simultaneously—that’s the washi paper effect. Your face receives even illumination from all angles, exactly what professional makeup artists achieve with ring lights but in a form that reads as architecture rather than equipment.
Designer’s Secret: Western interpretations of shoji often use rice paper or synthetic alternatives, but authentic washi paper (made from kozo, mitsumata, or gampi fibers) has a luminous quality no substitute can match. Source it from Japanese specialty suppliers and frame it between acrylic panels for durability.
Design Breakdown:
- Console Base: Solid white oak with grain running lengthwise, finished with zero-VOC hardwax oil
- Screen Frame: Blackened steel or ebonized oak in traditional kumiko lattice pattern
- Lighting: Edge-lit LED panels (4000K, CRI 92) positioned behind washi paper at 15mm spacing
- Storage: Tansu-style sliding drawers with traditional iron pulls or minimalist finger-pull recesses
- Coordination: Pair with minimalist bedroom elements for cohesive design flow
Best For: Zen-seekers and those sensitive to visual clutter who need a meditation-like space for morning routines. The aesthetic restraint calms rather than stimulates.
Material Pairing Logic: Oak’s open grain contrasts beautifully with washi’s smooth luminosity—the interplay between rough and refined creates subtle tension that prevents minimalism from feeling sterile.
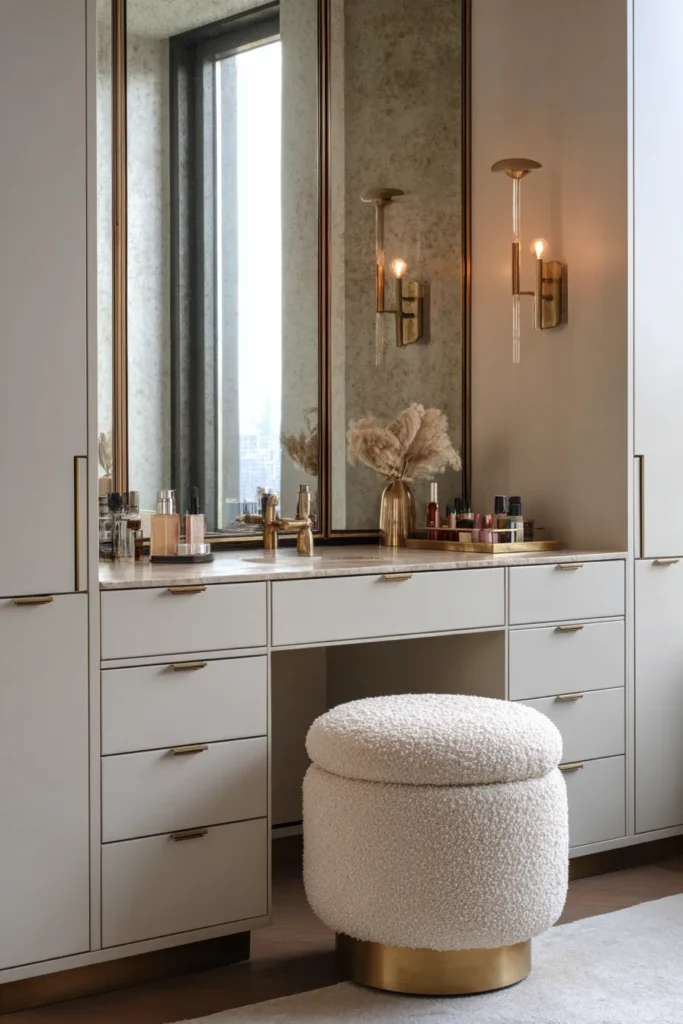
Art Deco Revival with Fluted Marble and Antiqued Mirrors
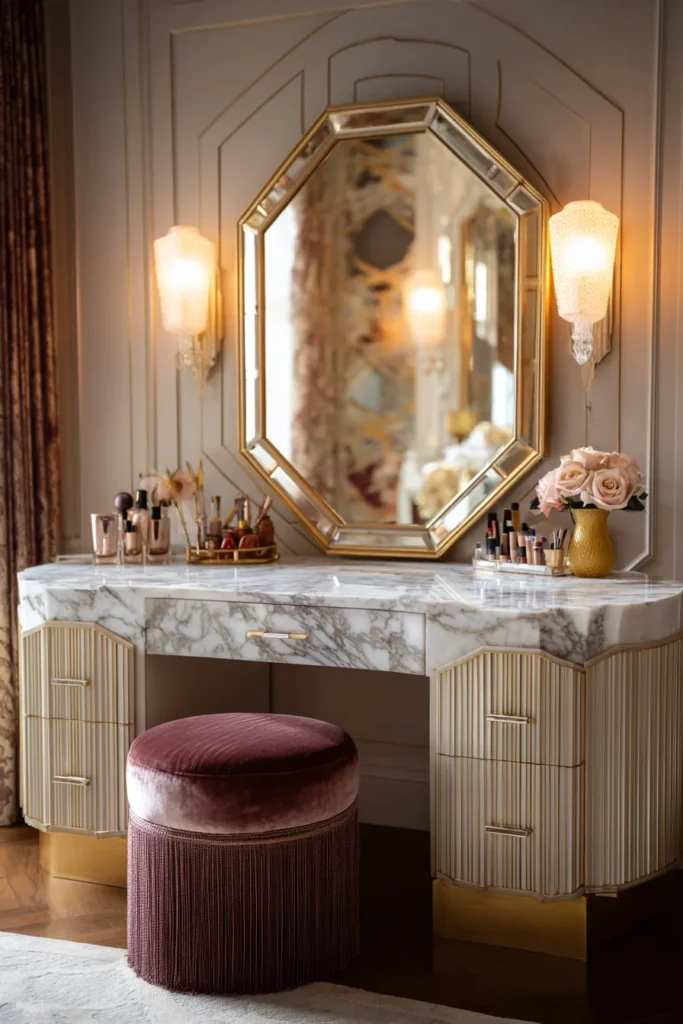
Art Deco’s geometric precision and material opulence translate brilliantly to closet vanities. Picture a Calacatta marble countertop with vertical fluting carved into the front apron, paired with a sunburst-motif antiqued mirror and champagne bronze hardware. The style’s characteristic symmetry works here because the design movement specifically emphasized glamour and theater—exactly the energy you want in a space dedicated to transformation.
The fluted marble technique (achieved through waterjet cutting or CNC routing) adds dimensional depth that flat polished slabs lack. Light travels along the grooves, creating subtle shadow lines that shift with changing light angles throughout the day.
Designer’s Secret: True Calacatta marble costs $200-400 per square foot and stains easily. Specify high-pressure compact laminate with photorealistic Calacatta printing instead—at $45-80 per square foot, you get the visual drama with zero maintenance anxiety. High-quality laminates like Wilsonart or Formica now achieve such convincing realism that only professional fabricators can distinguish them from stone.
Design Breakdown:
- Surface Material: Book-matched Calacatta laminate with matte finish (60% gloss maximum to prevent glare)
- Edge Detail: Waterfall edge with vertical fluting at 1″ spacing, 1/2″ depth
- Mirror Style: Octagonal or sunburst antiqued mirror with hand-applied patina (avoid factory “antique” mirrors—they look flat)
- Hardware: Champagne bronze or polished nickel drawer pulls with geometric Art Deco profiles
- Lighting: Pair with period-appropriate sconce fixtures featuring milk glass shades
Best For: Maximalist glamour enthusiasts and vintage lovers who want drama without darkness. The style reads as luxurious without requiring intimidating maintenance.
Spatial Flow Consideration: Art Deco’s strong geometry can overwhelm small spaces. Reserve this treatment for closets with at least 80 square feet to prevent visual compression.
Industrial Blackened Steel Frame with Reclaimed Wood
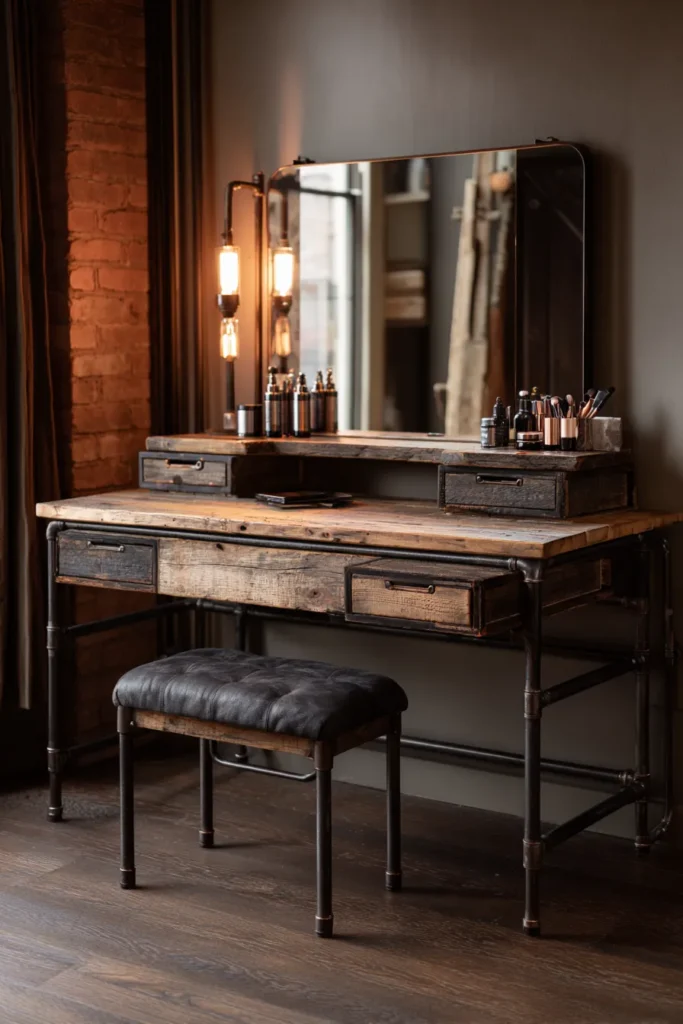
The industrial aesthetic brings raw authenticity through exposed materials and honest construction. A blackened steel frame vanity uses 1.5″ square tube steel welded into a geometric base, topped with reclaimed factory beams or barn wood planks that show authentic weathering, nail holes, and surface checking. The contrast between refined metal geometry and organic wood imperfection creates visual tension that keeps the eye engaged.
Blackened steel (achieved through high-heat oxidation or chemical patination) develops a living surface that darkens with handling and develops subtle bronze undertones where oils from hands contact the metal. This evolutionary quality makes each vanity unique over time. The technique mirrors strategies used in living room designs where industrial elements add character to compact areas.
Designer’s Secret: Reclaimed wood often harbors insects, mold spores, or chemical residues from its previous life. Insist on kiln-dried, decontaminated reclaimed lumber certified by suppliers like Pioneer Millworks or Trestlewood. The premium ($18-35 per board foot) buys peace of mind.
Design Breakdown:
- Frame System: 1.5″ x 1.5″ steel tube in blackened finish with clear wax topcoat (prevents rust transfer to clothing)
- Wood Selection: Reclaimed Douglas fir, oak, or pine beams with surface planing to reveal grain while retaining saw marks
- Finish: Zero-VOC penetrating oil to enhance grain without creating a plastic surface film
- Drawer System: Industrial-style drawer slides with exposed rivets and visible mounting hardware
- Seating: Pair with vintage factory stool or modern industrial vanity seat
Best For: Urban loft dwellers and those who appreciate visible history in materials. The aesthetic works equally well in renovated industrial buildings and suburban homes seeking edge.
Common Mistake Warning: Unsealed blackened steel transfers oxide residue to hands and clothing. Always specify a protective wax or lacquer topcoat despite the “raw” aesthetic preference.
Monolithic Concrete Vanity with Linear LED Channels
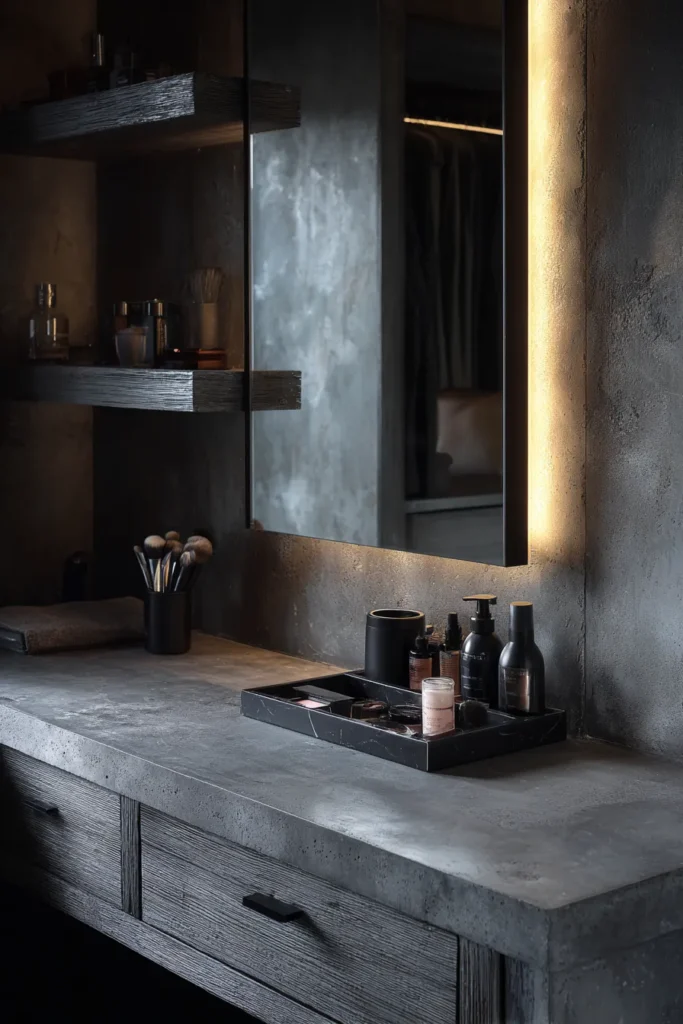
Architectural concrete moves beyond its utilitarian associations when cast into custom vanity forms with integral LED channels. The process involves building precise formwork, pouring self-consolidating concrete with integral color pigments, then routing narrow channels during the semi-cured stage to accept flexible LED strips. The result reads as a single sculptural mass that glows from within.
Board-formed concrete (where wood grain texture from formwork transfers to the concrete surface) adds organic irregularity that prevents the industrial material from feeling cold. Polished concrete provides a sophisticated alternative, with aggregate exposure levels customizable from minimal (cream finish) to heavy (terrazzo-like).
Designer’s Secret: Standard concrete weighs 150 pounds per cubic foot—prohibitive for second-floor installations. Specify GFRC (Glass Fiber Reinforced Concrete) at 20-30 pounds per cubic foot instead. It achieves the same visual impact at one-fifth the weight, opening up installation possibilities in wardrobe design bedroom configurations where structural loading is a concern.
Design Breakdown:
- Concrete Mix: GFRC with integral charcoal or warm gray pigment, board-formed texture
- LED Integration: Recessed linear channels at 3/4″ width housing 3500K LED strip lighting at 600 lumens/meter
- Sealer: Penetrating silicate sealer plus topical wax (reapply every 3-4 months)
- Hardware: Minimalist pulls in blackened steel or stainless steel to complement industrial aesthetic
- Storage: Integrate modular drawer organizers to maximize concrete mass efficiency
Best For: Modern minimalists and architecture enthusiasts who appreciate material honesty. The monolithic quality creates a powerful visual anchor in any closet.
Light Temperature Strategy: The 3500K LED temperature prevents concrete’s gray tones from reading overly cool while providing adequate color accuracy for makeup application. Avoid warmer temperatures that create excessive yellow cast.
Bouclé-Upholstered Stool with Layered Mirror Walls
Sometimes the vanity’s power comes not from the surface itself but from the seating experience and reflective environment. A statement bouclé-upholstered stool in 100% wool becomes the focal point when positioned before a triptych of mirrors with varying patinas—one antiqued, one clear, one smoked bronze. The layered reflection creates depth illusion while providing multiple viewing angles simultaneously.
Bouclé’s nubby texture (created by looping yarn at irregular intervals) provides tactile richness that engages your sense of touch during seated grooming. The 100% wool specification matters—synthetic bouclés pill within months, while natural wool maintains its character for decades.
Designer’s Secret: Triptych mirrors work only when the center panel is larger and lighter than the flanking panels. Use a 36″ x 48″ central clear mirror flanked by 18″ x 48″ antiqued mirrors. This weight differential prevents the composition from reading as monotonous repetition.
Design Breakdown:
- Stool Upholstery: 100% wool bouclé in natural oatmeal or cream (avoid dyed fibers that show wear patterns)
- Frame Construction: Swivel base in brushed brass or blackened steel for easy rotation
- Mirror Configuration: Three-panel system with varying patinas mounted on continuous cleat system
- Task Lighting: Articulating wall-mounted sconces at 62″ height (eye level when seated)
- Accessories: Incorporate vanity organization systems on adjacent surfaces
Best For: Tactile design lovers and those who prioritize comfort during lengthy grooming sessions. The seating becomes an invitation to slow down and be present.
Material Pairing Logic: Bouclé’s organic irregularity balances mirror’s cold perfection—the interplay between soft/hard creates sensory complexity that keeps spaces interesting.
Scandinavian Birch Ply with Pendant Task Lighting
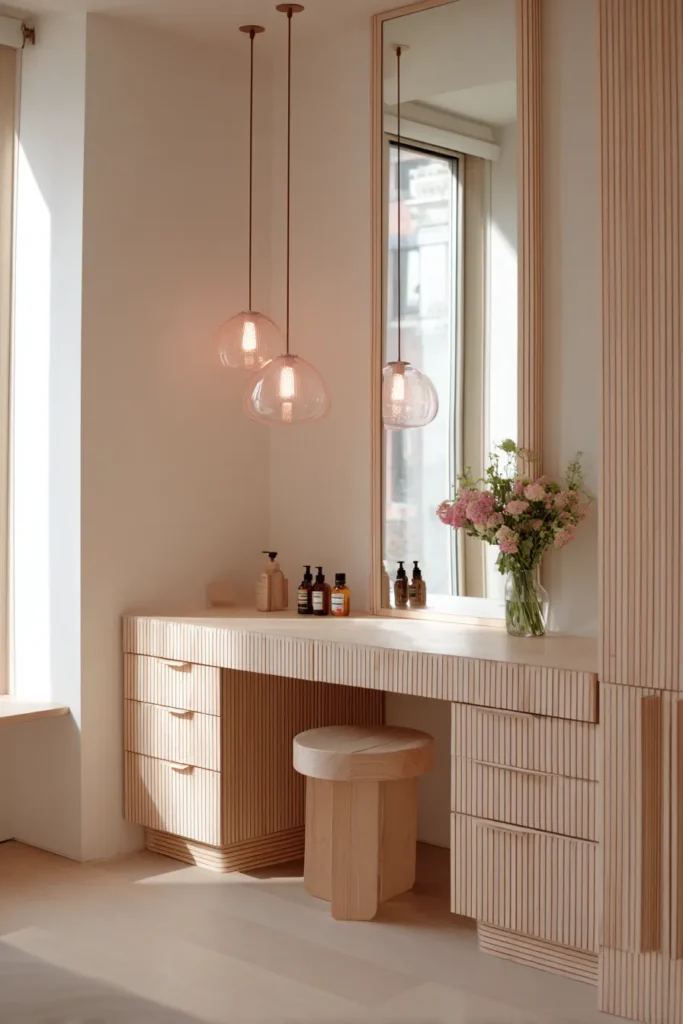
Baltic birch plywood exposed edges create a signature Scandinavian aesthetic through honest material expression. Rather than hiding plywood’s laminated construction, this approach celebrates it—the visible edge-banding shows the material’s engineered layers as decorative striation. Pair this with oversized pendant lighting suspended at precise heights for asymmetrical task illumination.
The birch’s natural pale color (40-50 on the Munsell value scale) reflects light efficiently while introducing subtle warmth through barely-perceptible pink undertones. Left natural or finished with white oil, the wood grain remains visible but refined. This design philosophy extends to other areas like kitchen cabinet color ideas where material honesty drives aesthetic decisions.
Designer’s Secret: Standard 3/4″ birch ply shows only 9-11 lamination layers. Specify 13-ply Baltic birch for the dramatic edge striping that defines the Scandinavian look. The tighter lamination also increases dimensional stability by 30-40% compared to standard grades.
Design Breakdown:
- Plywood Grade: 13-ply Baltic birch in B/BB grade (one perfect face, one with minor color variation)
- Edge Treatment: Exposed ply edges with light sanding and clear hardwax oil finish
- Pendant Height: Primary pendant at 42″ above vanity surface, secondary at 54″ for layered lighting
- Shade Material: Mouth-blown glass or spun aluminum in matte white for optimal diffusion
- Organization: Install drawer dividers to maximize birch ply cabinetry
Best For: Budget-conscious modernists and DIY enthusiasts (birch ply costs $85-120 per 5×5 sheet versus $400+ for solid wood). The material’s engineered consistency ensures reliable results.
Common Mistake Warning: Unsealed birch ply absorbs water and cosmetic stains. Always apply penetrating oil or water-based polyurethane (3 coats minimum) for protection.
Maximalist Jewel-Toned Lacquer with Brass Inlay
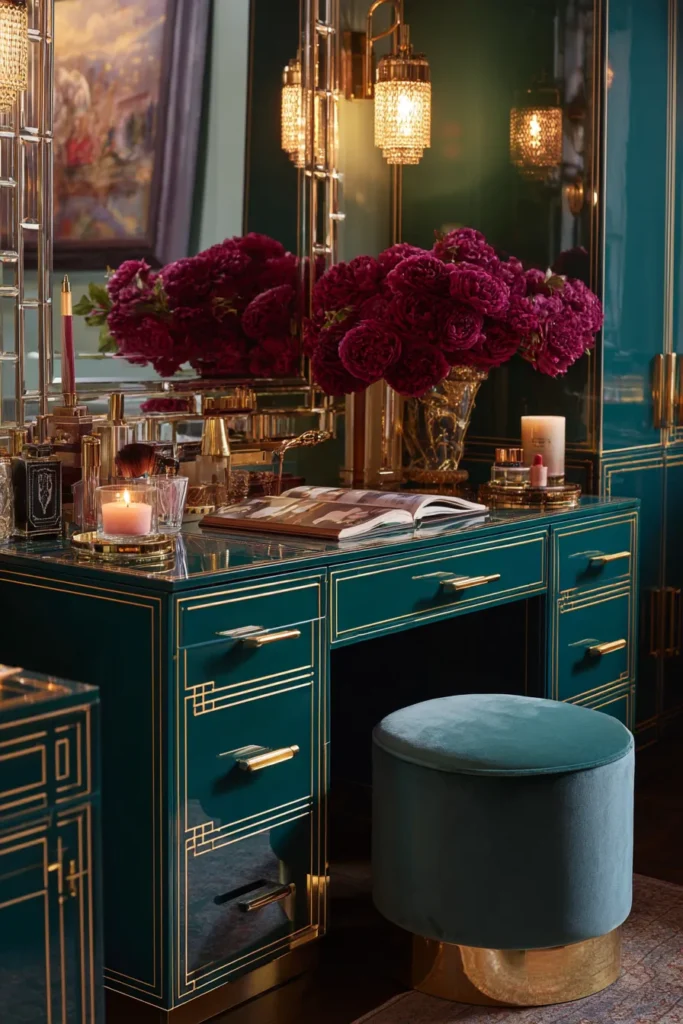
High-gloss lacquer in deep emerald, midnight sapphire, or oxblood creates jewel-box drama that transforms the vanity into the closet’s visual anchor. Modern automotive-grade lacquer systems (applied via HVLP spray in 8-12 coats) achieve mirror-like depth impossible with brush-applied paints. Inlaid brass detailing—thin strips following drawer fronts or geometric patterns inspired by Art Deco motifs—adds metallic flash that catches light dynamically.
The high reflectivity serves a practical purpose beyond aesthetics: glossy surfaces maximize light distribution in small spaces, effectively doubling your illumination through reflection. This becomes critical in closets without windows where every lumen counts.
Designer’s Secret: Deep colored lacquers show every surface imperfection. The substrate must be MDF (Medium Density Fiberboard) rather than plywood—MDF’s homogeneous composition prevents grain telegraph-through that ruins glass-smooth lacquer finishes. Expect 3-5 days of spray application plus 7-10 days cure time before installation.
Design Breakdown:
- Base Material: 3/4″ MDF with 5-coat primer system (sanded between coats)
- Lacquer System: Automotive-grade colored lacquer in custom-mixed jewel tones (10-12 finish coats)
- Brass Inlay: 1/8″ x 1/16″ brass strips routed into surface at 1/16″ depth, filled with clear epoxy
- Hardware: Coordinating brass drawer pulls in geometric profiles
- Protection: Install mirror with anti-glare coating to prevent lacquer reflections from creating visual confusion
Best For: Maximalist color enthusiasts and those treating the closet as a personal gallery space. The intensity demands commitment but delivers unmatched visual impact.
Light Temperature Strategy: Deep saturated colors shift dramatically under different light temperatures. Specify 3200K LEDs—warm enough to prevent color from reading cold, cool enough to maintain color accuracy for makeup application.
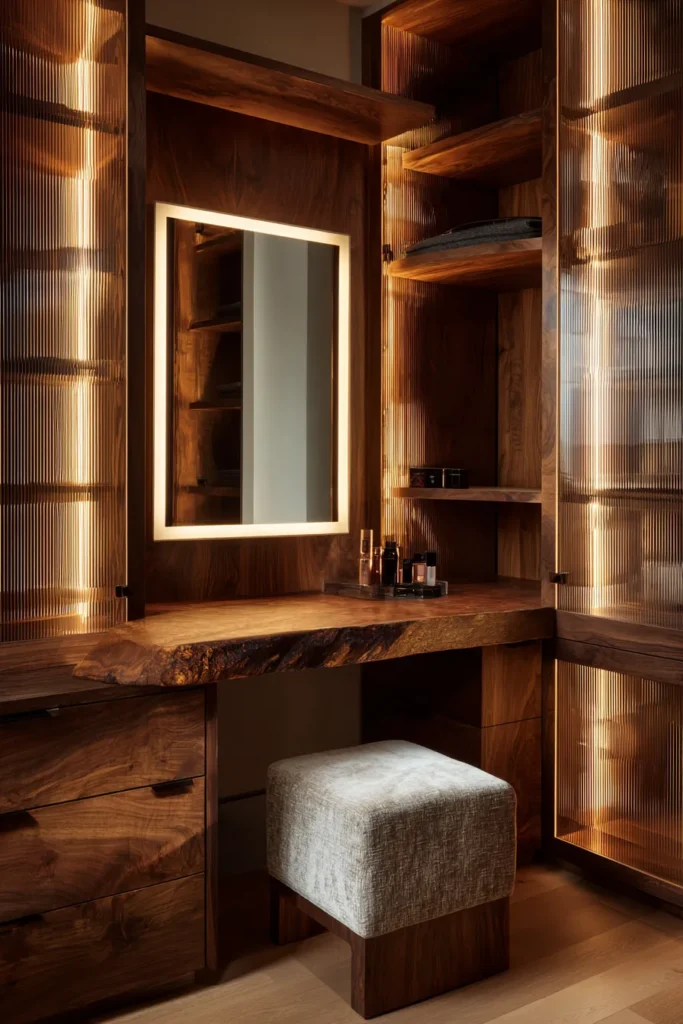
Organic Edge Live Wood Slab with Stone Vessel Sink

Live edge slabs—wood planks with natural bark edge retained—bring biophilic authenticity when paired with honed stone vessel sinks. Claro walnut or spalted maple slabs show dramatic figure and natural edge character that makes each vanity literally one-of-a-kind. The vessel sink (undermounted stone bowl) elevates above the wood surface, creating a sculptural focal point while solving the practical challenge of integrating plumbing into live edge wood.
The approach requires careful moisture management since bathrooms and closets experience humidity fluctuations that cause wood movement. Proper sealing with penetrating wood oils that allow vapor permeability while repelling liquid water becomes essential.
Designer’s Secret: Live edge slabs cost $800-2000+ depending on species and figure. Achieve 80% of the visual impact at 20% of the cost by purchasing standard lumber and routing one edge with an organic wave pattern using a flush-trim bit. Apply dark stain to the routed edge to mimic bark texture.
Design Breakdown:
- Wood Species: Claro walnut (dramatic figure, 30-40% darker than black walnut) or spalted maple (white base with dark fungal striping)
- Slab Thickness: 2.5″-3″ to accommodate vessel sink weight and provide visual mass
- Vessel Sink: Honed travertine or river rock in natural gray/cream tones
- Finish: Waterlox or Rubio Monocoat—both allow vapor transmission while providing water resistance
- Support: Steel bracket system concealed within slab depth
- Maintenance: Reapply finishing oil every 6-8 months
Best For: Nature-lovers and those prioritizing unique, irreplaceable pieces over mass-produced perfection. Each slab’s unrepeatable grain pattern ensures your vanity exists nowhere else on earth.
Spatial Flow Consideration: Live edge slabs require 48″ minimum clearance to prevent the organic form from feeling cramped. In tighter spaces, use conventional straight edges with live edge reserved for decorative floating shelves.
Gallery Wall Vanity with Rotating Art Display
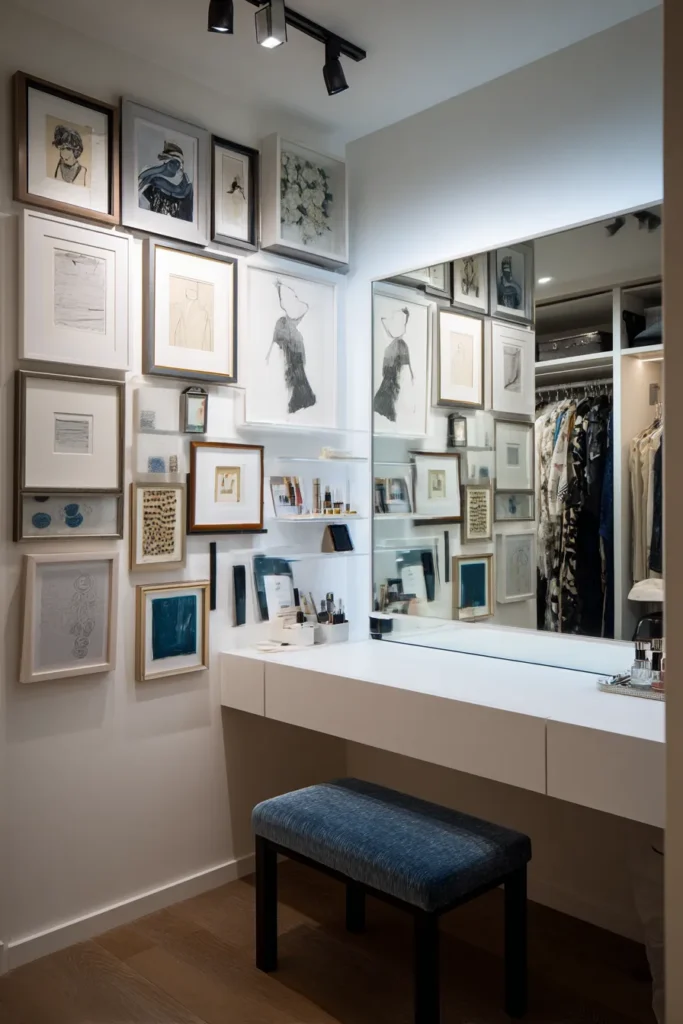
The gallery wall vanity treats your grooming space as a curated exhibition by integrating a rotating art rail system behind the vanity mirror. Picture a 6-8″ deep frame system allowing you to slide artwork in and out seasonally, creating a personal museum that evolves with your taste. The vanity surface itself becomes secondary to the wall composition—a minimal floating shelf supporting essential task lighting and organization trays.
This approach works brilliantly for art collectors or photography enthusiasts who want their collections actively integrated into daily life rather than relegated to formal living spaces. The morning routine becomes a mini-gallery experience. Similar curation principles apply when selecting wall art for bedrooms or creating cohesive wall art living room displays.
Designer’s Secret: Standard picture rails mount 12-18″ below the ceiling—too high for vanity-height viewing. Install a custom rail at 54-60″ height (eye level when standing at vanity) with an integrated LED track that illuminates artwork from above at 30-degree angle, museum-standard.
Design Breakdown:
- Rail System: Aluminum or brass picture rail with hook-and-cable hanging system
- Lighting: LED track lighting at 3500K, 30-degree beam angle, 900 lumens per fixture
- Vanity Surface: Minimal 8″ deep floating shelf in matching wall color to “disappear” visually
- Mirror: Frameless mirror with French cleat mounting for easy repositioning
- Artwork Protection: UV-filtering acrylic glazing on displayed pieces to prevent fading
- Display Rotation: Install art prints on seasonal rotation
Best For: Art collectors and creative professionals who need visual stimulation from their environment. The constantly evolving display prevents routine stagnation.
Common Mistake Warning: Avoid hanging valuable or sentimental artwork in humid closets without proper ventilation. Maintain 40-60% relative humidity to prevent mold and paper degradation.
Terrazzo Surface with Vintage Pharmacy Mirror
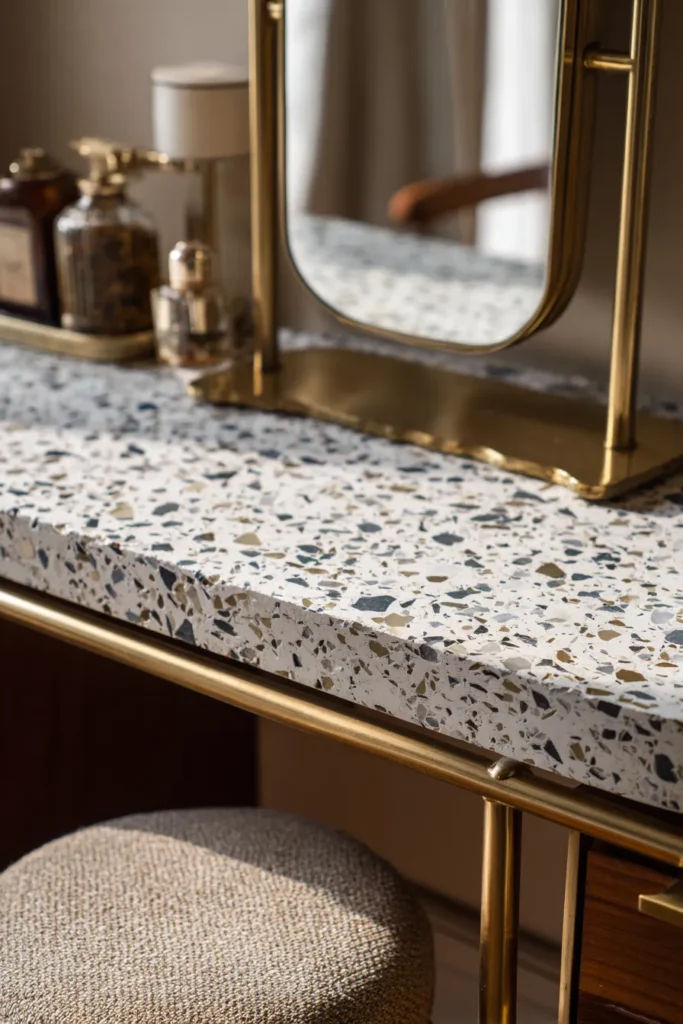
Terrazzo’s renaissance brings this composite material (marble chips set in colored cement or epoxy) back into contemporary design. Modern terrazzo allows custom chip sizing and color combinations—specify large 1-2″ Carrara chips in charcoal epoxy for dramatic contrast, or tiny rice-grain chips in cream epoxy for subtle texture. Pair with an authentic vintage pharmacy mirror (the pivoting rectangular mirrors originally used in druggist shops) sourced from architectural salvage.
The terrazzo surface provides unmatched durability—properly sealed terrazzo lasts 50+ years with minimal maintenance while resisting stains, scratches, and moisture damage that plague other materials. The vintage mirror adds historical gravitas that new mirrors cannot replicate. The combo creates timeless sophistication that transcends trend cycles.
Designer’s Secret: New terrazzo slabs cost $80-150 per square foot installed. Achieve the look for $15-25 per square foot using terrazzo-look porcelain tile in 24″ x 24″ format. Modern digital printing creates such convincing terrazzo simulation that visual distinction requires close inspection. Reserve real terrazzo for visible edges where tile grout lines would reveal the deception.
Design Breakdown:
- Surface Material: Cast-in-place terrazzo or high-quality porcelain tile simulation
- Chip Specification: 60% large chips (1-2″) in Carrara marble, 40% small chips (1/4-1/2″) in cream or gray marble
- Binder Color: Charcoal, sage green, or dusty pink epoxy to create color depth
- Mirror Style: Authentic vintage pharmacy mirror in brass or nickel finish (source from 1stDibs, Chairish, or local salvage)
- Hardware: Period-appropriate brass hardware in unlacquered finish
Best For: Vintage enthusiasts and those seeking heirloom-quality materials that improve with age. The combination of durable terrazzo and authentic vintage creates instant patina.
Material Pairing Logic: Terrazzo’s busy pattern requires visual rest—pair with simple drawer fronts in solid colors rather than figured wood or additional patterns. The pharmacy mirror provides the only other focal point.
Velvet-Lined Jewelry Drawer System with Tilt-Out Storage
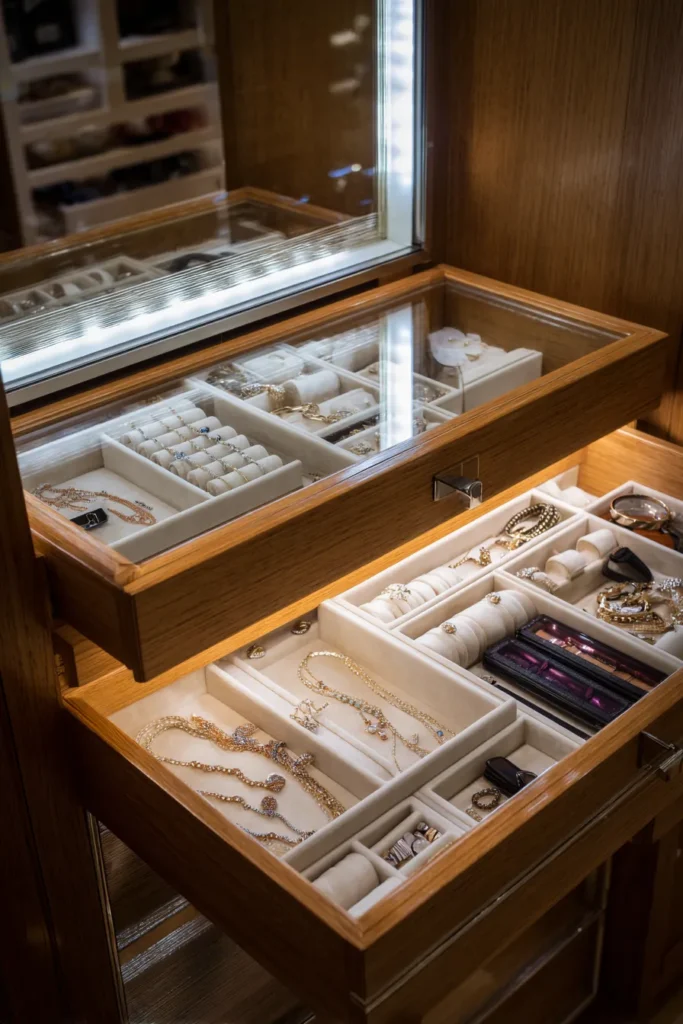
Dedicated jewelry storage elevates the vanity from grooming station to personal vault. Custom drawer organization systems with velvet-lined compartments, ring rolls, and watch cushions transform chaotic jewelry tangles into orderly displays. Add tilt-out storage panels that reveal necklace hooks or earring grids hidden within the vanity face—maximizing vertical space while maintaining clean exterior lines.
The velvet lining serves both aesthetic and practical purposes: the fabric’s pile prevents jewelry from sliding during drawer operation while the soft surface prevents scratches on precious metals. Color choice matters—cream or gray velvet provides neutral backgrounds that make gemstones pop visually.
Designer’s Secret: Standard drawer boxes are 3.5-4″ deep—inadequate for modern beauty tool storage (blow dryers, curling irons, etc.). Specify alternating drawer depths: shallow 2″ drawers for jewelry, medium 4.5″ drawers for cosmetics, deep 8″ drawers for tools. This dimensional variation costs nothing extra but doubles functional capacity.
Design Breakdown:
- Drawer System: Dovetailed hardwood boxes with soft-close undermount slides
- Velvet Specification: 100% cotton velvet in 12-14 oz weight (heavier weights resist crushing)
- Compartmentalization: Removable insert trays allowing custom reconfiguration
- Tilt-Out Panels: Spring-loaded doors concealing vertical necklace storage with individual hooks
- Additional Organization: Acrylic makeup organizers for countertop storage
Best For: Jewelry collectors and accessory enthusiasts who need museum-quality storage. The system prevents damage while showcasing collections.
Common Mistake Warning: Velvet fades in direct sunlight. If your closet has windows, specify UV-resistant velvet or position jewelry drawers away from light exposure zones.
Biophilic Green Wall Backdrop with Natural Light Optimization
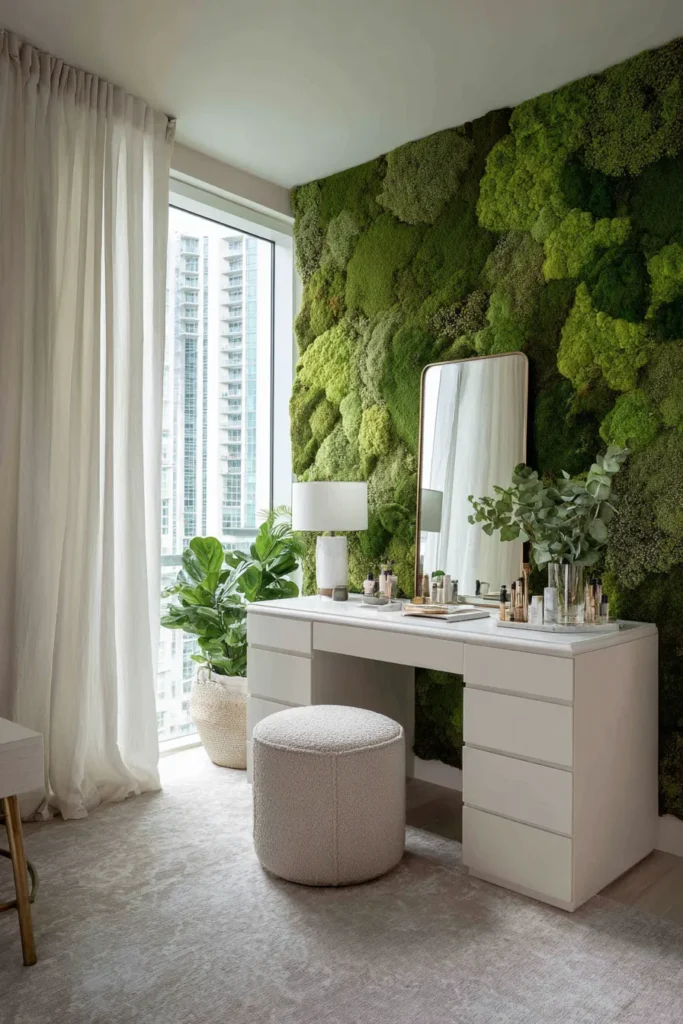
The ultimate wellness-focused vanity integrates a living green wall—preserved moss panels or low-maintenance pothos installations that bring literal nature into your dressing routine. Combine this with strategic natural light optimization: position the vanity perpendicular to windows rather than facing them (prevents squinting and backlight), use sheer textiles for privacy without blocking light, and install light tubes or skylights if your closet lacks windows.
Preserved moss requires no watering or sunlight—stabilized through glycerin treatment, it maintains vibrant green color for 7-10 years with zero maintenance beyond occasional dusting. Living plant walls demand more commitment but provide air purification and the psychological benefits of tending living things. This philosophy extends beyond closets into reading nook bedroom designs and entryway decor where biophilic elements enhance wellbeing.
Designer’s Secret: North-facing windows provide ideal makeup application light—consistent, shadowless, and color-neutral throughout the day. If your closet faces south (harsh direct sun) or has no windows, install a light tube (Solatube or similar) that pipes actual daylight from the roof through a reflective tunnel into your closet. This delivers 90% of skylight quality at one-third the installation cost.
Design Breakdown:
- Green Wall System: Preserved moss panels in mixed textures (sheet moss, reindeer moss, mood moss) for dimensional depth
- Living Alternative: Pothos or philodendron trained on coir pole systems with hidden drip irrigation
- Natural Light: Position vanity 90 degrees to window with sheer linen curtains at 180gsm fabric weight
- Supplemental Lighting: Full-spectrum LED panels at 5000K to simulate daylight on overcast days
- Air Quality: Combine with activated charcoal filters if using living plants to manage humidity
- Integration: Connect design to broader bathroom decor biophilic themes
Best For: Wellness-focused individuals and those experiencing seasonal affective disorder. The combination of greenery and natural light creates measurable mood improvement.
Light Temperature Strategy: Natural light from windows ranges 5000-6500K depending on weather. Your supplemental artificial lighting should match this range only for ambient fill—keep task lighting at 3500K to prevent the sterile “operating room” feeling of all-daylight spaces.
Material Pairing Logic: Moss’s organic irregularity pairs beautifully with minimal vanity surfaces in light woods or white lacquer. Avoid competing textures—let the green wall be the sole pattern element.
Designer’s Checklist: Vanity Ergonomics & Lighting Ratios
Before finalizing your closet vanity design, verify these technical requirements that separate amateur installations from professional-grade results:
Counter Height Standards
- Seated vanity: 30-34″ height (measure from floor to top surface)
- Standing vanity: 36″ height (standard bathroom vanity dimension)
- Universal design: 34″ height accommodates both seated and standing use
Task Lighting Requirements
- Minimum illumination: 40-60 foot-candles measured at face level when seated
- CRI (Color Rendering Index): 90+ mandatory for accurate makeup color perception
- Light temperature: 3000-3500K optimal range (warmer feels cozy but distorts color; cooler feels clinical)
- Positioning: Asymmetrical placement at 60″ and 66″ heights eliminates harsh shadows
- Dimming capability: Install dimmers on all task lighting circuits for time-of-day adjustments
Mirror Placement Precision
- Eye-level center: 60-65″ from floor for average adult (adjust for household height)
- Width: Minimum 30″ wide for adequate peripheral vision during makeup application
- Depth: Position mirror 6-8″ behind front edge of vanity to prevent nose-to-glass contact when leaning forward
- Anti-fog coating: Essential for closets connected to bathroom shower areas
Electrical Planning
- Outlet spacing: GFCI outlets every 12″ along vanity backsplash
- Dedicated circuit: 20-amp circuit for hair tools and heated styling equipment
- USB integration: Built-in USB charging ports for modern device charging needs
- Switch location: Place lighting controls 48″ from floor, accessible from seated position
Clearance Zones
- Front clearance: 36″ minimum depth in front of vanity for comfortable seated posture
- Drawer extension: Add 18-24″ to clearance if drawers pull toward user
- Door swing: If closet has doors, ensure 42″ minimum prevents door-to-knee collision
- Adjacent storage: Maintain 6″ minimum between vanity edge and wardrobe systems
Storage Depth Requirements
- Makeup/skincare: 4″ minimum drawer depth (accommodates foundation bottles, palettes)
- Hair tools: 8-10″ depth for blow dryers, flat irons, curling wands
- Jewelry: 2-3″ shallow drawers with velvet-lined compartments
- Cleaning supplies: 12″ depth for product bottles, towel storage
Material Performance Standards
- Surface durability: Minimum Mohs hardness scale rating of 5 for scratch resistance
- Water resistance: Sealed surfaces with water droplet contact angle >90 degrees
- Heat tolerance: Countertops must withstand 300°F for styling tool contact
- LRV (Light Reflectance Value): 40-60% range optimal—lower values create caves, higher values cause glare
Common Mistakes: Designer’s Warning Section
Even with the best intentions, certain vanity design errors appear repeatedly. Avoid these professional pitfalls:
Lighting Failures
Mistake: Relying solely on overhead recessed lighting or single-source sconces Why it fails: Creates unflattering shadows under eyes, nose, and chin—the “horror movie lighting” effect Solution: Implement three-point lighting: overhead ambient + bilateral task sconces + under-cabinet toe-kick lighting for shadow elimination
Mistake: Installing 2700K “warm white” LEDs for task lighting Why it fails: Makes foundation appear too yellow, blush too orange, and eye shadow colors shift dramatically in natural light Solution: Specify 3200-3500K for color accuracy while maintaining warmth
Surface Selection Errors
Mistake: Choosing high-gloss countertops or mirrors without anti-glare treatment Why it fails: Creates blinding reflections from task lighting, making precision work impossible Solution: Specify matte or honed finishes with LRV 40-60%; add anti-glare mirror coatings
Mistake: Ignoring LRV in dark closets Why it fails: Dark surfaces (LRV <30%) absorb light, requiring 40-50% more illumination to achieve adequate brightness Solution: Use light-colored surfaces in windowless closets; reserve dark drama for naturally-lit spaces
Ergonomic Oversights
Mistake: Installing vanity at standard 36″ bathroom height without considering seated use Why it fails: Causes shoulder and neck strain during lengthy makeup sessions Solution: Lower vanity to 32-34″ or install adjustable-height mechanisms
Mistake: Inadequate drawer depth for modern beauty tools Why it fails: Dyson Airwrap, T3 tools, and professional blow dryers don’t fit in standard 3.5″ drawers Solution: Specify minimum 8″ depth for tool storage with custom organizers
Spatial Planning Failures
Mistake: Positioning vanity directly facing windows Why it fails: Backlighting creates silhouette effect, making facial details invisible Solution: Place vanity perpendicular to windows; use sheer window textiles for glare control
Mistake: Insufficient clearance in front of vanity Why it fails: Cramped spaces prevent comfortable seated posture and drawer access Solution: Maintain 42″ minimum clearance; increase to 54″ in high-traffic closets shared by multiple users
Storage Configuration Errors
Mistake: Symmetrical drawer sizing (“all drawers same height”) Why it fails: Wastes vertical space and forces awkward storage solutions Solution: Vary drawer depths: 2″ jewelry, 4.5″ cosmetics, 8″ tools, 12″ linens
Mistake: Over-accessorizing small vanity surfaces Why it fails: Creates visual chaos that defeats the calming purpose of dressing rituals Solution: Limit countertop items to 3-5 essential daily-use objects; store everything else in drawers
Material Finishing Guide: Protecting Your Investment
The difference between a vanity that ages gracefully and one that deteriorates within months often comes down to proper finishing and maintenance protocols:
Wood Surfaces
Best finish: Hardwax oil systems (Rubio Monocoat, Osmo Polyx) that penetrate rather than coat Maintenance: Reapply wood conditioning oil every 6-8 months Avoid: Polyurethane film finishes that yellow under LED lighting and chip with impact
Natural Stone
Best sealer: Impregnating sealers (not topical coatings) applied annually Daily care: pH-neutral cleaners only—avoid acidic or alkaline products Emergency: Poultice treatment for stains within 24 hours of occurrence
Metal Hardware
Unlacquered brass: Ages naturally; clean with lemon juice + salt paste quarterly Powder-coated steel: Wipe with microfiber only; abrasive cleaners damage coating Polished nickel: Requires weekly buffing with brass cleaner to prevent tarnish
Lacquered Surfaces
Protection: Avoid placing hot styling tools directly on surface (use heat-resistant mats) Cleaning: Damp microfiber cloth only—all-purpose cleaners dissolve lacquer over time Repair: Professional refinishing required for chips (DIY touch-ups never match)
Adapting Vanity Design to Closet Size
Your available square footage dictates which of these 15 concepts will work effectively:
Compact Closets (40-60 sq ft)
Best choices: Floating walnut slab (#1), Japandi console (#4), Scandinavian birch ply (#9) Design principle: Vertical emphasis and minimal footprint Integration: Coordinate with small bedroom ideas strategies
Medium Closets (60-100 sq ft)
Best choices: Zellige tile (#2), Plaster vanity (#3), Art Deco revival (#5), Industrial steel (#6) Design principle: Balance visual weight with circulation space Cross-reference: Apply principles from wardrobe design bedroom planning
Spacious Closets (100+ sq ft)
Best choices: All designs work, particularly monolithic concrete (#7), gallery wall (#12), biophilic green wall (#15) Design principle: Create distinct zones for dressing, grooming, and storage Inspiration: Draw from vanity room ideas for dedicated dressing suites
The 2026 Vanity Philosophy: Ritual Over Routine
What separates contemporary closet vanity design from previous eras isn’t just aesthetic preference—it’s a fundamental shift in how we conceptualize personal grooming spaces. The 2026 approach treats your vanity as a ritual anchor point rather than a functional necessity.
This means:
- Lighting designed for accuracy AND ambiance (not just brightness)
- Materials chosen for tactile engagement (not just visual appeal)
- Storage that reveals rather than conceals (celebrating your collection as decor)
- Spatial flow that encourages lingering (not rushed efficiency)
The vanity becomes what psychologists call a “temporal decompression zone”—a space that deliberately slows you down, forcing presence and mindfulness during morning and evening transitions. In our hyper-accelerated world, these moments of enforced slowness carry therapeutic weight.
Whether you choose the raw authenticity of industrial blackened steel, the jewel-box drama of deep lacquer, or the organic warmth of live edge wood, your selection should reflect not just aesthetic preference but how you want to feel during those quiet moments before the day begins and after it ends.
Your closet vanity isn’t just where you get ready. It’s where you prepare to face the world—and where you shed the day’s armor before rest. Design it accordingly.
Related Resources:
- Bathroom Vanity Ideas for coordinating design across spaces
- Vanity Desk concepts for bedroom integration
- Vanity Mirror selection guide for optimal illumination
- Kids Bedroom Wardrobe to extend organization principles
- Entryway Table Decor for similar styling approaches