The 2026 dining room wall has evolved from decorative afterthought to architectural envelope—a shift driven by material tactility over visual pattern, where hand-troweled lime plasters, enveloping murals, and reclaimed millwork now outperform the formulaic gallery wall in creating spaces that register as lived-in rather than curated.
This transformation stems from three converging forces: clients demanding refinishable surfaces over disposable treatments, architects reclaiming the dining room as ceremonial space rather than open-concept overflow, and material science delivering low-VOC mineral finishes that perform as well as they photograph. The gallery wall—that safe grid of interchangeable frames—has become shorthand for design indecision. What follows are seventeen approaches that treat walls as architecture rather than decoration.
Understanding the Material Shift
The contemporary dining wall prioritizes haptic experience. A hand-troweled plaster catches afternoon light differently than paint—the micro-relief creates dimensional depth that flat color cannot replicate. This isn’t aesthetics for its own sake. These material choices influence how long guests linger, how intimate conversations feel, how the room transitions from breakfast light to dinner candlelight.
Sustainability now functions as design constraint rather than marketing angle. Clients expect FSC-certified hardwoods, mineral-based finishes with breathability, and surfaces that can be refinished rather than replaced. The ten-year lifecycle matters. A Venetian plaster improves with age; vinyl wallcovering does not.
1. Hand-Troweled Venetian Plaster: High-Gloss Marmorino Finish

The marmorino technique—crushed marble dust suspended in lime putty—creates depth through transparent layering rather than opaque coverage. Applied in three to seven thin coats with steel trowel sets at pressure varying by angle, the surface develops chatoyancy: light appears to move across the wall as you walk through the room. This is not paint with a sheen. This is calcified mineral that continues curing for months, growing harder and more luminous.
The finish ranges from satin to high-polish depending on final burnishing. For dining rooms with northern exposure, specify a burnished surface to maximize light reflectance. Southern exposures benefit from softer finishes that won’t create glare during midday meals.
Designer’s Secret: Commission application during low-humidity months (under 50% relative humidity). Excess moisture prevents proper carbonation, leaving the surface chalky rather than stone-like. Professional applicators use dehumidifiers in the space for 48 hours before starting.
Design Breakdown:
- Base coat: Mineral-based primer with 24-hour cure time
- Build coats: 3-5 layers of marmorino, each 1mm thick, applied perpendicular to previous layer
- Burnishing: Executed with 400-600 grit wet sanding blocks followed by steel trowel compression
- Sealing: Natural beeswax or acrylic sealer (specify based on kitchen proximity)
- Color selection: Earth pigments maintain depth; synthetic dyes flatten over time
Best For: Formal dining rooms in historic renovations, wine-tasting rooms, spaces requiring museum-quality light modulation.
2. Matte Limewash: The European Standard

Unlike paint that sits atop drywall, limewash penetrates and mineralizes with the substrate. The result is a surface that breathes, resists mold, and develops a soft patina as it ages. The finish is completely matte—no sheen whatsoever—which makes it ideal for dining rooms where you want textural interest without reflective hotspots.
Application requires a dampened wall surface. The limewash is brushed on in cross-hatch strokes, creating subtle striations that catch raking light. Two coats minimum, four coats for saturation. The color lightens by approximately 30% as it dries, so test samples are non-negotiable.
Designer’s Secret: For an authentic aged look, apply the final coat unevenly—more product in corners and along trim, lighter in field areas. This mimics decades of natural wear and prevents the “too perfect” appearance of modern application.
Design Breakdown:
- Surface prep: Clean, porous substrate (raw drywall, plaster, or masonry)
- Application tool: Natural boar bristle brush 4-6 inches wide
- Technique: Figure-eight motion, cross-hatch final pass
- Cure time: 24 hours between coats, 30 days for full carbonation
- Touch-up protocol: Feather edges with damp sponge immediately after application
Best For: Mediterranean-inspired homes, farmhouse dining rooms, coastal properties with high humidity, clients allergic to VOCs.
3. Clay-Based Plaster Systems: Biophilic Depth

Clay plaster represents the intersection of performance and sustainability. The material regulates humidity naturally, absorbs odors, and improves acoustic properties—meaningful in open-plan homes where dining spaces share airspace with kitchens. The finish ranges from smooth to heavily textured depending on aggregate size and trowel technique.
The color palette skews toward ochres, siennas, and umber—the inherent pigmentation of clay minerals. Synthetic tints can be added but often flatten the dimensional quality that makes clay compelling. The surface accepts light differently than lime plaster; where Venetian plaster reflects, clay absorbs and re-radiates with warmth.
Design Breakdown:
- Base: Clay plaster with straw or sand aggregate
- Application: 2-4 coats at 2-3mm per layer using Japanese trowels for finest control
- Texture options: Smooth (polished with damp sponge), stippled (coarse aggregate), or combed (horizontal relief)
- Finish: Unsealed for maximum breathability, or natural oil finish for moisture-prone areas
- Repair: Easily patched with wet clay compound; blends seamlessly after drying
Best For: LEED-certified projects, clients with chemical sensitivities, homes in arid climates, spaces requiring acoustic dampening.
Designer’s Warning: Clay plaster should not be applied in rooms with direct water exposure (behind sinks, wet bars). Use lime-based systems or tile in splash zones.
4. Full-Height Walnut Paneling: Architectural Gravitas

Solid wood paneling signals permanence. A walnut installation—properly detailed—will outlast three generations of paint trends. The material is specified for its dimensional stability (less movement than oak or cherry) and its capacity to deepen with age, developing a honey-brown patina that improves yearly.
Panel width matters more than most designers acknowledge. Narrow boards (3-4 inches) read as wainscoting regardless of height. For true architectural presence, specify 8-12 inch panels with 1/4 inch reveal spacing. The reveals create shadow lines that define the composition; too tight and the wall reads flat, too wide and it becomes busy.
Designer’s Secret: Specify FSC-certified black walnut lumber with rift-sawn grain orientation. This cut minimizes figure distraction and allows the installation geometry to dominate. Quarter-sawn shows too much medullary ray; plain-sawn creates visual chaos in large-scale applications.
Design Breakdown:
- Material: 3/4 inch solid walnut with moisture content below 8%
- Layout: Vertical board pattern with reveals at 8-12 inch intervals
- Mounting: French cleat system on treated plywood backer for dimensional stability
- Finish: Hand-rubbed Danish oil (3-5 coats) or water-based polyurethane in matte (for high-traffic households)
- Hardware integration: Recessed outlets with matching wood covers, invisible wire management channels
Best For: Mid-century modern interiors, lawyer/doctor home offices converted to dining, clients investing in heirloom-quality architecture.
5. Board-and-Batten Grid: Proportion Over Pattern

The board-and-batten system succeeds or fails based on mathematical relationships. Panels divided into thirds create visual harmony; fourths feel forced; fifths introduce sophisticated tension. Most failures occur when designers eyeball the layout rather than calculating proportions relative to ceiling height and wall width.
Paint selection determines success as much as geometry. Dead-flat finishes emphasize shadow lines—the actual design element. Eggshell or satin sheens flatten the dimensional relief you’ve engineered. For maximum impact, paint walls and battens in the same color at different sheen levels: matte field, satin battens. The light behavior differentiation creates subtle depth without color contrast.
Designer’s Secret: Extend battens onto the ceiling by 6-12 inches to visually heighten the room. This technique—called “envelope framing”—tricks the eye into perceiving greater volume. Especially effective in homes with 8-foot ceilings.
Design Breakdown:
- Batten width: 2-3 inches (wider reads as beam detail, narrower as trim)
- Batten depth: 1/2 inch minimum for shadow definition
- Panel proportion: Aim for 3:5 or 2:3 width-to-height ratios
- Base material: MDF for paint-grade applications (more stable than poplar), maple boards for stain-grade
- Installation: Brad nailer attachment with adhesive backing, caulk-free corners for crisp lines
- Paint: Benjamin Moore Advance in matte base, semi-gloss battens
Best For: Transitional dining rooms, new-construction homes lacking architectural detail, spaces requiring visual height manipulation.
6. Fluted Wood Detailing: Acoustic Luxury

Vertical fluting—channels cut into wood panels—originated as a sound-diffusion strategy in recording studios. The technique migrated to residential design because it solves an actual problem: echo in hard-surface dining rooms. The channels scatter sound waves, reducing the harshness of conversation in rooms with tile floors and glass tables.
The flute profile matters. Deep channels (1/2 inch) with narrow spacing (1 inch on-center) create dramatic relief but collect dust. Shallow channels (1/4 inch) with wider spacing (2 inches on-center) perform equally well acoustically while maintaining cleaner. CNC-milled panels provide consistency; hand-milled panels introduce organic variation that some clients prize.
Design Breakdown:
- Panel material: White oak veneer on MDF substrate (stable, cost-effective) or solid walnut (heirloom quality)
- Flute specification: 1/4 to 1/2 inch deep, 1 to 2 inches on-center spacing
- Orientation: Vertical installation makes ceilings feel taller; horizontal creates width illusion
- Finish: Clear matte polyurethane (3 coats) or hard wax oil for natural appearance
- Mounting: Z-clip system allows removal for refinishing
Best For: Open-concept homes with hard flooring, modern interiors requiring warmth, audiophile clients, dining rooms doubling as home offices with video conferencing.
7. Enveloping Hand-Painted Murals: Commissioned Narrative

The bespoke mural—executed by a fine artist rather than installed from a catalog—transforms dining from functional activity to immersive experience. This approach works when the room itself becomes the art, eliminating the need for additional wall decoration. Scale is non-negotiable: the composition must wrap at least two walls and preferably extend onto the ceiling to achieve envelope effect.
Subject matter ranges from abstracted landscapes to trompe l’oeil architectural elements to botanical studies. The most successful installations incorporate the room’s existing architecture—painting around windows and doors rather than interrupting the image. Color density should increase toward edges and lighten in central fields to create psychological spaciousness rather than enclosure.
Designer’s Secret: Commission the artist to include one intentional “error”—a slightly off-perspective element or color anomaly. This humanizes the work and prevents the sterile perfection of digital wallcovering. Clients often fixate on finding the imperfection, creating engagement with the wall.
Design Breakdown:
- Artist selection: Portfolio review for scale experience (residential murals differ from gallery work)
- Surface prep: Smooth eggshell paint base in neutral for optimal adhesion
- Paint type: Acrylic artist paints with UV-protective clear coat (prevents fading)
- Execution time: 40-120 hours depending on complexity
- Protection: Seal with water-based polyurethane (satin sheen) in dining rooms near kitchens
Best For: Collectors’ homes, clients seeking one-of-a-kind environments, historic properties where period-appropriate decoration matters, wine cellars requiring visual interest.
8. Large-Format Grasscloth: Tactile Elegance

Natural grasscloth—woven from arrowroot, jute, or seagrass—introduces textural complexity that synthetic wallcoverings cannot replicate. Each panel contains slight color variation and visible warp threads, creating an organic quality that sophisticated clients recognize as authentic. The material also provides acoustic absorption, softening conversation in ways that painted walls cannot.
Installation requires specialist expertise. Grasscloth is fragile during application, cannot be pattern-matched perfectly (and shouldn’t be—the irregularity is the point), and shows seams intentionally rather than hiding them. The seams become part of the design language. Specify panels at natural width (usually 36 inches) rather than requesting custom sizing.
Designer’s Secret: Install grasscloth with vertical seams spaced rhythmically rather than trying to minimize them. Create a 3-3-4-3-3 pattern across a wall rather than even spacing. This introduces visual rhythm and makes the material installation method—the “how it’s made”—visible and celebrated.
Design Breakdown:
- Material: Natural fiber grasscloth at 180-220gsm weight
- Backing: Paper-backed (traditional) or non-woven (easier but less authentic)
- Adhesive: Cellulose-based paste applied to wall, not wallcovering
- Seam treatment: Butt joints without overlap, seam roller used minimally to avoid crushing fiber
- Edge detail: Wrapped returns at windows and doors; trim added only at ceiling and baseboard
Best For: Serene dining spaces, coastal homes, Japanese-inspired interiors, clients who value craftsmanship, rooms requiring sound absorption.
Designer’s Warning: Grasscloth stains permanently from moisture. Do not install within 4 feet of sinks, bars, or in homes with young children prone to spills.
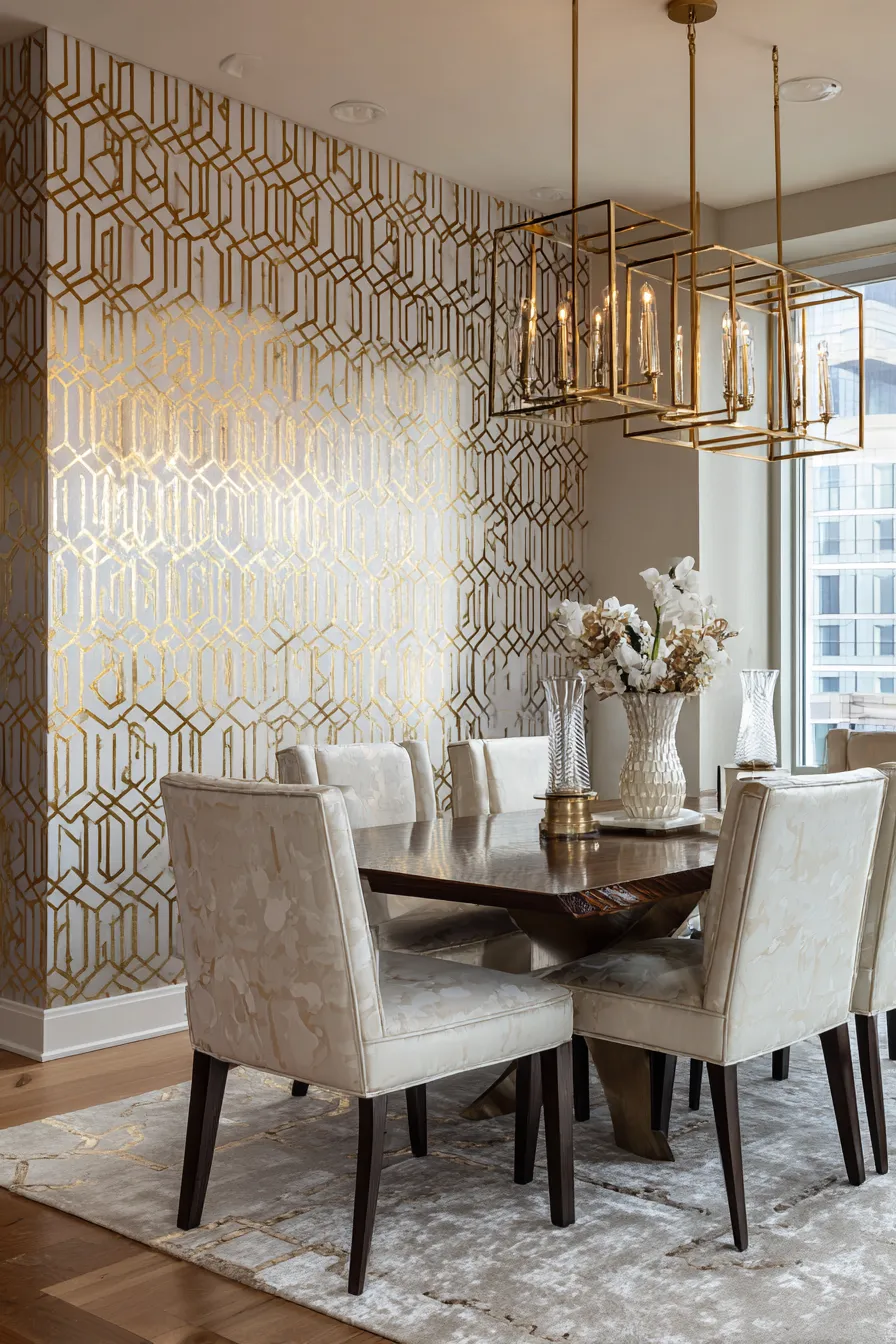
9. Metallic Mylar Inlay Wallcovering: Reflective Drama

Metallic wallcoverings—when specified correctly—introduce controlled sparkle without venturing into nightclub territory. The key is substrate quality and metal composition. Genuine metallic leaf wallpaper with real metal flake performs differently than mylar-coated papers. The former develops patina and interacts with light dynamically; the latter reads as costume jewelry.
Color temperature coordination matters critically here. Gold-toned metallics require warm white light sources (2700K); silver and pewter tones need cool white (3500K minimum). Mismatched lighting makes expensive wallcovering appear cheap. Always mock up with actual lighting before installation.
Design Breakdown:
- Material: Mylar-backed paper with embedded metal leaf (copper, silver, or gold)
- Pattern scale: Large-scale geometric (small patterns read busy and dated)
- Installation: Professional only—material shows every substrate imperfection
- Adhesive: Heavy-duty cellulose paste with extended open time
- Lighting coordination: Dimmable LED fixtures at 2700K for gold, 3200K for silver
Best For: Formal dining rooms in urban apartments, art deco renovations, clients who entertain frequently, spaces requiring drama without color.
10. Ceiling-to-Wall Color Drenching: Envelope Theory

Color drenching—painting walls and ceiling the same saturated hue—creates psychological cocooning. The technique eliminates visual boundaries, making the room feel simultaneously intimate and infinite. It works because our brains stop trying to define where surfaces end, allowing focus to shift entirely to furnishings and occupants.
Hue selection determines mood. Deep olive greens foster grounding conversation. Rich terracotta creates warmth and appetite stimulation. Navy blue establishes formality and concentration. The color must be mixed with at least 8 ounces of colorant per gallon; anything less reads as “tinted” rather than “saturated.”
Designer’s Secret: Eliminate all white trim—paint baseboards, crown molding, window casings, even outlets in the same color. Use only sheen differentiation: matte walls, semi-gloss trim. This creates dimensional definition without color contrast, intensifying the envelope effect.
Design Breakdown:
- Color selection: Jewel tones at 75%+ saturation (Farrow & Ball Preference Red, Benjamin Moore Hale Navy)
- Sheen strategy: Matte ceiling and walls, eggshell or satin trim
- Primer: Gray-tinted primer (not white) to achieve true depth in one fewer coat
- Application: Ceiling first, then walls, trim last
- Paint sprayer recommended for uniform finish on textured ceilings
Best For: Bold clients, small dining rooms requiring intimacy, homes with abundant natural light (technique darkens spaces), modern interiors, living rooms with adjacent dining areas needing definition.
11. Curated Two-Piece Photography Diptych: Strategic Restraint

The oversized photography diptych—two large-format prints installed with intentional spacing—outperforms the cluttered gallery wall because it commands attention through scale and restraint. This approach requires confidence: you’re dedicating 60-75% of wall real estate to two images. The composition must justify that dominance.
Print size matters mathematically. For a wall 120 inches wide, specify two 40×50 inch prints with 10 inches between them. The spacing creates a single visual unit while allowing each image independence. Too close and they merge; too far apart and they compete. Frame depth should be 1.5 inches minimum to create shadow relief against the wall.
Designer’s Secret: Commission prints in actual silver gelatin or platinum palladium process rather than inkjet reproduction. The tonal range and surface quality of analog photography remains unmatched. Clients may not consciously register the difference, but they’ll perceive quality subconsciously. Gallery-level photography dealers sell these, but expect $3,000-8,000 per print.
Design Breakdown:
- Print size: 40×50 inches minimum for standard dining rooms (10-12 foot walls)
- Framing: Museum-grade with UV-protective glazing, black metal frames or natural ash
- Mat treatment: No mats (photography should bleed to frame edge for maximum impact)
- Mounting height: Center line at 57 inches (standard gallery height) or centered on wall vertical midpoint
- Content: Abstract or atmospheric over literal—you want conversation starters, not distractions
Best For: Minimalist clients, photography collectors, small dining rooms where traditional gallery walls overwhelm, homes with statement furniture that needs quiet backdrop.
12. Floating Shelf Gallery: Curatorial Flexibility

The floating shelf system—solid walnut shelves at 10-12 inches deep—creates a gallery wall that can be reconfigured seasonally. Artwork leans rather than hangs, creating casual layering impossible with traditional hanging. The depth allows for dimensional objects: ceramic vessels, small sculptures, art books propped open to significant pages.
Shelf quantity and spacing follow the rule of three: install one, three, or five shelves, never two or four. Odd numbers create visual resolution. Space them proportionally rather than evenly: perhaps 18 inches between lower shelves, 24 inches at top. This graduated spacing creates rhythm and acknowledges that eye level content receives more attention.
Designer’s Secret: Install LED strip lighting in a routed channel along the bottom rear edge of each shelf. This uplight washes the wall above while highlighting objects on the shelf. Use 2700K LED strip lights and ensure the power supply is truly dimmable (many cheap systems flicker at low settings).
Design Breakdown:
- Shelf material: Solid hardwood 1.5 inches thick (engineered wood sags at this depth)
- Length: 48-72 inches per shelf (longer requires center support)
- Mounting: Heavy-duty floating shelf brackets rated for 100+ pounds
- Spacing: 18-30 inches vertical between shelves
- Styling: Layer frames at varying depths, include one sculptural element per shelf, leave 20% negative space
Best For: Clients who redecorate seasonally, art collectors with rotating inventory, entryway areas adjacent to dining rooms, homes lacking traditional hanging wall space.
13. Reclaimed Stone Accent Wall: Geological Presence

Stone introduces literal geological time into domestic space. Reclaimed limestone or sandstone—salvaged from demolished buildings—carries history in its surface: tool marks, weather erosion, mortar residue. This material weighs 12-18 pounds per square foot, requiring structural assessment before installation. Not every wall can support stone.
Application method determines aesthetics. Dry-stack installation (no visible mortar) creates clean horizontal lines and modern feel. Traditional mortared joints read rustic or Mediterranean. For dining rooms, specify dry-stack with recessed mortar joints—mortar present for stability but pushed 1/4 inch behind face of stone to maintain shadow lines.
Design Breakdown:
- Stone type: Reclaimed limestone or sandstone in 2-4 inch thicknesses
- Layout: Random ashlar (varied heights) or coursed ashlar (uniform heights)
- Substrate: Cement board attached to structural studs capable of bearing additional 15-20 pounds per square foot
- Installation: Thin-set mortar, joints recessed 1/4 inch and sealed with polyurethane
- Sealing: Penetrating stone sealer applied annually to prevent staining from wine splashes
Best For: Wine cellars, rustic modern farmhouses, clients valuing sustainability, homes with concrete or steel structural systems, European-inspired interiors.
Designer’s Warning: Stone accent walls introduce significant thermal mass. In poorly insulated homes, these walls remain cold, creating condensation issues. Verify wall assembly includes vapor barrier before specifying stone.
14. Blackened Steel Panel System: Industrial Refinement

Steel panels—hot-rolled and sealed with clear wax—introduce industrial materiality without coldness when properly detailed. The surface develops orange and purple oxidation patterns during heat treatment, creating organic variation within the metal. Each panel is unique; the installation becomes a form of abstract composition as panels are arranged for optimal visual flow.
Panel size affects installation complexity and cost. Larger panels (4×8 feet) minimize seams but require specialized lifting equipment. Smaller panels (2×4 feet) install easier but create more joints—which can be designed as reveals or welded invisible. Reveal joints read more contemporary; welded joints read seamless and monolithic.
Designer’s Secret: Specify unsealed steel and allow natural oxidation in the first six months, then seal. The accelerated patina develops richer character than pre-sealed panels. Provide clients with microfiber cloths and instructions to wipe accumulated rust dust weekly during this period.
Design Breakdown:
- Material: Hot-rolled steel at 16-18 gauge thickness
- Finish: Clear wax seal over oxidized surface or blackened with gun blue solution
- Mounting: Steel Z-clips welded to panel backs, mounted to steel frames in wall
- Seam treatment: 1/4 inch reveals or flush-welded (ground smooth and re-oxidized)
- Maintenance: Annual rewaxing with paste wax, immediate cleaning of acidic spills
Best For: Loft conversions, modern industrial interiors, clients in design professions, homes with exposed ductwork and concrete floors.
15. Stretched Linen Panel System: Acoustic Softness

Linen panels—280gsm Belgian linen stretched over wooden frames—function as both acoustic treatment and visual warmth. The fabric absorbs mid-range frequencies (human voice range), reducing echo in hard-surface dining rooms. Installation reads as upholstered walls without the dated connotation that phrase carries.
Frame construction determines longevity. Linen under tension will sag if frames aren’t properly engineered. Specify hardwood frames (not pine) with cross-bracing every 18 inches. The linen wraps around frame edges and staples to the rear, invisible when installed. Panel edges can butt tightly or leave 1/4 inch reveals—reveals create shadow lines and make individual panels readable.
Design Breakdown:
- Fabric: Natural Belgian linen fabric at 280-320gsm weight (lighter weights show wall texture behind)
- Frame: Hardwood (oak or ash) at 2 inches deep, cross-braced internally
- Stretching: Professional upholstery stretching, 12-15 pounds tension force
- Mounting: French cleat system or Z-clips for removability
- Panel size: 36×48 inches maximum (larger sizes difficult to tension uniformly)
Best For: Clients with noise sensitivity, homes with concrete or tile flooring, modern Scandinavian interiors, spaces requiring hypoallergenic wall treatments.
16. Woven Rattan Grid: Biophilic Texture

Natural rattan panels—woven in traditional lattice patterns—introduce biophilic design principles through material rather than imagery. The material is inherently warm, visually lightweight (doesn’t overwhelm), and flexible enough to wrap corners without seams. This approach works best when rattan covers entire wall surfaces rather than functioning as wainscoting-height treatment.
Authentic rattan (not synthetic) responds to humidity by expanding and contracting slightly. This is not a defect but a feature—the material breathes with the space. In dry winter months, panels may gap slightly at joints; in humid summers, they swell tight. Clients accustomed to engineered materials find this organic behavior either charming or concerning—qualify them carefully.
Designer’s Secret: Backlight rattan panels with warm LED strips mounted 2 inches behind the material. The light transmits through the weave, creating a glowing effect during evening dining while highlighting the shadow patterns cast on the wall behind.
Design Breakdown:
- Material: Natural rattan webbing in open or closed weave patterns
- Frame system: Wood frames every 36 inches vertically to prevent sagging
- Installation: Stapled to wood frames, frames mounted to wall with construction adhesive and screws
- Finish: Clear matte polyurethane or natural (no finish—shows age authentically)
- Backlighting: Optional LED tape light at 2700K mounted on wall behind panels
Best For: Tropical modern interiors, coastal properties, clients embracing wabi-sabi aesthetics, homes with abundant natural light, balcony-adjacent dining areas extending outdoor feeling inside.
17. Monochromatic Depth Layering: Three-Value Strategy

The monochromatic approach—single hue expressed in three distinct values—creates dimensional complexity without color distraction. This technique requires discipline: you’re committed to variations of one color family. The payoff is sophistication and visual rest, allowing attention to focus on dining companions rather than decorative competition.
Value distribution follows architectural logic. Darkest value on lower third (grounding), mid-value on middle zone (field), lightest value on upper third and ceiling (lifting). This mimics natural light behavior—darkness accumulates near ground, lightness near sky. The transitions between values can be hard-edged (geometric blocks) or soft-edged (ombré fade).
Designer’s Secret: Use three sheens of the same color rather than three values: flat lower wall, eggshell mid-wall, satin upper wall. The color appears to shift in value based purely on light reflection behavior, creating depth without actual color mixing. This technique works only with deeply saturated base colors—pastels lack sufficient intensity for sheen variation to register.
Design Breakdown:
- Color selection: Choose a base hue at 70% saturation
- Value structure:
- Lower third: Base color at full saturation, flat sheen
- Middle third: Base color tinted 20% lighter, eggshell sheen
- Upper third/ceiling: Base color tinted 40% lighter, satin sheen
- Paint brand: Farrow & Ball or Benjamin Moore Aura (consistent sheen behavior across values)
- Application: Tape lines at transitions, remove tape while paint wet for crisp edges
- Painter’s tape in 2-inch width for straight division lines
Best For: Color-passionate clients, modern interiors, small dining spaces requiring perceived volume, homes with architectural detailing that benefits from single-color emphasis.
Implementation Principles: What Architects Know
Material selection precedes aesthetic preference. A client may arrive requesting “something like that photo” but the photo was shot in a 14-foot ceiling room with abundant south-facing windows. Their actual dining room: 8-foot ceilings, north-facing, 12×14 feet. The approach that worked in the inspiration image will fail in their reality. Match materials to existing conditions first, aesthetics second.
Budget honestly for installation labor. Venetian plaster costs $12-25 per square foot in materials but $45-90 per square foot installed by qualified craftspeople. Wood paneling materials run $18-40 per square foot but installation adds $60-120. Grasscloth wallcovering costs $8-25 per square foot material, $45-75 installed. These numbers assume professional execution—DIY attempts on architectural finishes almost universally require professional correction, doubling final costs.
Consider the ten-year view. Paint refreshes every 3-5 years. Lime plaster lasts decades. Wood paneling becomes heirloom architecture. Stone is permanent. Choose based on your actual tenure plans and tolerance for maintenance. The “cheapest” option often costs most over time when replacement cycles are calculated.
Light behavior determines material success more than color choice. Northern light reads cool and constant—pair with warm materials (wood, clay plaster, warm-toned stone). Southern light swings from cool morning to warm afternoon—choose materials that perform across that range (Venetian plaster, metallic wallcoverings). Western light is harsh and golden—mitigate with matte materials (limewash, natural grasscloth). Eastern light is soft and brief—maximize it with reflective surfaces (high-gloss paint, mirrors, polished plaster).
The Dining Room as Designed Experience
These seventeen approaches share a common philosophy: the wall is not a container for decoration but the architecture itself. When executed with material integrity and proportional discipline, the space becomes the experience. You’re not dining in front of art; you’re dining inside architecture.
The best dining rooms make guests forget to check phones. They create acoustic environments where conversation feels natural. They use material warmth to suggest hospitality before any food arrives. This is the standard for 2026—not style trends that shift seasonally, but fundamental design principles that create spaces worth gathering in for decades.