
The 2026 shift in bathroom wall design abandons the ‘spa minimalism’ of the past decade in favor of material honesty—where unlacquered metals, raw plaster finishes, and deliberate asymmetry create spaces that feel collected rather than curated.
This movement away from sterile perfection stems from three converging forces: a post-pandemic desire for tactile materiality, sustainability demands that prioritize heirloom-quality installations over disposable trends, and emerging color psychology research linking warm neutrals (2700-3000K lighting temperatures) to measurable cortisol reduction. The bathroom has evolved from a purely functional space into a sensory retreat where material authenticity trumps coordination.
2026 Design Logic: Why “Collected Imperfection” Replaced Spa Sterility
The industry’s pivot toward texture-forward walls represents a rejection of the Instagram-perfect aesthetic. Designers now embrace natural oxidation on metals, hand-applied plaster variations, and the deliberate irregularities of artisan tilework. This philosophy—rooted in Japanese wabi-sabi principles—creates depth through imperfection rather than flawlessness.
Sustainability plays a crucial role. High-quality materials like solid walnut, unlacquered brass, and lime plaster develop patinas that deepen with age, eliminating the need for replacement cycles. The result? Bathrooms that mature gracefully rather than date quickly.
Unlacquered Brass Sconce Choreography
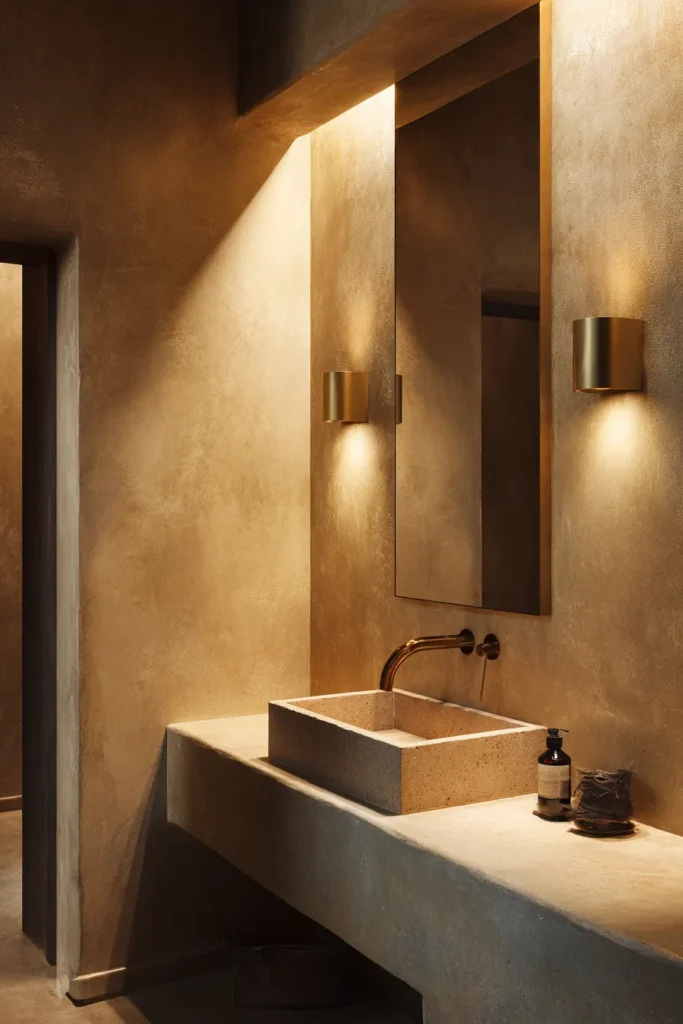
Brass without protective lacquer oxidizes naturally, creating a living finish that darkens from golden amber to rich bronze over 18-24 months. This transformation adds temporal depth impossible to achieve with static finishes.
The 2026 approach abandons symmetrical sconce placement in favor of asymmetrical compositions—one sconce flanking the mirror at eye level, another positioned lower to cast diagonal shadows across textured plaster. This technique, borrowed from gallery lighting design, creates visual tension that makes small powder rooms feel architecturally significant.
Designer’s Secret: Install sconces on dimmer switches rated specifically for LED compatibility (look for “ELV” electronic low voltage dimmers). Standard dimmers cause flickering at low levels, destroying the ambient atmosphere you’re creating. Pair 2700K bulbs with unlacquered brass—cooler temperatures (3000K+) read harsh against the warm metal undertones.
Design Breakdown:
- Fixture finish: Unlacquered brass with visible patina development
- Bulb specification: 2700K LED, 90+ CRI (Color Rendering Index) for accurate skin tones
- Installation pattern: Asymmetric placement with 18-24″ vertical offset between fixtures
- Pairing materials: Raw lime plaster or honed marble to contrast metal’s reflectivity
Best For: Design enthusiasts who appreciate evolving aesthetics and high-maintenance professionals seeking low-maintenance luxury that improves with time.
Recommended Product: Unlacquered brass wall sconces with adjustable arms for customizable light direction.
Raw Lime Plaster Feature Walls
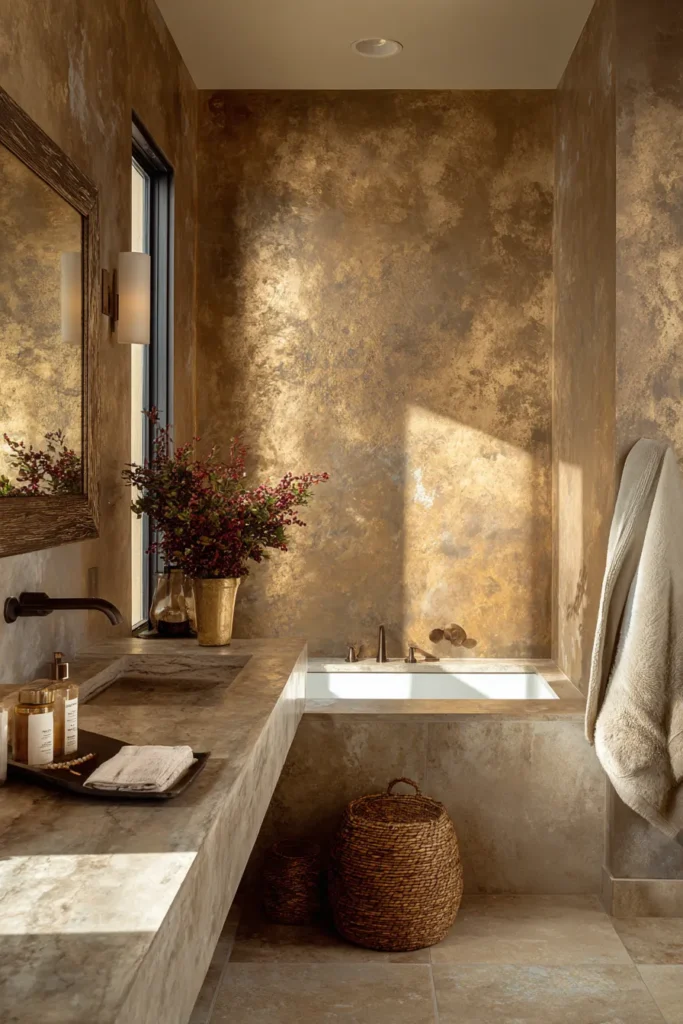
Tadelakt and Venetian plaster represent two distinct lime-based applications. Tadelakt—originally developed for Moroccan hammams—creates a waterproof, soap-like finish through olive soap burnishing. Venetian plaster achieves marble-like luminosity through layered application and polishing with steel trowels.
Both techniques produce micro-variations in texture and tone that shift throughout the day as natural light moves across the surface. This chromatic density—the subtle color gradients within a single “neutral” tone—creates visual interest without pattern or color.
Designer’s Secret: Apply lime plaster only in bathrooms with adequate ventilation. Without proper air exchange, the high alkalinity (pH 12+) releases moisture that can damage adjacent drywall or cause paint failure in connected rooms. Install it on moisture-rated backer board, never directly on drywall. The common mistake is treating it like regular paint—lime plaster requires 28 days to fully cure and carbonate.
Design Breakdown:
- Application zones: Wet walls (shower enclosures) require tadelakt; dry walls work with Venetian plaster
- Color selection: Pigment-added during mixing, not painted after—choose earth tones (ochre, umber, raw sienna) that deepen when wet
- Texture depth: 3-4mm application thickness for optimal light refraction
- Maintenance: Annual wax application for tadelakt; Venetian plaster needs no sealing
Best For: Minimalists seeking texture without pattern and homeowners investing in historically proven materials with 1000+ year track records.
Recommended Product: Venetian plaster kits with application tools and earth-pigment color concentrates.
Handmade Zellige Tile Installations
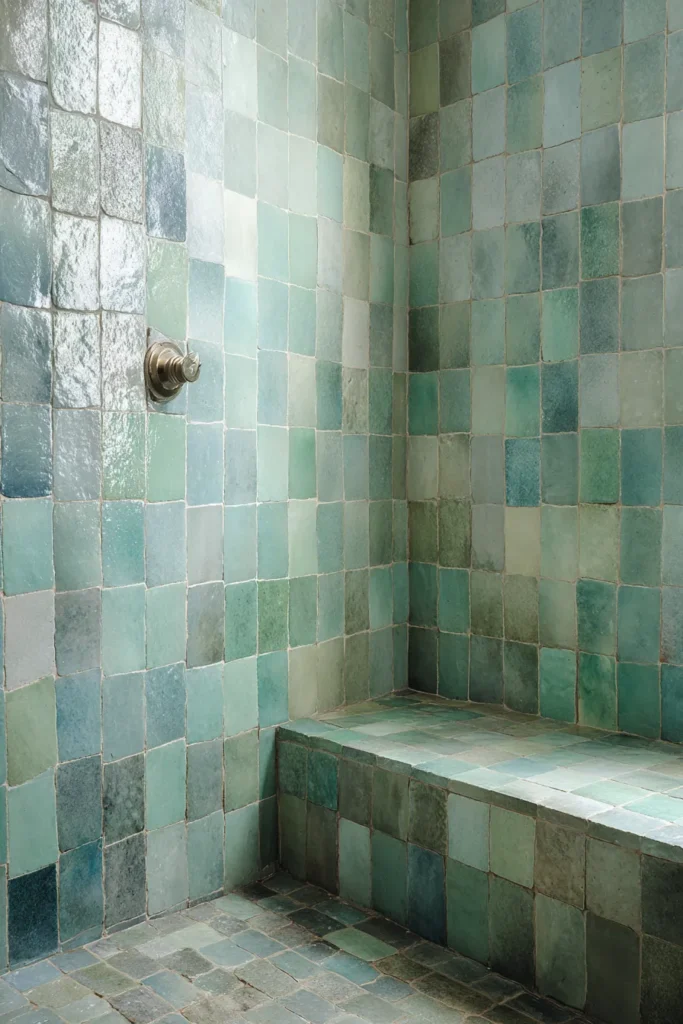
Zellige tiles—hand-cut Moroccan glazed terra cotta—exhibit intentional imperfections: glaze pooling, dimensional variation (±3mm), and color shifts within the same production batch. These “flaws” are the point. Mass-produced tiles achieve uniformity; zellige achieves humanity.
The 2026 approach uses zellige beyond traditional backsplashes, installing floor-to-ceiling in shower enclosures where water interaction reveals the glaze’s depth. Light refraction through the hand-applied glaze creates aquatic shimmer impossible with machine-made alternatives.
Designer’s Secret: Grout color temperature determines whether zellige reads traditional or contemporary. Bright white grout creates harsh contrast that fights the tiles’ organic nature. Instead, specify grout 2-3 shades darker than your lightest tile color—this allows the eye to read the installation as a cohesive surface rather than individual tiles. For powder blue zellige, use medium gray grout; for terracotta tones, choose warm taupe.
Design Breakdown:
- Tile dimension: Traditional 5×5cm or elongated 5×10cm for modern installations
- Grout joint: 3-4mm spacing (wider than standard) to accommodate size variation
- Color strategy: Monochromatic installations in single-color families (all warm whites, all sage greens) rather than multi-color mosaics
- Pattern: Stack bond (grid) or running bond; avoid complex patterns that compete with the glaze variation
Best For: Traditionalists seeking authenticity and design risk-takers who appreciate controlled chaos within structured grids.
Recommended Product: Zellige tile collections in curated color families with matching trim pieces.
Floating Walnut Shelving with Visible Joinery
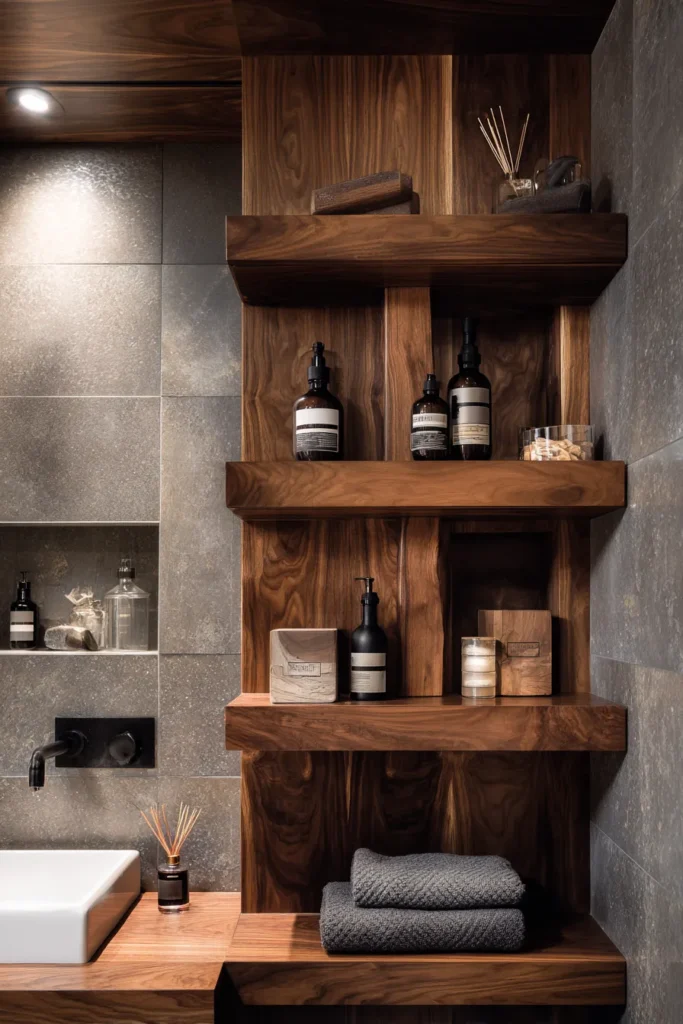
Solid walnut shelving—not veneered MDF—brings warmth through genuine material weight. The 2026 distinction lies in exposing the joinery: visible dovetails, through-tenons, or butterfly keys that celebrate craftsmanship rather than hiding it.
Book-matched grain patterns, where consecutive wood slabs mirror each other, create symmetry that grounds asymmetric shelf arrangements. Live edge shelving (preserving the tree’s natural edge) pairs with geometric bathroom fixtures to balance organic and architectural elements.
Designer’s Secret: Oil finishes (tung oil, Danish oil) enhance walnut’s natural depth and allow easy spot repair, but they offer minimal water protection. Hard wax oils—a hybrid finish popular in European cabinetry—provide better moisture resistance while maintaining the low-sheen aesthetic oil lovers prefer. Apply in thin coats with steel wool between layers for glass-smooth results. Standard polyurethane, despite its durability, creates a plastic appearance that deadens walnut’s three-dimensional grain figure.
Design Breakdown:
- Wood specification: Solid walnut, 1.5-2″ thickness for visual weight
- Grain orientation: Book-matched for formal bathrooms, live edge for organic aesthetics
- Finish system: Hard wax oil in matte or satin sheen
- Hardware: Concealed floating shelf brackets rated for 50+ lbs per linear foot
Best For: Craftsman enthusiasts and homeowners prioritizing natural materials with multi-generational longevity. For more ways to incorporate natural materials throughout your home, explore these bathroom decor strategies that emphasize organic textures.
Recommended Product: Floating walnut shelves with integrated mounting systems and oil-finished surfaces.
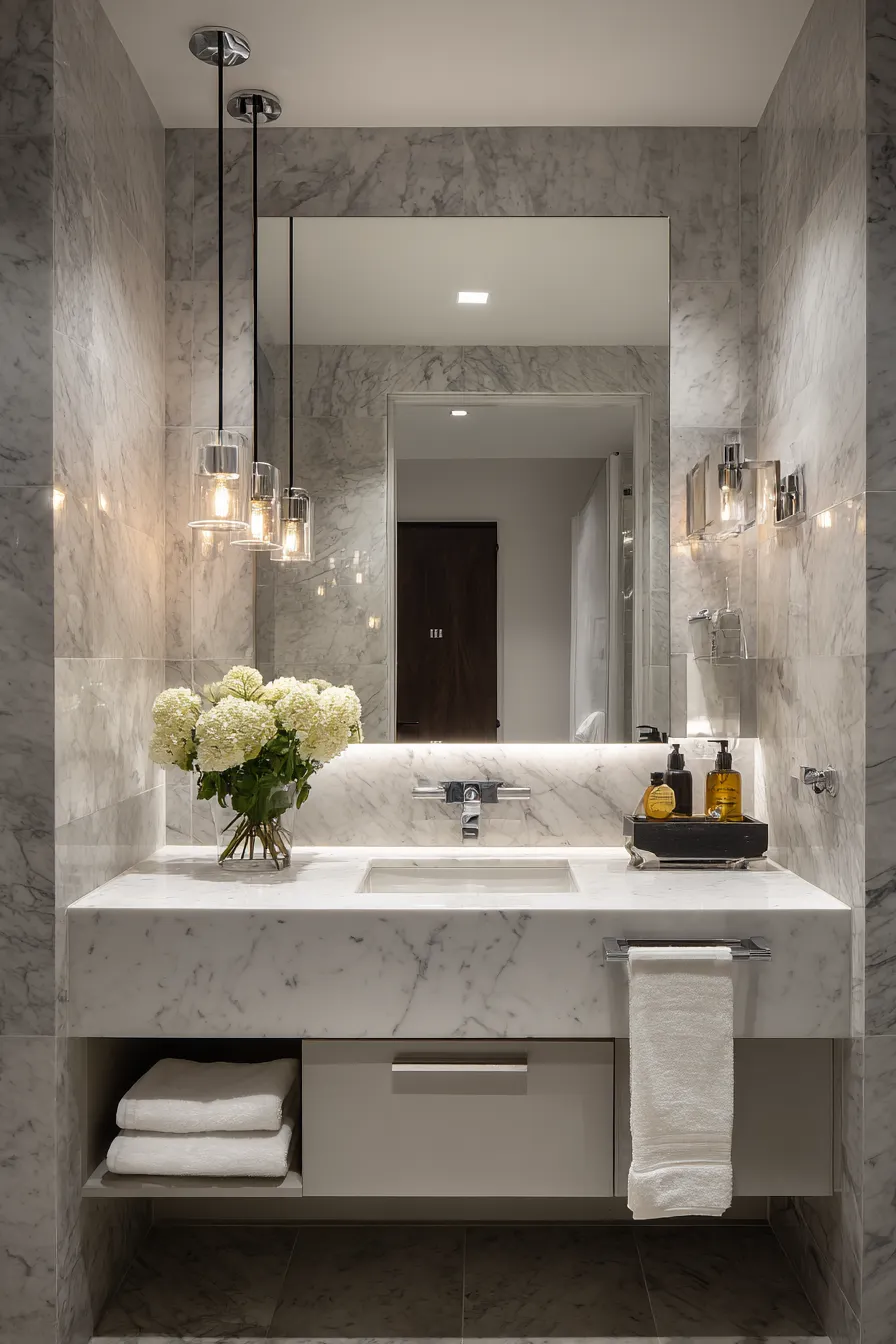
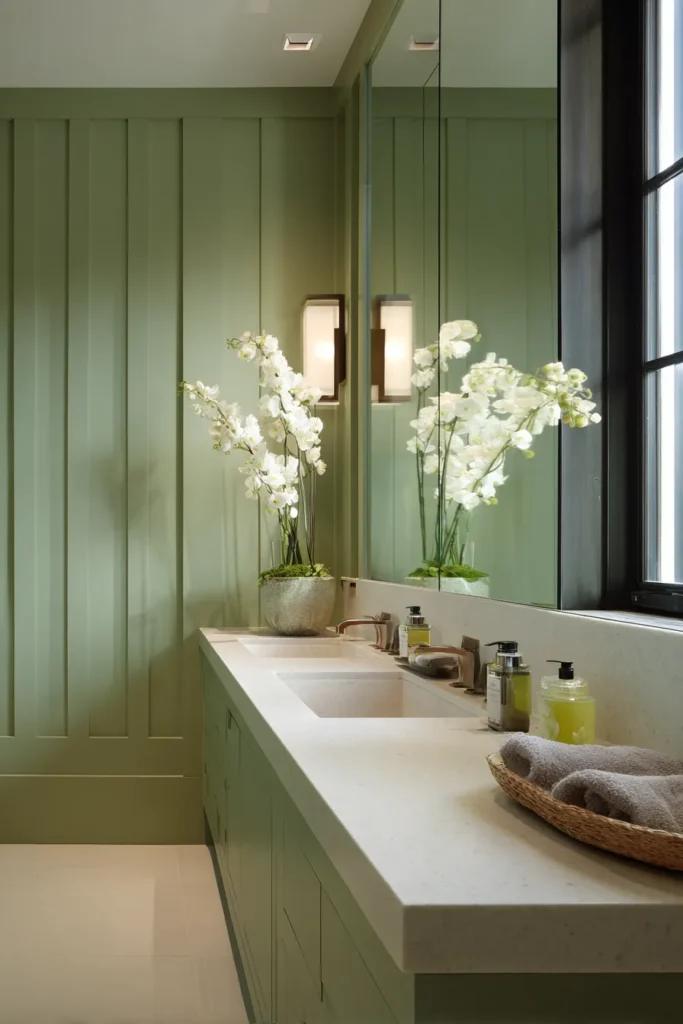
Oversized Frameless Mirrors with Beveled Edges

Light Reflectance Value (LRV) optimization transforms small bathrooms. Frameless mirrors installed floor-to-ceiling on narrow walls double perceived square footage by eliminating visual endpoints. The beveled edge—a 1″ angled perimeter cut—catches light and creates a subtle frame effect without adding material weight.
In 2026, designers specify mirrors 20-30% larger than conventional sizing. A 48″ wide vanity traditionally receives a 36″ mirror; the updated proportion calls for 54-60″ width extending beyond the vanity edges to amplify the spatial expansion effect.
Designer’s Secret: Backlit mirrors with 3000K LED strips create ambient glow, but front-lighting remains superior for grooming tasks. The professional approach layers both: perimeter backlighting for atmosphere plus adjustable sconces positioned 60-66″ from the floor (eye level for most users) at 75° angles to minimize facial shadows. Color Rendering Index (CRI) matters more than brightness—specify 95+ CRI bulbs to render skin tones accurately, eliminating the sallow appearance of standard 80 CRI LEDs.
Design Breakdown:
- Mirror sizing: 120-150% of vanity width for maximum spatial impact
- Edge treatment: 1″ bevel cut at 5° angle
- Installation: Float mirror 1/4″ off wall with polished chrome standoffs for shadow line
- Lighting integration: Dual-circuit system with dimmable backlighting (2700K) and task sconces (3000K, 95+ CRI)
Best For: Urban dwellers maximizing small bathrooms and anyone seeking professional-grade grooming illumination. Pair with strategic lighting from dimmable wall sconces for layered illumination.
Recommended Product: Beveled frameless mirrors with optional integrated LED backlighting systems.
Textile Wall Hangings (Museum-Quality)
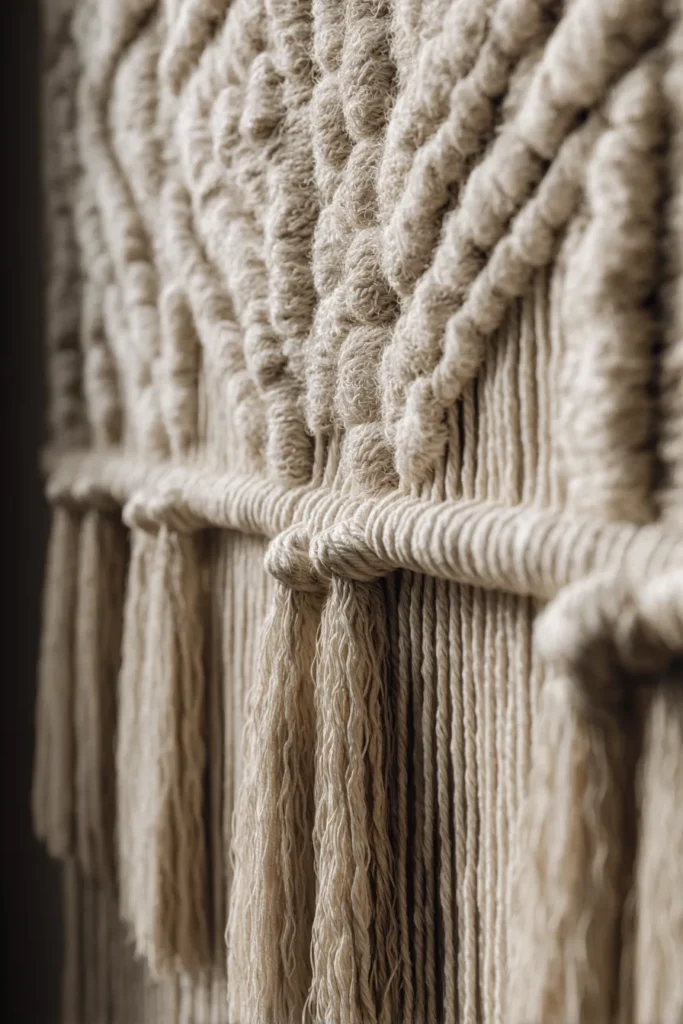
Fiber art in bathrooms contradicts conventional wisdom, but museum-grade textiles—when properly selected—thrive in controlled humidity. The key lies in fiber content: wool, linen, and cotton blends naturally resist mildew, while synthetic fibers trap moisture.
Commission or source wall hangings specifically rated for 40-60% humidity environments. Macramé, woven tapestries, and framed textile fragments add acoustic dampening (reducing echo in hard-surfaced bathrooms) while introducing sculptural shadows impossible with flat art.
Designer’s Secret: Rotate textile displays seasonally to prevent single-location moisture exposure. Store off-season pieces in acid-free tissue within breathable cotton bags—never plastic, which traps humidity. The rotation strategy extends textile life indefinitely while refreshing your bathroom’s aesthetic quarterly. Install textiles on walls opposite showers or tubs, never in direct splash zones, and ensure bathroom exhaust fans run 20 minutes post-shower to maintain the 40-60% humidity sweet spot.
Design Breakdown:
- Fiber content: Natural fibers (wool, linen, cotton) with inherent antimicrobial properties
- Size: Minimum 24×36″ to register as architectural elements rather than accessories
- Installation: Museum-quality hanging systems with UV-protective acrylic for framed pieces
- Humidity management: Dedicated exhaust fan sized at 1 CFM per square foot of bathroom space
Best For: Art collectors seeking non-traditional display spaces and bohemian aesthetics valuing texture over hard surfaces.
Recommended Product: Museum-quality fiber art specifically designed for high-humidity environments.
Architectural Molding Layering
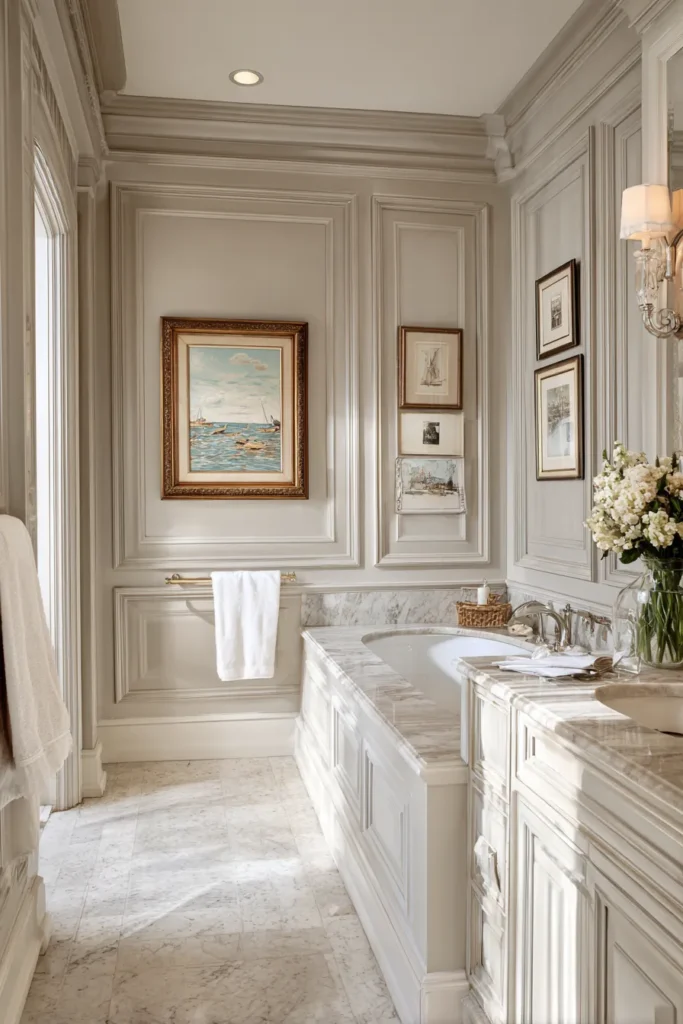
Chair rail and picture rail combinations create horizontal lines that alter perceived room proportions—lowering visual ceiling height in tall bathrooms or adding architectural interest to builder-grade boxes.
The contemporary approach layers moldings in unexpected ways: chair rail at 48″ (higher than traditional 32-36″) paired with picture rail at 72″, creating three distinct wall zones. Paint these zones in tonal variations—the same color family in different sheens (matte below chair rail, eggshell between rails, semi-gloss above) for subtle depth.
Designer’s Secret: Paint sheen differential creates more visual interest than color changes while maintaining design cohesion. Matte absorbs light, reading soft and recessive; eggshell reflects moderately; semi-gloss bounces light, appearing to advance forward. This three-sheen approach on a single wall color creates dimensional depth that monochromatic sheen cannot achieve. The common mistake is using glossy paint everywhere “for moisture resistance”—modern acrylic paints in eggshell sheen handle bathroom humidity perfectly while avoiding the clinical appearance of high-gloss surfaces.
Design Breakdown:
- Molding profile: Simple, squared profiles (contemporary) vs. ornate traditional designs
- Height placement: Chair rail at 48″, picture rail at 72″ for 8′ ceilings
- Paint strategy: Single color in three sheens (matte/eggshell/semi-gloss) by zone
- Material: Primed MDF for paint-grade applications; solid wood for stain-grade
Best For: Traditional home enthusiasts and anyone adding architectural character to featureless new construction.
Stone Slab Accent Walls
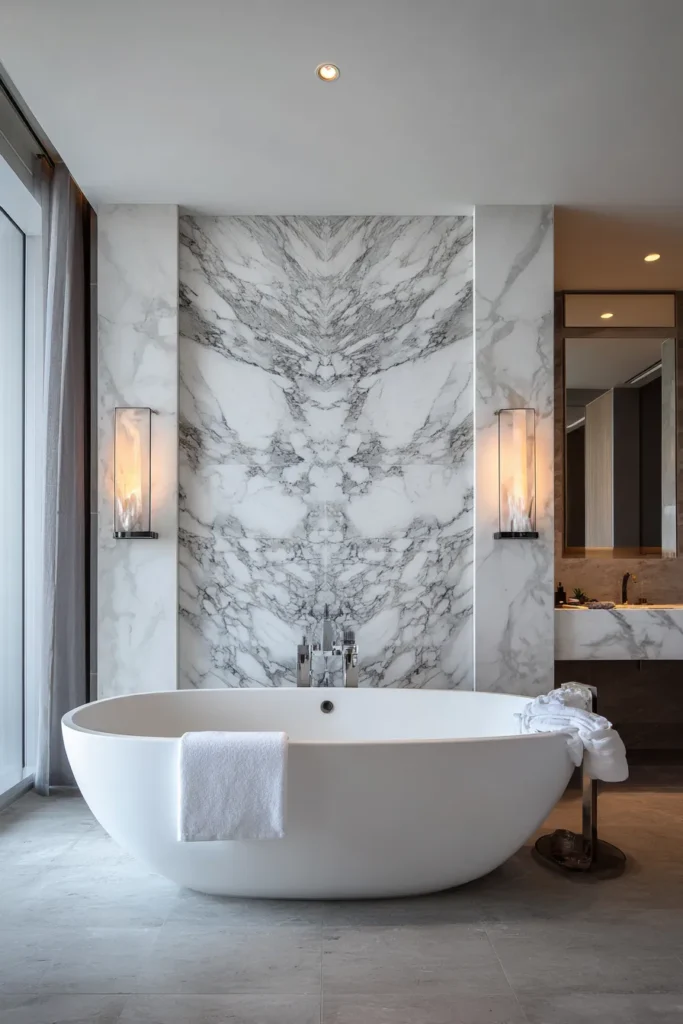
Book-matched marble or quartzite—where adjacent slabs from the same block mirror each other—creates symmetrical drama behind freestanding tubs or vanities. This technique, borrowed from high-end hotel design, transforms utilitarian stone into fine art.
Finish selection determines the stone’s personality. Polished surfaces reflect light, reading formal and luxurious. Honed (matte) finishes absorb light, appearing organic and calm. Leathered finishes—a textured surface created by diamond-tipped brushes—offer slip resistance and hide water spots while maintaining color depth.
Designer’s Warning: Common Mistake: Installing polished marble in shower floors. The wet surface becomes dangerously slippery regardless of texture. Always specify honed or leathered finishes for any horizontal wet surface. Reserve polished stone for vertical applications where its light-reflective properties maximize beauty without safety compromise.
Designer’s Secret: Stone slab installations require waterproofing membranes even on “dry” walls. Natural stone is porous—water migrates through, causing efflorescence (white mineral deposits) or damaging the wall structure behind. Install a topical sealer plus a sheet-applied waterproofing membrane between the stone and substrate. This double-barrier system costs more upfront but prevents the catastrophic failure I’ve witnessed on dozens of “budget” installations.
Design Breakdown:
- Slab selection: Book-matched pairs with dramatic veining for focal walls
- Finish options: Polished for vertical dry walls, honed for wet areas, leathered for contemporary aesthetics
- Installation: Full-height (floor to ceiling) for maximum impact
- Waterproofing: Dual system with membrane and topical sealer
Best For: Luxury seekers investing in permanent materials and design purists who appreciate stone’s geological storytelling. Similar stone applications work beautifully in bathroom shower ideas for creating cohesive wet zones.
Recommended Product: Stone slab remnants from premium quarries, often available at fraction cost for small bathroom installations.
Custom Millwork Paneling Systems
Vertical grain orientation (V-groove paneling) draws the eye upward, increasing perceived ceiling height. Horizontal orientation (shiplap) expands narrow bathrooms visually. Shadow gap detailing—a recessed channel where panels meet ceiling or floor—creates floating panel effects that read as custom joinery rather than material application.
The 2026 distinction lies in panel depth variation. Instead of flat wall coverage, install panels at varying depths (1/4″, 1/2″, 1″ reliefs) to create architectural topography that captures light differently throughout the day.
Designer’s Secret: Pre-finish panels before installation—not after. Factory-applied finish (whether paint or stain) achieves uniform coverage impossible with brush-applied finishes on installed panels. The seams between panels create shadowed recesses where brush bristles can’t reach, resulting in visible finish gaps. Professional installers finish all sides of each panel, then touch up nail holes post-installation for flawless results. This approach costs 20-30% more in labor but delivers the high-end appearance that separates designer work from DIY attempts.
Design Breakdown:
- Grain direction: Vertical for height emphasis, horizontal for width expansion
- Panel depth: Multi-plane installation (varying relief depths) for dimensional interest
- Shadow gap: 1/2″ recess at ceiling and floor intersections
- Finish: Pre-applied factory finish in custom color match
Best For: Homeowners seeking permanent architectural upgrades and those renovating builder-grade bathrooms into custom spaces.
Recommended Product: Custom millwork panels in engineered wood with moisture-resistant cores.
Vintage Apothecary Ladder Displays
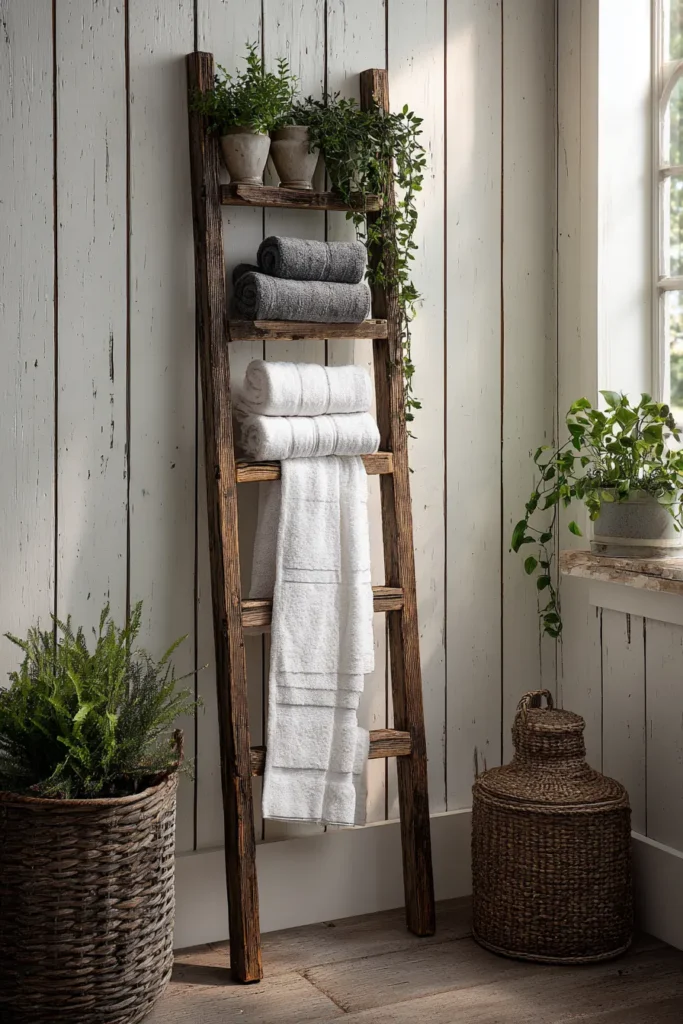
Salvaged or reproduction wood ladders lean against walls, providing sculptural towel storage that reads decorative rather than utilitarian. The intentional imperfection—weathered paint, irregular rung spacing, visible wood grain—brings collected authenticity to new construction bathrooms lacking patina.
Function meets form: lower rungs hold rolled towels (spa-style presentation), middle rungs drape hand towels for easy access, upper rungs display decorative textiles or hang plants in ceramic containers.
Designer’s Secret: Wood species matters for humidity resistance. Oak and teak contain natural oils that repel moisture; pine and poplar absorb humidity, leading to warping or mildew. If you’re drawn to a pine ladder for its aesthetic, seal it with marine-grade spar urethane (the same finish used on boat decks) rather than standard polyurethane. Spar urethane contains UV blockers and remains flexible as wood expands/contracts with humidity changes—standard poly cracks under these conditions. Apply three coats with 24-hour cure time between layers.
Design Breakdown:
- Material: Moisture-resistant hardwoods (oak, teak) or sealed softwoods
- Height: 6-7′ for standard 8′ ceilings
- Finish: Natural wood tones, whitewashed, or distressed paint
- Staging: Towels rolled and stacked (lower rungs), plants or decorative objects (upper rungs)
Best For: Farmhouse and cottage aesthetics, small bathrooms needing vertical storage, and collectors appreciating vintage industrial design. Complement with natural textures from stonewashed linen towels for authentic layered styling.
Recommended Product: Vintage-style apothecary ladders in reclaimed wood with varying patina levels.
Plaster Crown Molding with Indirect Lighting
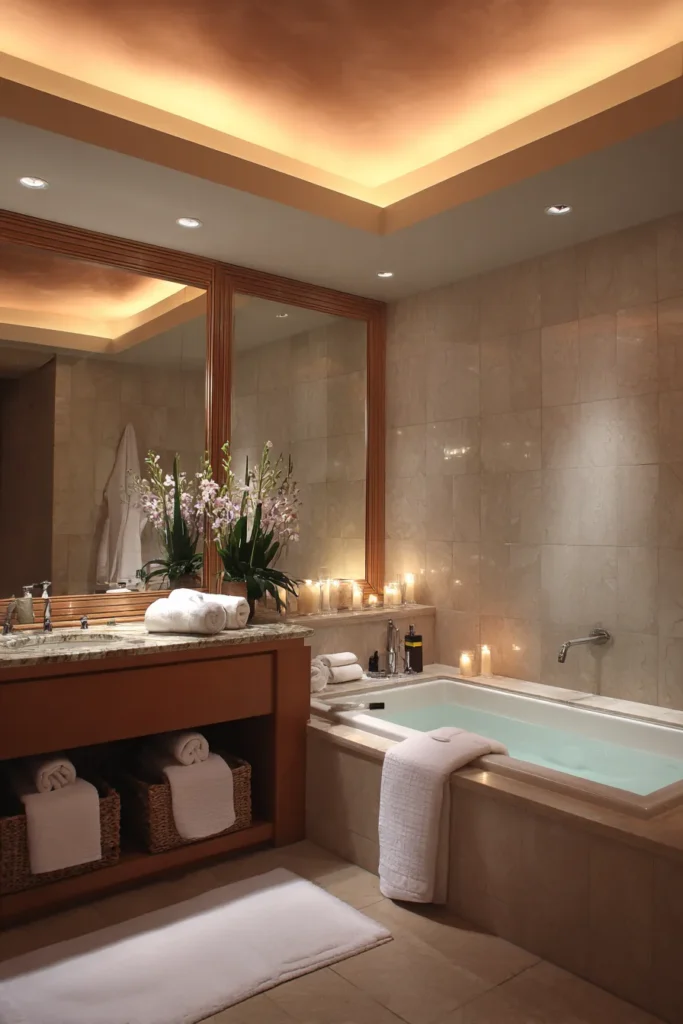
Cove lighting—LED strips concealed in crown molding—casts indirect illumination upward, washing ceilings with ambient glow while eliminating harsh overhead fixtures. This technique, standard in luxury hospitality, creates relaxation-inducing environments through shadow elimination.
Color temperature selection profoundly affects atmosphere. 2700K produces warm amber light (candlelight equivalent) perfect for evening baths. 3000K offers neutral white for morning routines. Tunable white LEDs allow adjustment throughout the day, supporting circadian rhythm alignment.
Designer’s Secret: Cove depth determines light quality. Shallow coves (3-4″ from ceiling) create narrow light wash with visible LED hotspots. Professional installations use 8-10″ cove depth, allowing light to diffuse before reaching the ceiling. This deeper recession also conceals LED strips completely from any viewing angle—you see the effect, never the source. Install aluminum channels with frosted diffusers rather than bare LED strips; the diffusion eliminates the dotted appearance of individual diodes.
Design Breakdown:
- Crown molding: Minimum 6″ face height to accommodate lighting channel
- Cove depth: 8-10″ from ceiling plane for optimal diffusion
- LED specification: 2700-3000K, dimmable, with frosted diffuser channels
- Control: Dimmer switches or smart home integration for scene programming
Best For: Wellness-focused individuals using lighting to regulate mood and anyone eliminating harsh overhead lighting in favor of layered ambient sources.
Recommended Product: 2700K LED strip lighting with dimmable drivers and aluminum mounting channels.
Living Moss Wall Panels (Preserved)
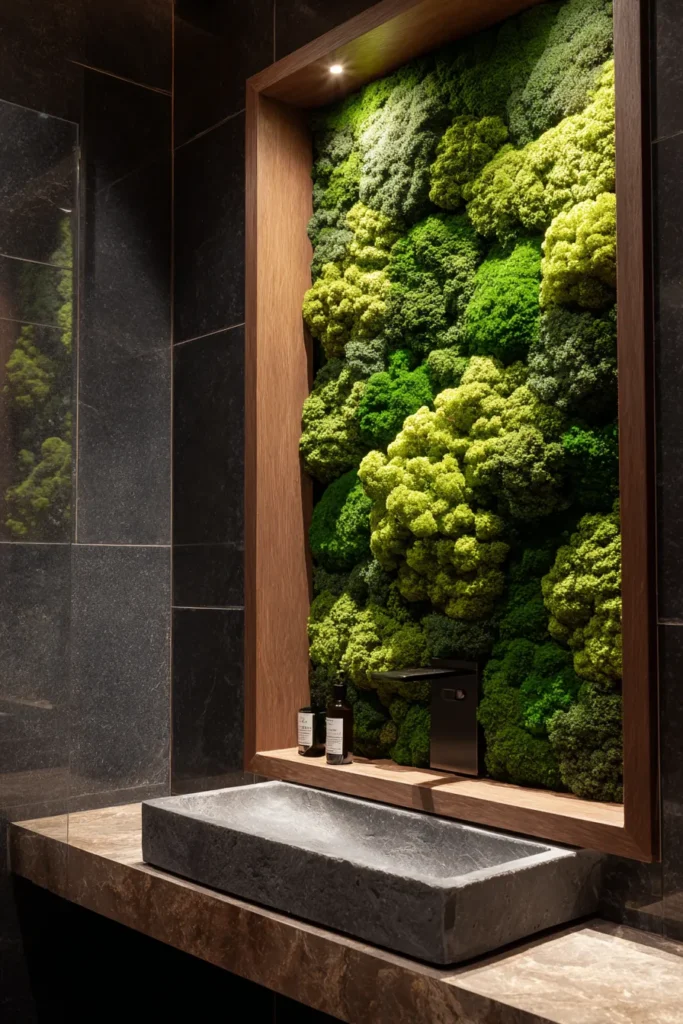
Preserved moss—real moss treated with glycerin to halt growth while maintaining texture—requires zero irrigation, zero sunlight, and zero maintenance. These panels bring biophilic design (nature connection) into bathrooms without the complications of living plants.
Reindeer moss (Cladonia rangiferina) offers loose, organic texture perfect for contemporary installations. Sheet moss (Hypnum) creates carpet-like density suited to traditional frames. Mix both types for dimensional contrast within a single installation.
Designer’s Secret: Frame depth creates shadow play that makes moss installations read three-dimensional rather than flat wall art. Specify frames with 2-3″ depth, allowing moss to cluster naturally with front-to-back variation. The common mistake is pressing moss flat against backing boards—this destroys the natural branching structure that makes moss visually interesting. Professional installers allow moss to maintain its organic height variation, securing it at the base while letting upper portions float freely. This creates dynamic shadows as light direction changes.
Design Breakdown:
- Moss type: Reindeer moss for texture, sheet moss for coverage, or mixed composition
- Frame specification: 2-3″ deep shadow box frames in natural wood or matte black
- Size: Minimum 18×24″ to register as architectural features
- Placement: Dry walls only—never in direct shower spray zones
Best For: Plant enthusiasts in windowless bathrooms, allergy sufferers avoiding living plants, and minimalists seeking low-maintenance nature integration. Pair with additional greenery from ceramic wall planters for layered botanical displays.
Recommended Product: Preserved moss wall panels in custom color-dyed options and natural green tones.
Minimalist Ceramic Wall Planters

Wall-mounted planters save precious counter space while bringing living greenery to eye level where its air-purifying benefits maximize. The 2026 approach favors ceramic over plastic—not just for aesthetics, but for root health. Ceramic breathes, preventing the waterlogged soil conditions that kill most bathroom plants.
Drainage vs. non-drainage design determines plant selection. Drainage-equipped planters accommodate traditional houseplants but require saucer attachments or careful watering. Non-drainage planters work perfectly for epiphytic plants (air plants, orchids, certain ferns) accustomed to intermittent moisture.
Designer’s Secret: Low-light bathroom plants thrive under specific conditions most designers overlook. Install planters within 3-5 feet of windows (even frosted glass transmits adequate light for most species). For truly windowless bathrooms, use grow light bulbs in nearby sconces—full-spectrum 5000K bulbs provide the blue light wavelengths plants require for photosynthesis. Standard warm white bulbs (2700K) look beautiful but offer insufficient blue spectrum for sustained plant health. The solution: alternate between decorative 2700K bulbs for ambiance and 5000K grow bulbs during daytime hours using smart bulbs programmed via app.
Design Breakdown:
- Material: Glazed ceramic with breathing properties
- Drainage: Match to plant type—drainage for soil-based plants, sealed for epiphytes
- Installation: Wall-mounted brackets at 48-60″ height (eye level)
- Plant selection: Pothos, philodendron, ferns for drainage planters; air plants, orchids for sealed vessels
Best For: Urban gardeners with limited floor space and air quality conscious homeowners leveraging plants’ natural filtration. Source appropriate plants from low-light bathroom plants specially cultivated for interior conditions.
Recommended Product: Ceramic wall planters in minimal geometric forms with integrated mounting hardware.
Black Steel Grid Shelving
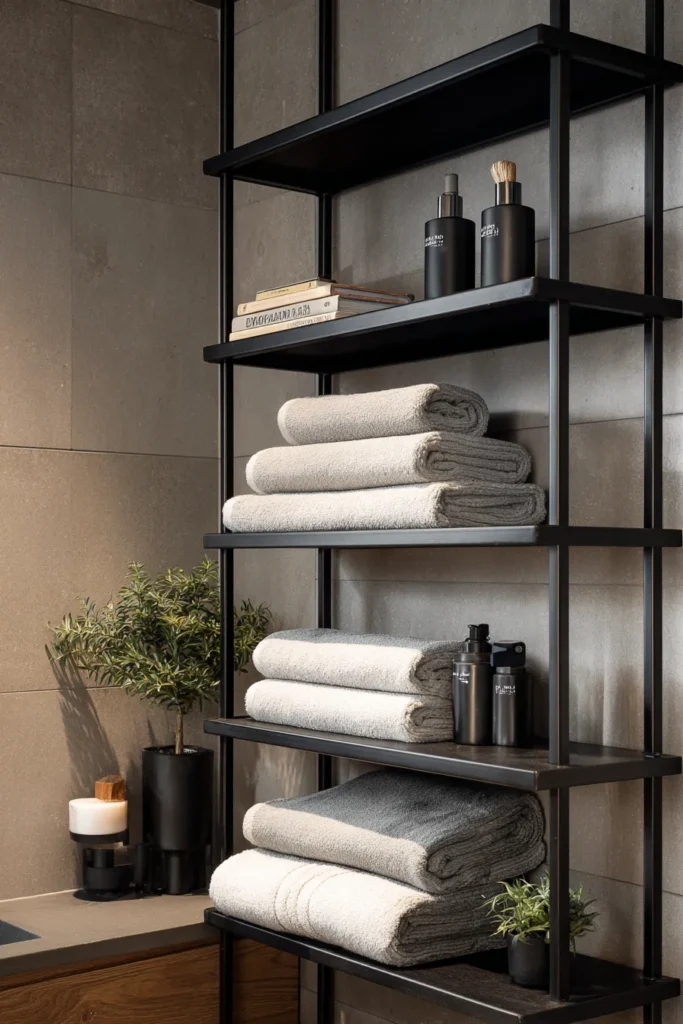
Industrial grid systems—welded steel frameworks with adjustable shelf positioning—bring commercial design language into residential bathrooms. The negative space (open grid structure) prevents visual heaviness while providing functional storage.
Finish selection determines longevity. Powder-coated steel offers color permanence and scratch resistance. Waxed steel develops natural patina (similar to unlacquered brass) creating evolving character. Raw steel requires maintenance (periodic oil application) but achieves authentic industrial aesthetic.
Designer’s Secret: The 70-20-10 ratio governs shelf loading for optimal visual balance. Leave 70% of grid space empty (negative space is the design element), populate 20% with functional items (towels, toiletries), accent the remaining 10% with decorative objects (plants, candles, small art). Overstuffed grids lose their architectural clarity, reading as cluttered storage rather than intentional design. I’ve seen countless installations fail because homeowners can’t resist filling every available surface—discipline in restraint separates professional styling from amateur accessorizing.
Design Breakdown:
- Frame material: Welded steel in 1/2″ or 3/4″ rod diameter
- Finish options: Powder-coated (matte black, white), waxed natural steel, or raw steel
- Configuration: Modular systems allowing custom sizing and shelf positioning
- Negative space ratio: 70% empty, 20% functional, 10% decorative
Best For: Industrial and modern aesthetics, renters using wall-mounted systems instead of built-ins, and organizational enthusiasts appreciating visible storage systems.
Recommended Product: Black steel grid systems with adjustable shelving and modular expansion options.
Artisan Wallcoverings (Grasscloth/Cork)
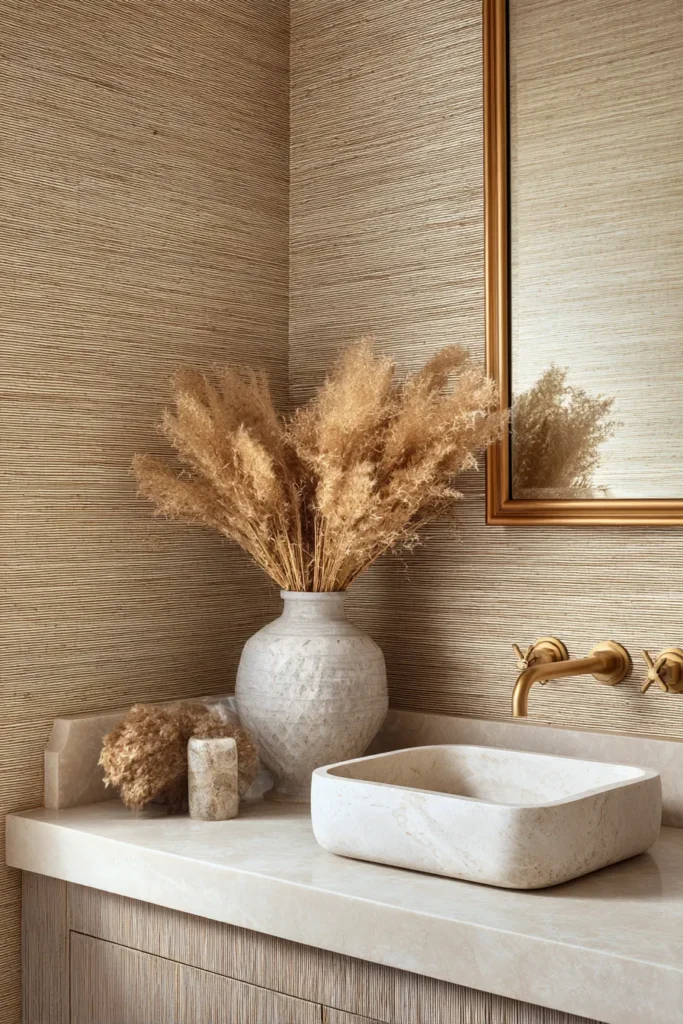
Natural wallcoverings bring three-dimensional texture impossible with paint or printed wallpapers. Grasscloth—woven natural grasses adhered to paper backing—creates horizontal grain patterns with inherent color variation. Cork wallcoverings offer acoustic dampening plus natural antimicrobial properties.
Both materials require professional installation. Their textured surfaces show seam imperfections dramatically, making DIY attempts visually obvious. The investment in professional application ensures seams align with room corners or architectural breaks, rendering them invisible.
Designer’s Secret: Moisture barriers save grasscloth installations in bathrooms. Natural fibers absorb humidity, leading to warping or mildew without proper protection. Install breathable vapor barriers (not plastic sheeting) on walls before grasscloth application—these barriers allow wall structure to dry toward the interior while blocking moisture from reaching the grasscloth backing. Alternatively, specify acrylic-coated grasscloth designed specifically for high-humidity environments. Standard grasscloth belongs in powder rooms or far from shower zones; treated versions handle full bathrooms confidently.
Seam placement strategy separates amateur from professional installations. Plan seams to fall in shadow lines (behind doors, in corners, beneath wall sconces) where texture breaks disappear. Never place seams in high-visibility center wall positions where natural light emphasizes inconsistencies.
Design Breakdown:
- Material: Natural grasscloth or cork with moisture-appropriate backing systems
- Color: Earth tones emphasize natural texture; dyed versions offer color with maintained texture
- Installation zones: Full walls in powder rooms, accent walls (away from wet zones) in full bathrooms
- Seam strategy: Corner and shadow line placement for invisible transitions
Best For: Texture enthusiasts and acoustically sensitive individuals appreciating sound-dampening natural materials. For additional texture inspiration throughout your home, explore these wall art for living room ideas that emphasize dimensional surfaces.
Recommended Product: Grasscloth wallpaper in moisture-resistant formulations with professional installation guides.
Mixed Metal Hardware Compositions
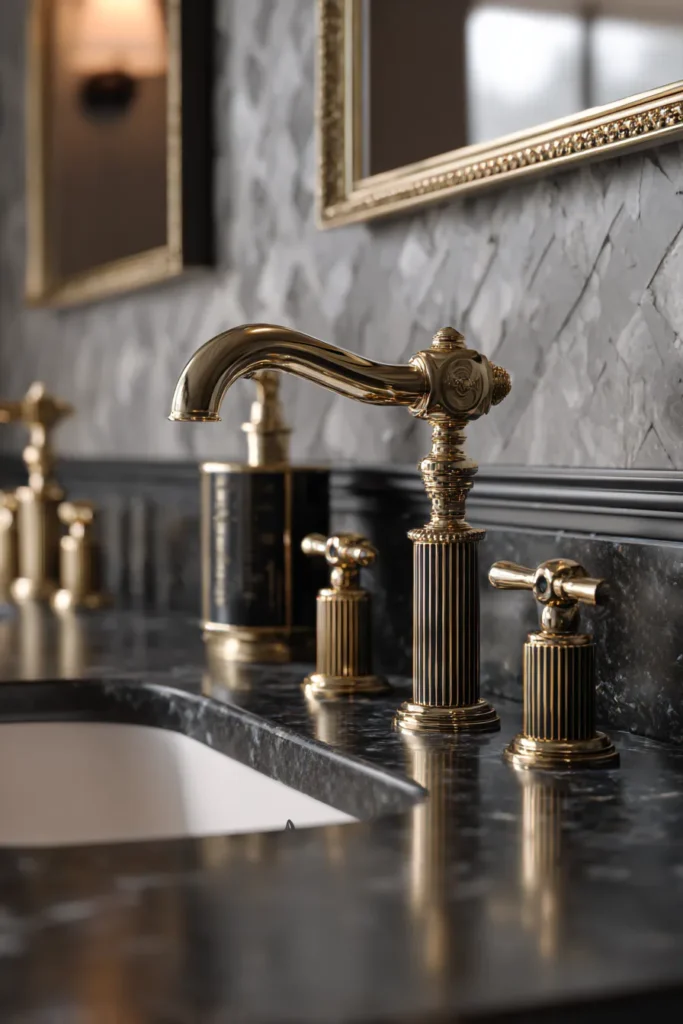
The 2026 approach to bathroom metals abandons “everything must match” dogma in favor of intentional mixing. The 70-20-10 metal ratio provides structure: 70% primary metal (unlacquered brass faucets, drawer pulls), 20% secondary metal (matte black mirror frame, towel bars), 10% accent metal (polished nickel cabinet knobs).
Finish compatibility depends on undertones. Warm metals (brass, copper, bronze) harmonize together. Cool metals (chrome, nickel, stainless) create cohesive groupings. Mixing warm and cool works when one clearly dominates—70% warm brass with 20% cool matte black accents reads intentional; 50-50 splits appear indecisive.
Designer’s Secret: Hardware weight determines whether mixing reads intentional or accidental. When combining metals, ensure the dominant 70% metal appears in the largest hardware pieces (faucets, substantial drawer pulls, towel bars). Reserve the secondary 20% metal for medium-scale elements (mirror frames, shelf brackets). Use the accent 10% metal only in small details (cabinet knobs, hooks). This creates a visual hierarchy where size and frequency work together—large dominant elements appear repeatedly, medium secondary elements appear occasionally, small accent elements appear sparingly.
The common mistake: using three different metals on three same-sized elements (faucet, mirror, and towel bar all equal visual weight). This creates competition rather than composition. Successful mixing requires deliberate hierarchy.
Design Breakdown:
- Primary metal (70%): Largest hardware pieces in room’s dominant finish
- Secondary metal (20%): Medium elements providing contrast
- Accent metal (10%): Small details adding complexity
- Undertone matching: Keep warm metals together or cool metals together unless deliberately contrasting
Best For: Eclectic designers avoiding matchy-matchy aesthetics and sophisticated spaces balancing multiple design eras. Coordinate with statement pieces like [vintage brass mirrors](https://amzn.to/3Zc Sjuj) as focal points anchoring metal mixing strategies.
Recommended Product: Brass shelf brackets, hand-forged iron towel hooks, and smart lighting systems for layering multiple metal finishes with functional purpose.
Creating Your Material Story
These sixteen approaches share a common thread: material authenticity over surface decoration. Whether through unlacquered metals that oxidize naturally, plasters that carbonate over weeks, or woods that deepen with age, 2026’s bathroom walls prioritize materials that mature rather than deteriorate.
The shift from perfection to patina represents more than aesthetic preference—it’s a rejection of disposable design culture. Bathrooms constructed with heirloom-quality materials develop character through use, becoming more valuable over time rather than outdated.
Your bathroom walls hold potential beyond paint color selection. They can showcase natural materials’ three-dimensional textures, demonstrate craftsmanship through visible joinery, or harness light through strategic plaster application. The question isn’t which trend to follow, but which materials authentically express how you want to experience this daily ritual space.
Start with one wall. Install unlacquered brass sconces to begin understanding how living finishes evolve, or commission a single lime plaster feature wall to appreciate material depth. These aren’t decorating decisions—they’re investments in permanent architectural character that transcends trend cycles.
For complementary approaches to creating cohesive luxury spaces, explore these luxury bathroom ideas that extend these material principles throughout your entire bathroom design. When ready to expand your vision beyond walls, consider how bathroom vanity ideas and bathroom storage solutions can integrate with your chosen wall treatments for seamless design continuity.
The bathroom has evolved from purely functional to deeply personal—a space where material choices communicate values, where imperfection signals authenticity, and where walls tell stories of craftsmanship, time, and intentional living.


