Three years ago, I stood in my friend Rachel’s brand-new kitchen and watched her nearly cry while trying to find a mixing bowl. She’d spent $47,000 on a renovation that looked stunning in photos but was an absolute disaster to actually cook in. The gorgeous open shelving collected cooking grease within weeks. Those trendy marble countertops showed water stains from her coffee maker. The massive farmhouse sink looked beautiful but splashed water everywhere, soaking her clothes daily.
That kitchen taught me everything about what modern kitchen design shouldn’t be. After twelve years of working in homes and making plenty of my own expensive mistakes, I’ve figured out what actually matters when creating a kitchen that’s both beautiful and genuinely functional.
Real modern kitchen ideas aren’t about copying Pinterest boards or following every design trend. They’re about understanding how you actually use your kitchen—not some aspirational version of yourself who meal preps every Sunday and hand-washes delicate glassware. Whether you cook elaborate weekend dinners or need quick weeknight solutions, thoughtful design changes how you experience your space every single day.
What You’ll Learn in This Guide
I’m sharing 10 modern kitchen ideas that I’ve either implemented myself or helped others execute successfully. You’ll get actual costs from late 2024, realistic timelines, specific product recommendations, and honest assessments about what works and what doesn’t. I’ll tell you about my failures too—like the $340 I wasted on cabinet hardware that looked amazing online but felt cheap in person, or the backsplash tile I chose that showed every fingerprint.
These aren’t theoretical ideas from someone who’s never renovated a kitchen. Every recommendation comes from real experience, including the mistakes that cost me time and money. If you’re working with a budget (and who isn’t?), you’ll find practical alternatives that deliver similar impact without the premium price tag.
By the end, you’ll know exactly which modern kitchen upgrades provide the best return on your investment, both financially and in daily quality of life improvements.
1. Hidden Appliance Garage with Charging Station ($280-$450 DIY or $800-$1,200 Professional)
Your countertops shouldn’t look like a small appliance convention. I learned this the hard way in my first kitchen, where my coffee maker, toaster, blender, and stand mixer created permanent visual clutter that made the entire space feel chaotic.
Appliance garages solve this instantly. These dedicated cabinets hide your daily-use appliances while keeping them plugged in and ready to use. I installed my first one in 2019 and it remains one of my favorite kitchen upgrades.
How to Create Your Appliance Garage
The key is building a cabinet deep enough for your largest appliances (typically 18-24 inches) with a door that completely disappears when opened. You have three main options:
Roll-up tambour doors ($180-$250 from Rockler or Woodcraft) look sleek and save space but can jam if not installed perfectly. I tried one in 2020 and fought with it for six months before switching to a simple lift-up door.
Lift-up doors with soft-close hardware ($80-$120 from Rev-A-Shelf) are my current favorite. They stay open while you use appliances and close smoothly without slamming. Install gas lift supports (around $40 per pair) so the door stays up without propping.
Sliding pocket doors ($200-$300 for quality hardware) work beautifully but require more cabinet depth since the door slides back into the cabinet sides.
Inside your appliance garage, install a power strip with 6-8 outlets plus USB ports ($25-$40 from Amazon—I use the Anker model with surge protection). Add LED strip lighting ($15-$22) so you can see everything clearly. If you’re handy, this entire project costs $280-$450 in materials and takes a weekend. Professional installation runs $800-$1,200 depending on your location.
My Biggest Mistake: I initially made my appliance garage only 16 inches deep, which worked for my toaster but not my KitchenAid mixer. I had to rebuild it six months later. Measure your tallest and deepest appliances before building anything.
The visual impact is immediate. Your kitchen instantly feels more spacious and organized, and you’ll never unplug appliances after each use again.
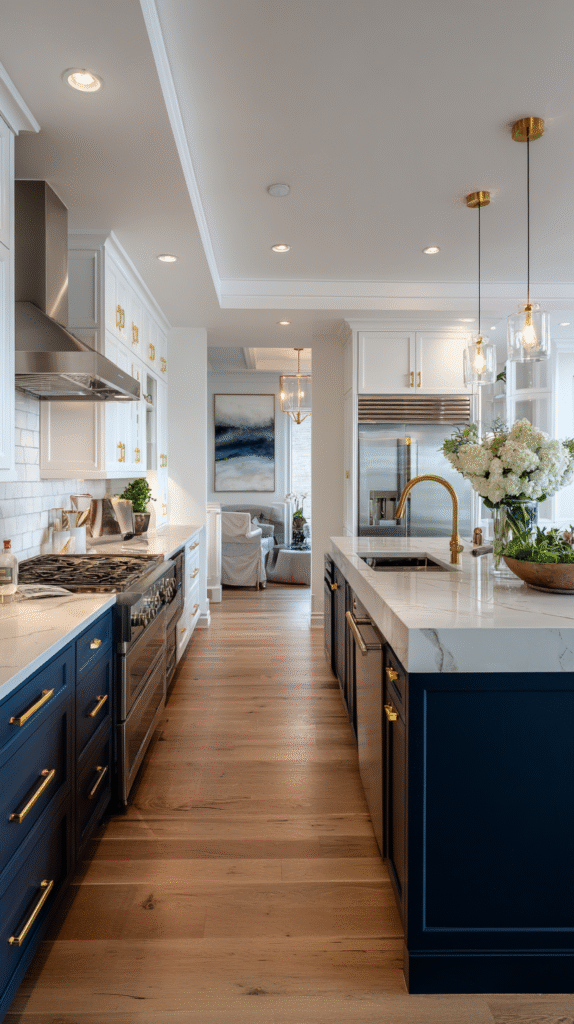
2. Statement Waterfall Island Counter ($3,200-$8,500 Installed)
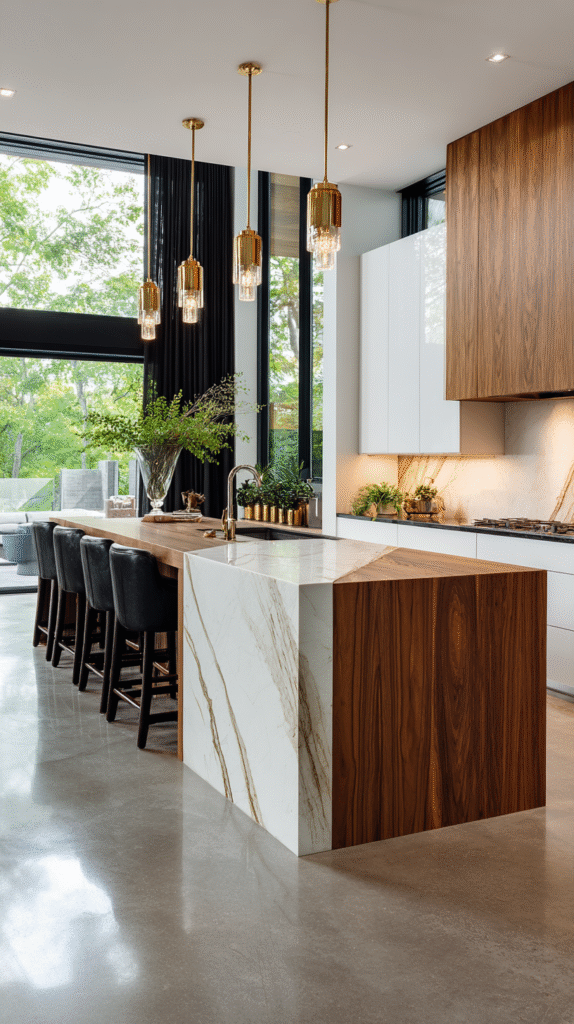
Waterfall islands are the single most impactful upgrade you can make to a modern kitchen. That continuous surface flowing down the sides creates instant luxury that rivals kitchens three times the price.
I installed a waterfall island in my kitchen renovation last year and it completely transformed the space. Guests always comment on it, and the practical benefits exceed the aesthetic ones.
Understanding the Investment
Waterfall counters aren’t cheap, but understanding the pricing helps you budget realistically. As of late 2024, expect these ranges:
Quartz waterfall islands cost $3,200-$5,800 installed for standard 8-foot islands. I used Cambria quartz in Torquay ($85 per square foot installed) and spent $4,100 total. The material is engineered, never needs sealing, and resists staining far better than natural stone.
Granite waterfall islands run $2,800-$4,900 installed but require annual sealing. I had granite in my previous kitchen and constantly worried about wine or lemon juice staining it. The maintenance stress wasn’t worth the $1,000 savings.
Marble waterfall islands cost $5,000-$8,500 installed and look absolutely stunning, but marble is high-maintenance. A friend installed Carrara marble in 2022 and regrets it—her counters show etching from acidic foods and water rings from drinking glasses. Unless you’re meticulous about coasters and immediate cleanup, skip marble.
Installation Realities
Creating waterfall edges requires precise fabrication and installation. The vertical seams where your countertop meets the waterfall side are the critical detail. Quality fabricators book-match the material so the veining flows continuously, creating that seamless look. This precision costs more but makes the difference between impressive and amateurish.
My installation took three weeks from template to final install. The fabricator visited twice—once to template and again to install. Factor in 3-4 weeks minimum when planning your timeline.
Design Considerations That Matter
Waterfall islands work best when your island is at least 6 feet long and your kitchen has sufficient space around it. In smaller kitchens (under 150 square feet), a full waterfall can overwhelm the space. Consider a waterfall on just one end instead.
Choose materials with interesting veining or patterns. Solid colors don’t showcase the waterfall effect as dramatically. My Cambria Torquay has subtle gray and gold veining that looks beautiful on the vertical surface.
The waterfall side becomes your seating area. Position bar stools here and you’ll have comfortable legroom that traditional overhangs can’t provide. I fit three bar stools at my 6-foot island with room to spare.
Common Problems I’ve Seen
The biggest mistake people make is trying to DIY this. I’ve seen three failed attempts where homeowners ordered prefab countertops and tried to create waterfall edges themselves. The seams showed badly, and all three eventually hired professionals to fix the work.
Another issue is choosing the wrong edge profile. Thick mitered edges (creating that chunky, substantial look) cost $20-$40 more per linear foot but dramatically improve the final appearance. Don’t cheap out on edge details.
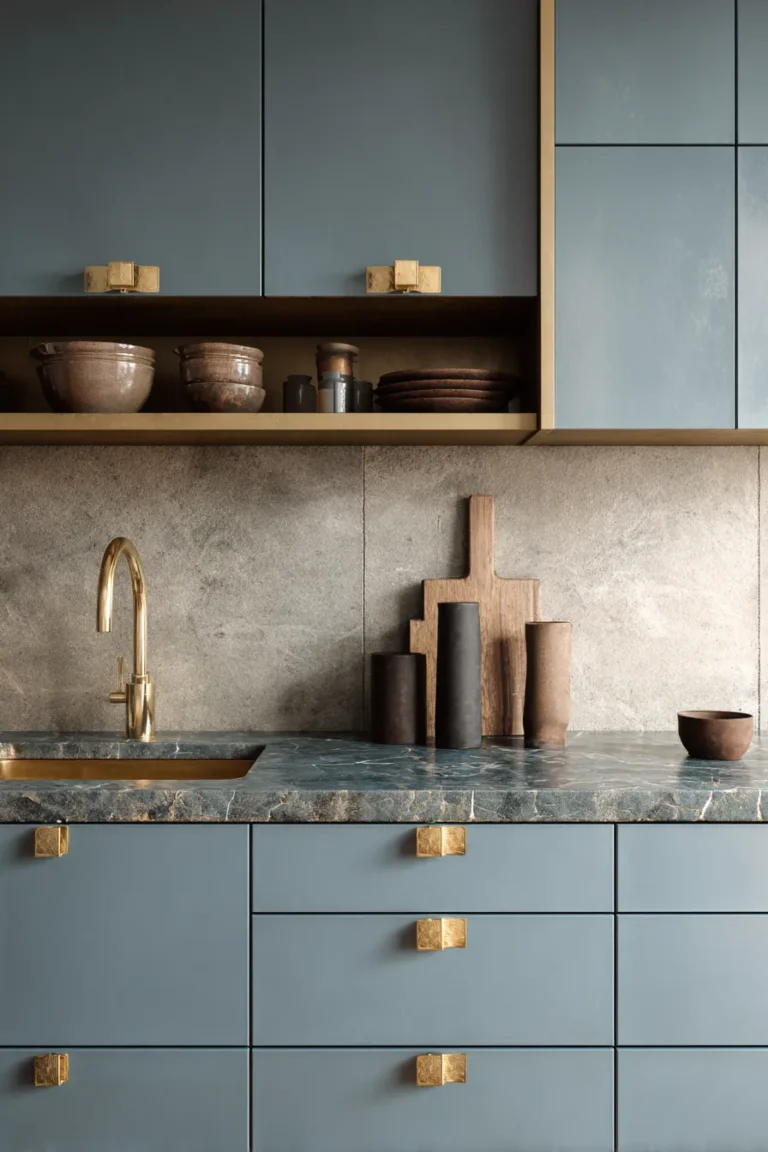
3. Two-Tone Cabinet Color Scheme ($3,500-$8,000 for Professional Paint or $800-$1,500 DIY)
Single-color kitchens feel flat and one-dimensional. Two-tone cabinets create visual interest and make kitchens feel larger by establishing distinct zones.
I tried painting my own cabinets in 2018 and learned exactly what works and what doesn’t. The project took three weeks of evenings and weekends, but I saved $5,000 compared to hiring professionals.
Color Combinations That Work
After seeing dozens of two-tone kitchens, certain combinations consistently deliver:
White uppers with navy lowers create classic contrast that never feels dated. Benjamin Moore’s Simply White ($52/gallon) paired with Hale Navy ($52/gallon) is the combination I used in my own kitchen. The navy grounds the space while white uppers keep it feeling open and bright.
Cream uppers with sage green lowers feel current and calming. Sherwin-Williams’ Alabaster ($58/gallon) with SW Clary Sage ($58/gallon) creates sophisticated warmth perfect for kitchens with good natural light.
Light gray uppers with charcoal lowers provide modern edge without going too bold. Benjamin Moore’s Stonington Gray with Kendall Charcoal offers subtle contrast that works with both warm and cool tones.
The DIY Process (If You’re Brave)
Painting cabinets yourself saves thousands but requires serious time commitment and attention to detail. Here’s what I learned doing mine:
Remove all cabinet doors, drawers, and hardware. Label everything with painter’s tape so you remember where pieces go. This step alone took me 4 hours for a medium kitchen.
Clean cabinets thoroughly with TSP cleaner ($8 for concentrate at Home Depot). Grease and cooking residue prevent paint adhesion. I cleaned mine twice and still found grease I’d missed.
Sand everything with 220-grit sandpaper ($12 for a pack). You’re not removing finish, just roughing up the surface for paint to grip. This was the most tedious part—plan for 8-10 hours of sanding.
Prime with high-quality bonding primer. I used Benjamin Moore Fresh Start ($45/gallon) and needed 2 gallons for 30 cabinet doors. Don’t skip primer even if the paint claims it’s “paint and primer in one.” That’s marketing nonsense.
Paint with proper cabinet paint, not regular wall paint. I used Benjamin Moore Advance ($65/gallon) which is specifically formulated for cabinets. It self-levels beautifully and dries to a hard, durable finish. Plan for 2-3 coats on all surfaces.
The entire DIY process took me three weekends plus weekday evenings. Total material cost: $340 for paint, primer, sandpaper, TSP, and supplies. Professional painting would have cost $5,500-$6,800 for the same work.
Hardware Makes or Breaks the Look
I initially bought cheap hardware from Amazon ($2-3 per pull) and regretted it immediately. The finish looked fake and the weight felt flimsy. I spent another $180 replacing them with Liberty Hardware brushed brass pulls ($8-12 each from Home Depot) and the quality difference was dramatic.
For two-tone kitchens, choose hardware that complements both cabinet colors. Brushed brass or aged bronze adds warmth. Matte black creates striking contrast. Polished chrome feels modern but shows fingerprints constantly (learned that the hard way in 2019).
Budget $8-15 per cabinet pull and $6-10 per knob for quality hardware that will last. You’ll need approximately one pull per drawer and one knob per door, so count carefully before ordering.
4. Integrated Smart Storage Solutions ($400-$1,200 for Full Kitchen)

The difference between a functional kitchen and a frustrating one often comes down to storage. After years of crawling on floors to reach pots in back corners of deep cabinets, I’ve become obsessed with smart storage that actually works.
Pull-Out Drawers vs. Traditional Shelves
This upgrade changed my cooking life more than any other. Pull-out drawers in lower cabinets let you access every inch of space without gymnastics.
Rev-A-Shelf pull-out shelves ($45-$85 each depending on width) install in existing cabinets in about 30 minutes per drawer. I installed six in my kitchen for $340 total and can now see and reach everything I own. No more mystery pots living in back corners.
For pots and pans, invest in heavy-duty pull-outs rated for 100+ pounds. The cheap versions sag and stick within months. I learned this replacing a $22 pull-out that broke after three months with a $68 heavy-duty version that’s still working perfectly two years later.
Vertical Storage for Flat Items
Baking sheets, cutting boards, and serving platters are nightmares to store horizontally. They stack, slide, and bury each other in chaos.
Vertical pull-outs designed for these items fit in spaces as narrow as 6 inches. I have one beside my stove (Rev-A-Shelf model 432-VF-6SS for $112) that holds six baking sheets, four cutting boards, and three cooling racks. Everything is visible and accessible.
DIY alternative: Install vertical dividers in existing cabinets using plywood strips and wood glue. This costs under $20 but requires precise measuring and cutting.
Spice Storage That Doesn’t Suck
Traditional spice storage in deep cabinets means you can never find what you need. I’ve tried three different solutions:
Pull-out spice racks ($60-$95) work great beside stoves. Everything is visible when you pull the rack out. I use a Lynk Professional Pull-Out Spice Rack ($74 on Amazon) that holds 36 spice jars.
In-drawer spice organizers ($18-$35) keep spices at an angle so you can read labels easily. Great if you have a drawer near your cooking area.
Magnetic spice jars on a wall-mounted strip ($45-$65 for 12-jar set) look Instagram-worthy but collect cooking grease. I tried these in 2020 and spent more time cleaning them than actually using them.
The $60 Drawer Organizer That Changed Everything
Kitchen drawers become junk magnets without organization. I use OXO drawer organizers ($60-$85 for a set) that expand to fit your drawer dimensions. Everything has a spot—measuring spoons, whisks, spatulas, thermometers—and you can actually find things when cooking.
This sounds basic, but organized drawers reduce cooking stress significantly. You’re not rummaging through tangled utensils while something burns on the stove.
5. Minimalist Backsplash with Maximum Impact ($450-$1,800 Material + $500-$1,200 Installation)

Your backsplash bridges countertops and cabinets while protecting walls from cooking splashes. The right choice creates focal points; the wrong choice dates your kitchen instantly.
I’ve installed four different backsplashes over the years and learned what works through both successes and expensive mistakes.
Large Format Tiles Change Everything
Small subway tiles (3×6 inches) mean more grout lines to clean and more visual busyness. Large format tiles (12×24 inches or bigger) create seamless, sophisticated looks with minimal grout.
I used 12×24 inch porcelain tiles from Floor & Decor ($3.89 per square foot) in my current kitchen. For a typical 60-square-foot backsplash, that’s $235 in tiles. Add thin-set mortar ($25), grout ($18), and supplies ($45) for $323 in materials.
Professional installation costs $8-$15 per square foot depending on your area. I paid $680 for installation in 2023, bringing my total to $1,003 for a backsplash that looks like it cost three times that amount.
Materials Worth Considering
Porcelain tile ($3-$12 per square foot) is my top recommendation for busy kitchens. It’s durable, stain-resistant, and comes in styles that convincingly mimic natural stone, concrete, or even wood. The technology has improved dramatically in recent years.
Natural stone ($12-$25 per square foot) looks beautiful but requires sealing and more maintenance. Marble shows etching from acidic splashes, which drives perfectionists crazy.
Glass tile ($15-$35 per square foot) reflects light beautifully but shows water spots and fingerprints constantly. I installed glass in a rental kitchen in 2018 and spent absurd amounts of time wiping it down.
Stainless steel ($20-$40 per square foot) creates industrial appeal but dents easily and shows every smudge. Better for professional chefs who embrace patina.
Extending to the Ceiling: Yes or No?
Taking your backsplash all the way to the ceiling creates dramatic impact, especially behind ranges. It makes ceilings feel higher and creates custom, intentional looks.
I did this behind my range and love it, but the tile cost increased by about 40% since I covered more wall area. For a 4-foot-wide area behind the range, extending to a 9-foot ceiling added roughly $180 in materials and $140 in labor compared to a standard 18-inch backsplash height.
Do this only behind your range or in one focal area. Extending everywhere makes even large kitchens feel busy.
My $420 Mistake
I once chose beautiful hand-painted Moroccan tiles ($18 per square foot) that looked incredible in the store. Within three weeks, I noticed they were showing water stains and required constant wiping. The porous glaze absorbed everything.
I replaced them after four months with simple porcelain tiles that looked similar ($5 per square foot) but performed infinitely better. That mistake cost me $420 in materials plus the labor to remove and reinstall.
Choose durability over Instagram-worthy patterns, especially in areas near sinks and stoves where splashing happens constantly.
6. Open Shelving Done Right ($180-$400 for Quality Floating Shelves)

Open shelving can add airiness and personality to modern kitchens or become grease-covered nightmares you regret immediately. The difference is strategic placement and realistic expectations.
I’ve had open shelving in three different kitchens and learned exactly where it works and where it fails spectacularly.
Where Open Shelving Actually Works
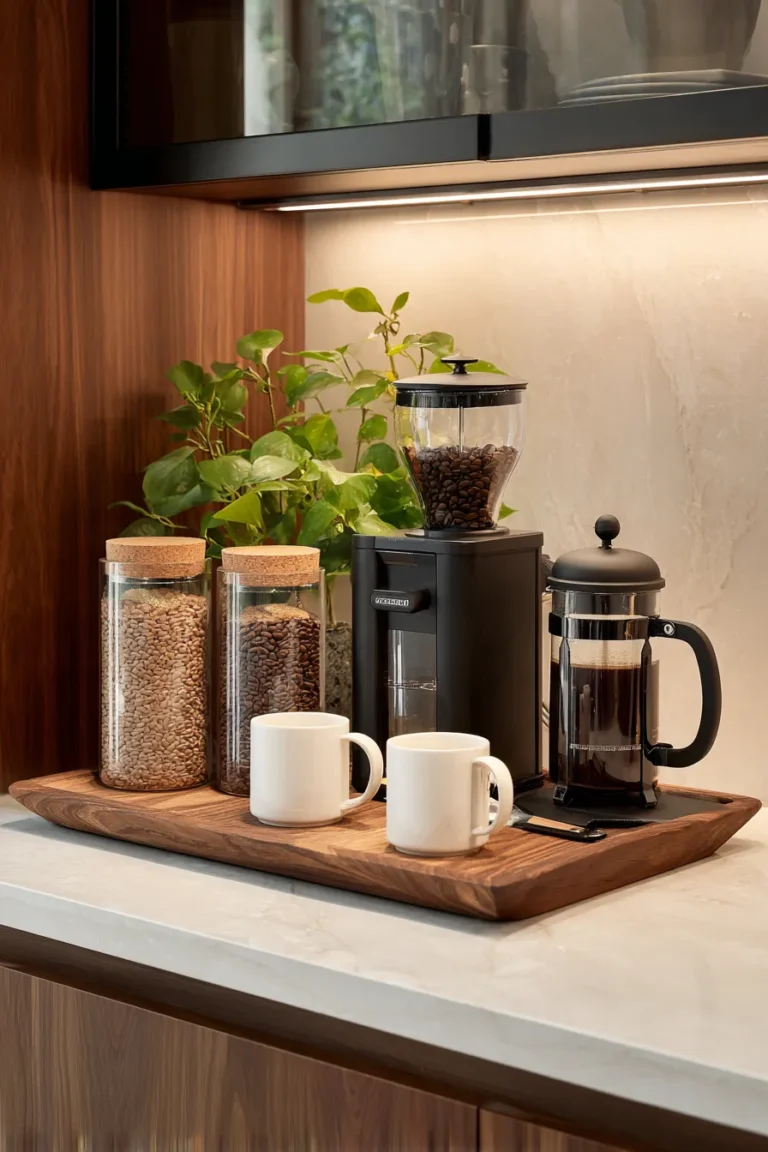
Near coffee stations for mugs and supplies. This is my favorite application. I have two floating shelves above my coffee maker holding 12 mugs and coffee accessories. They’re easily accessible, look intentional, and don’t collect much grease since they’re away from cooking areas.
Beside refrigerators for cookbooks and decorative pieces. This area sees minimal cooking splatter while adding visual interest.
In butler’s pantries or separate prep areas. If your shelves aren’t in direct line with your range, they’ll stay cleaner.
Where Open Shelving Fails
Above or beside ranges. Anything near cooking surfaces collects aerosolized grease rapidly. I made this mistake in 2017, installing beautiful reclaimed wood shelves beside my range. Within six weeks, they had a sticky grease film I couldn’t fully remove. I replaced them with closed cabinets after four months.
Near sinks without good drainage. Water splashes onto plates and glasses, creating water spots that look messy.
In homes with minimal cabinet storage. Open shelving should supplement closed storage, not replace it. You’ll still need places to hide less-pretty items.
Shelf Materials That Last
Solid wood floating shelves ($80-$150 per shelf from Etsy or local woodworkers) add warmth and character. I use 10-inch-deep walnut shelves from a local craftsman who charged $120 per 4-foot shelf. After three years, they still look beautiful.
Metal shelves ($45-$95 per shelf from West Elm or CB2) work well for industrial aesthetics. Powder-coated finishes resist rust and wipe clean easily.
Cheap hollow shelves from big box stores ($25-$40) sag under weight and look flimsy. I tried these once to save money and replaced them within a year. Not worth it.
Styling Rules I Actually Follow
Display only items you genuinely use weekly. Decorative pieces collect dust and make shelves feel staged rather than functional.
Leave 30-40% of shelf space empty. Overpacked shelves look chaotic and are harder to keep organized.
Group similar items together. All mugs together, all small plates together. This creates visual cohesion.
Use shelf height variation for interest. Stack some items, display others individually, vary visual weight.
Commit to weekly cleaning. Dusting and reorganizing open shelves takes 10-15 minutes weekly. If that sounds annoying, skip open shelving entirely.
7. Statement Lighting That Actually Functions ($180-$850 for Quality Fixtures)

Kitchen lighting should illuminate work surfaces while creating ambiance for dining and entertaining. Most kitchens get this wrong, relying on harsh overhead lighting that makes everyone look terrible.
I’ve learned that layered lighting—combining multiple types at different heights—makes the biggest difference in how kitchens feel and function.
Pendant Lights Over Islands
This is where most people start, and rightfully so. Pendant lights create focal points while providing task lighting for prep work.
Hang pendants 30-36 inches above counter surfaces. Lower looks cramped, higher doesn’t provide adequate light. I’ve adjusted hanging heights in three kitchens and this range consistently works best.
For islands 6-8 feet long, use 2-3 pendants spaced 24-30 inches apart. I have three pendants over my 7-foot island, spaced 28 inches apart.
Quality matters enormously. I initially bought $45 pendants from Wayfair that looked great online but felt cheap in person—thin metal that dented easily and exposed bulbs that created harsh glare. I replaced them after four months with $165 pendants from West Elm (Hampton Collection) that have substantial weight and proper diffusers.
Budget alternatives that don’t feel cheap: Progress Lighting from Home Depot ($85-$140 per pendant) or Kichler fixtures from Lowe’s ($95-$175). Both brands offer quality construction at accessible prices.
Under-Cabinet Lighting Is Non-Negotiable
This was the upgrade that surprised me most. Under-cabinet lighting eliminates shadows on work surfaces and highlights beautiful backsplashes.
LED strip lights ($35-$65 per run from Amazon or Home Depot) provide even illumination. I use Lithonia Under-Cabinet LED strips ($48 per 24-inch section) hardwired to a switch. They produce 400 lumens of warm white light (2700K temperature) that makes food prep dramatically easier.
Puck lights ($55-$85 for a 6-pack) create pools of light rather than even coverage. They work fine but look less polished than continuous LED strips.
Battery-operated options ($22-$35) work for rentals or if you can’t hardwire. Just expect to change batteries every 2-3 months with regular use.
Installation takes 2-3 hours if hardwiring, 30 minutes if using plug-in versions. This is a relatively easy DIY project that makes significant impact.
Dimmer Switches Change Everything
Installing dimmer switches for all kitchen lighting ($18-$35 per switch) lets you adjust brightness based on time of day and activity. Bright lighting for morning coffee and cooking, softer lighting for evening dinners.
I use Lutron Caseta smart dimmers ($52 per switch) that connect to voice control. Being able to say “dim kitchen lights to 30%” while my hands are covered in dough is worth every penny.
Standard dimmer switches ($18-$28) from Lutron or Leviton work beautifully without smart features.
The Recessed Lighting Debate
I’ve installed recessed lighting in two kitchens and skipped it in my current one. Here’s my honest take:
Recessed lights provide general ambient lighting that’s necessary in kitchens without good natural light. Plan for one fixture per 25-30 square feet of kitchen space. For a 150-square-foot kitchen, you’ll need 5-6 fixtures.
LED retrofit kits ($12-$22 per fixture from Home Depot) make installation relatively affordable. Professional installation costs $125-$185 per fixture including materials and labor.
But recessed lighting alone creates flat, shadowless spaces that feel institutional. You must combine it with pendant and under-cabinet lighting for proper layering.
My current kitchen has excellent natural light, so I skipped recessed fixtures entirely. I rely on three pendant lights over the island, under-cabinet LED strips, and one flush-mount ceiling fixture over the dining area. This combination provides all the light I need while creating better ambiance than recessed fixtures ever did.
8. Seamless Appliance Integration ($0-$1,500 Premium for Panel-Ready Appliances)
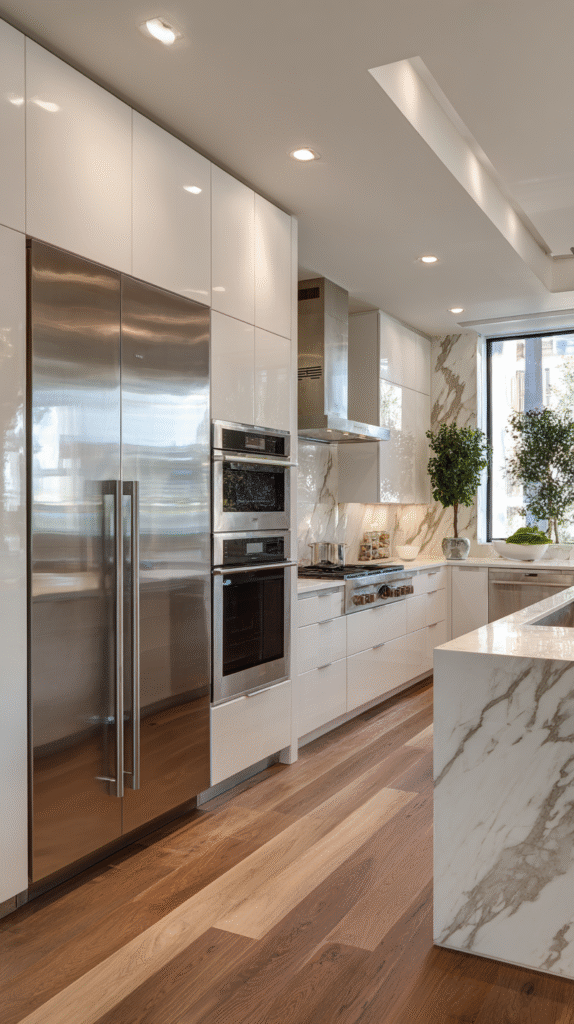
Modern kitchens achieve clean, uninterrupted lines by integrating appliances into the overall design. This approach creates sophisticated spaces that look custom and intentional rather than showroom-default.
Panel-Ready Appliances Worth the Premium
Panel-ready dishwashers let you attach a cabinet front that matches your cabinetry perfectly. Bosch 300 Series panel-ready dishwashers ($850-$950) cost about $100-$150 more than standard stainless versions but disappear completely into your design.
I have a Bosch 500 Series panel-ready dishwasher ($1,100) and absolutely love this decision. My kitchen feels more custom and cohesive than it would with a stainless steel appliance interrupting the cabinet flow.
Panel-ready refrigerators are where costs jump significantly. A standard stainless refrigerator costs $1,500-$2,500 for quality brands. Panel-ready versions cost $2,800-$4,500 for the same capacity. That $1,500+ premium is hard to justify unless you’re doing a high-end renovation.
I chose a standard stainless KitchenAid refrigerator ($2,100) because the panel-ready version would have been $3,800. That $1,700 difference bought my waterfall island instead.
Appliance Placement Strategy
Where you position appliances matters as much as which appliances you choose.
Microwaves above ranges interrupt clean sight lines and are inconvenient for anyone under 5’6″. I’m 5’4″ and hate reaching above my head for hot food.
Better options: Mount microwaves in base cabinets with a trim kit ($45-$65), creating ergonomic access that doesn’t disrupt your visual flow. Or designate a section of tall pantry cabinets for a built-in microwave at chest height.
I installed my microwave in a base cabinet using a Sharp drawer-style microwave ($395 on sale from Best Buy). It’s easier to access, keeps counters clear, and looks intentional. This was one of my favorite design decisions.
Refrigerator placement determines your kitchen’s work triangle efficiency. Position it at one end of your main work zone, not in the middle where it interrupts cooking flow.
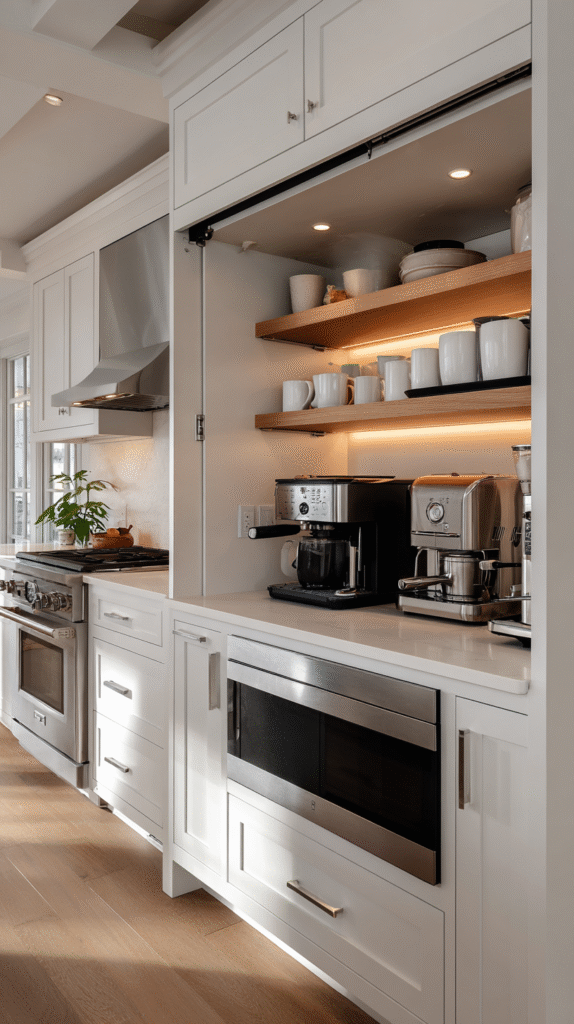
Small Appliance Storage Solutions
Counter clutter from small appliances makes even expensive kitchens look messy. Beyond the appliance garage I mentioned earlier, consider these strategies:
Dedicate a section of tall pantry cabinets for small appliances with electrical outlets inside. My friend installed outlets in her pantry ($75 for an electrician to add) and stores her stand mixer, food processor, and blender there. She pulls them out only when needed.
Use lift-up cabinet shelves that bring appliances to counter height. Rev-A-Shelf makes excellent lift systems ($185-$240) that hold heavy stand mixers and rise with smooth hydraulics.
Accept that some appliances earn permanent counter space. My coffee maker and electric kettle stay out because I use them multiple times daily. Everything else gets stored.
9. Natural Light Maximization ($0-$2,800 for Window Treatments + Potential Skylight)
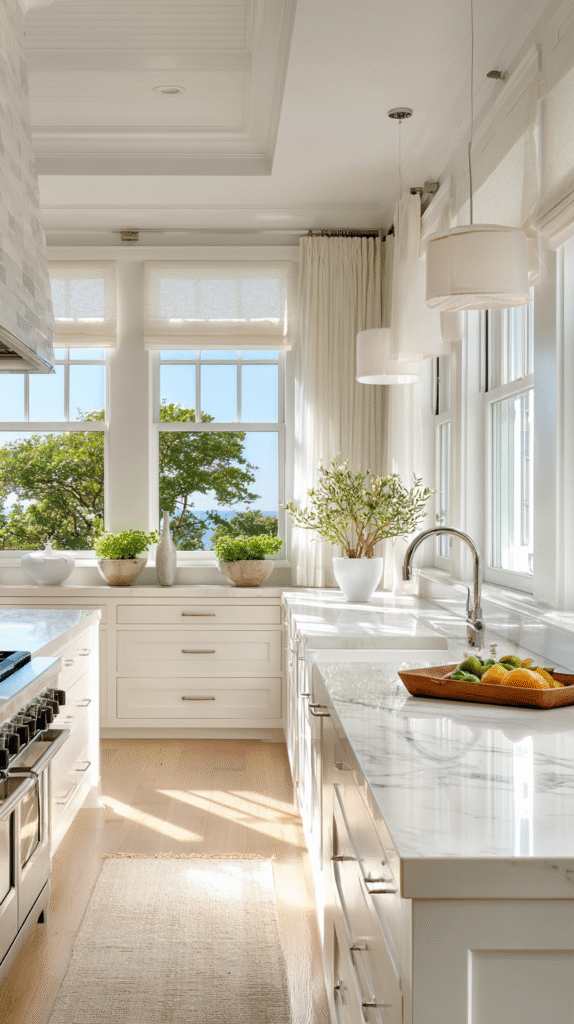
Natural light makes kitchens feel larger, brighter, and more connected to outdoors. Smart design choices dramatically improve how light flows through your space.
Window Treatments That Maximize Light
Heavy curtains block precious natural light. Choose treatments that provide privacy when needed while allowing maximum light transmission during the day.
Cellular shades ($45-$125 per window depending on size) offer excellent light control with top-down/bottom-up options. You can lower them from the top for privacy while keeping the upper portion open for natural light. I use these in my kitchen and love the flexibility.
Cafe curtains ($25-$55 per pair) cover only the bottom half of windows, providing privacy while keeping the top half fully exposed. They work beautifully in kitchens overlooking neighbors’ yards.
Simple valances ($35-$75 each) add softness without blocking light. They’re purely decorative, so pair them with blinds or shades if you need privacy or light control.
Skip roman shades in kitchens near sinks or stoves. The fabric collects moisture and cooking odors, requiring frequent cleaning.
Light-Reflecting Materials
Every surface in your kitchen either absorbs or reflects light. Choose materials that amplify available natural light:
White or light-colored cabinets reflect 80-85% of light hitting them. Even light gray cabinets reflect significantly less—around 50-60%. I’ve worked in both and the brightness difference is substantial.
Glossy backsplashes bounce light around rooms more effectively than matte tiles. My polished porcelain backsplash reflects light beautifully, making my kitchen feel brighter than it would with matte tile.
Polished countertops reflect more light than honed or leathered finishes. My polished quartz counters amplify natural light noticeably compared to the honed granite in my previous kitchen.
Adding Skylights: My Experience
I added a 2×4 foot skylight ($1,800 installed including tax) to my previous kitchen and it transformed the space completely. That kitchen had only one window, and the skylight brought in dramatic natural light from above.
Velux skylights with integrated shades ($1,400-$2,200 installed) let you control light levels and insulation. I could darken the kitchen in summer when the sun was intense or open the shade completely on overcast days.
The installation was less disruptive than I feared—one day of work including cutting the roof opening and patching drywall. The energy efficiency impact was neutral since modern skylights have excellent insulation.
Would I do it again? Absolutely, but only in kitchens lacking adequate window light. If you have good natural light already, spend that $1,800 on other upgrades with bigger impact.
10. Multi-Functional Kitchen Island ($2,500-$8,500 for Custom Build)
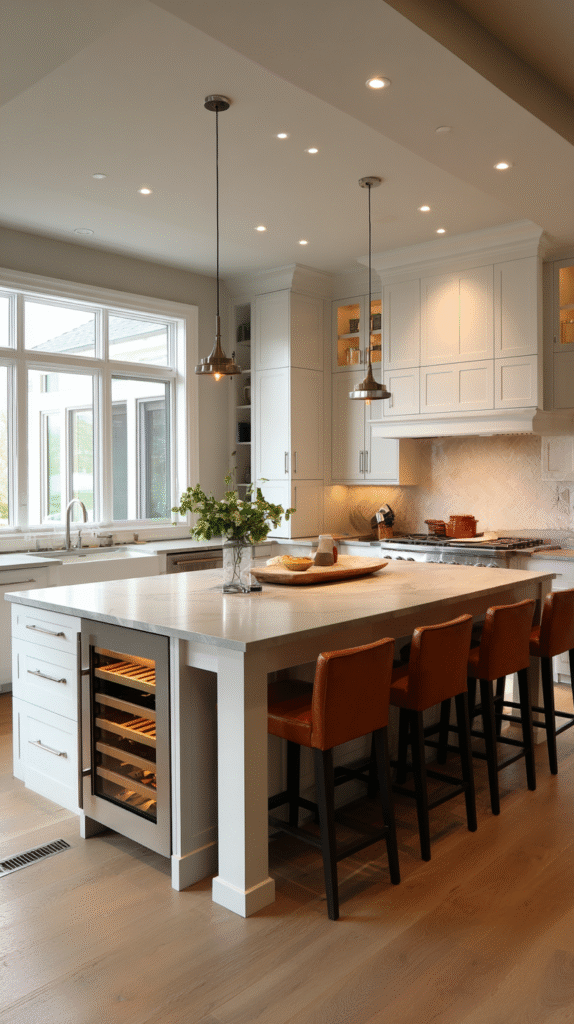
Your kitchen island should work harder than just providing extra counter space. Well-planned islands integrate storage, seating, and specialized work zones while anchoring your kitchen’s layout.
I’ve designed three kitchen islands and learned that thoughtful planning creates dramatically better functionality.
Multiple Height Surfaces
Standard counter height (36 inches) works for food prep. Bar height (42 inches) provides comfortable dining. Different heights serve different purposes.
My island has standard 36-inch height on the cooking side for prep work, then rises to 42-inch bar height on the seating side. This creates visual distinction between work and dining zones while providing comfortable seating.
The cost difference between single-height and dual-height islands is minimal—typically $300-$600 more for the additional structure and materials.
Some people add lowered sections (30-32 inches) for baking and pastry work. I considered this but decided I don’t bake frequently enough to justify the space. Know your actual cooking habits before adding specialty zones you won’t use.
Integrated Storage That Works
Islands offer prime real estate for smart storage that keeps your most-used items accessible.
Deep drawers for pots and pans ($85-$140 per drawer for quality soft-close mechanisms) eliminate the need to walk across your kitchen while cooking. I have three deep drawers on my cooking side that hold all my pots, pans, and lids.
Pull-out trash and recycling ($120-$185 for quality systems) hide unsightly bins while keeping them conveniently accessible. Get systems with soft-close mechanisms—cheap versions slam loudly.
Open shelving on the seating side displays cookbooks and decorative items while creating visual interest. I have one section of open shelves that I style with cookbooks and ceramic pieces.
Wine refrigeration ($450-$1,200 for quality units) fits in islands if you have adequate depth. I don’t drink enough wine to justify this, but friends who installed wine fridges use them constantly.
Seating Considerations
Comfortable island seating requires proper planning for overhang depth and knee space.
Plan at least 15 inches of overhang for bar stools, though 18 inches provides more comfortable legroom. My island has 18-inch overhang and adults can sit comfortably without feeling cramped.
Allow 24 inches of width per person. For three bar stools, you need at least 72 inches of linear space. I have 84 inches of seating length accommodating three stools with breathing room between them.
Support overhangs properly. Anything over 12 inches requires corbels, brackets, or structural support. My 18-inch overhang has three heavy-duty steel brackets ($45 each from a local fabricator) that are essential for safety.
Choose backless bar stools for easier tucking under the island when not in use. Stools with backs require more clearance space.
Electrical Outlets Are Essential
Install electrical outlets in island sides (not countertop surfaces where they collect debris). I have two outlets on my seating side for charging phones or plugging in small appliances when entertaining.
Building codes typically require outlets every 4 feet of counter space. Plan outlet locations during the design phase—adding them after construction is expensive and requires cutting into finished surfaces.
Pop-up outlets ($75-$140 each) that sit flush with countertops when not in use look sleek but collect food debris and liquid spills. I tried these in a previous kitchen and found them annoying to clean. Standard outlets in island sides work better.
Frequently Asked Questions About Modern Kitchen Ideas
How much should I budget for a modern kitchen update?
If you’re doing smaller updates yourself (painting cabinets, adding hardware, new lighting), expect $1,500-$3,500 total. For major renovations including countertops and cabinets, realistic budgets start at $15,000 and easily reach $40,000-$60,000 for complete overhauls with quality materials. As of late 2024, my own kitchen renovation cost $28,400 for new cabinets, quartz countertops, waterfall island, and updated lighting. I did the cabinet painting myself, which saved approximately $5,500.
What should I prioritize if I have a limited budget?
Start with changes that impact daily function first. Good lighting (under-cabinet LED strips plus pendant lights over the island) costs $400-$800 and improves both function and aesthetics immediately. Fresh cabinet paint and new hardware runs $800-$1,500 DIY and completely transforms the space. Smart storage solutions like pull-out drawers cost $400-$800 but eliminate daily frustration. These three upgrades combined cost under $3,000 and deliver the biggest quality-of-life improvements.
Can renters make any of these modern kitchen updates?
Absolutely. Focus on removable changes: battery-operated under-cabinet lighting, freestanding kitchen islands, window treatments, open shelving using damage-free mounting systems, and organizational inserts for existing cabinets. I’ve helped three friends update rental kitchens spending $400-$900 on changes they could remove when moving. The impact was dramatic without risking security deposits.
How long do modern kitchen renovations typically take?
Minor updates (painting cabinets, new hardware, lighting) take 2-4 weeks of part-time work if you’re DIYing. Major renovations with new cabinets and countertops require 6-12 weeks from planning to completion. My renovation took 9 weeks including 3 weeks of planning and ordering, 4 weeks of installation, and 2 weeks of finishing touches and adjustments. Factor in delays for custom orders—nothing arrives as quickly as promised.
Are waterfall islands worth the extra cost?
If your kitchen island is a focal point and you have the budget, yes. The visual impact is immediate and the practical benefits (protecting island sides, comfortable seating) justify the cost. However, if your island is small or tucked away, invest that $3,000-$5,000 premium elsewhere. In my kitchen, the waterfall island was the single most impactful upgrade and guests always comment on it.
What’s the biggest mistake people make with modern kitchen design?
Prioritizing aesthetics over function. I’ve seen too many kitchens with gorgeous marble countertops that stain constantly, open shelving that collects grease, and trendy fixtures that don’t provide adequate lighting. The best modern kitchens look beautiful because they’re designed around how you actually cook and live. Function creates the foundation for lasting beauty.
Common Mistakes to Avoid (Learned from Experience)
After twelve years and multiple kitchen projects, I’ve made—or witnessed—every mistake possible. Here are the most expensive ones you should avoid:
Choosing Materials Based on Looks Alone
That stunning marble looks incredible in showrooms but requires constant maintenance and shows every stain. I watched a friend spend $8,500 on Carrara marble countertops only to regret the decision within three months. Every coffee ring, wine splash, and lemon juice drip left permanent marks. She eventually spent another $4,200 replacing it with quartz.
Ask about maintenance requirements and real-world durability before committing to any material, no matter how beautiful it looks.
Skimping on Hardware Quality
I saved $140 buying cheap cabinet hardware from Amazon instead of quality pieces from Home Depot. Those pulls felt flimsy, the finish wore off within four months, and I replaced everything after eight months. That “savings” cost me an extra $180 plus the frustration of handles that felt cheap every time I touched them.
Budget $8-15 per pull and $6-10 per knob for hardware that will last and feel substantial.
Installing Open Shelving Everywhere
Open shelving photographs beautifully for Pinterest but requires discipline and frequent cleaning to maintain. My friend installed open shelving on three walls of her kitchen in 2021, then removed it all nine months later because the maintenance was exhausting. That mistake cost her $1,400 in materials and labor.
Use open shelving strategically in 1-2 areas away from cooking splatter, not as wholesale cabinet replacement.
Undersizing Your Island
Kitchen islands need to be substantial to feel intentional rather than awkward. I’ve seen too many islands that are too small for the space—they look like afterthoughts floating in the middle of the room.
Minimum island size should be 4 feet long by 2 feet deep for functional work and seating space. Anything smaller becomes more obstacle than asset. My island is 7 feet by 3.5 feet, which provides ample prep space and comfortable seating for three people.
Ignoring the Work Triangle
The relationship between your sink, stove, and refrigerator determines how efficiently your kitchen functions. These three points should form a triangle with sides between 4 and 9 feet each.
I’ve cooked in kitchens where the refrigerator was 15 feet from the stove, requiring constant back-and-forth trips while cooking. It’s exhausting and inefficient. When planning layouts, prioritize work triangle efficiency over aesthetic arrangements.
Choosing Trendy Colors Over Timeless Ones
That emerald green or millennial pink might feel current today, but will you love it in five years? I painted cabinets bright turquoise in 2016 because it was trending. By 2019, I was tired of it and repainted everything white.
Stick with classic colors for expensive, permanent elements. Save trendy colors for easily changeable items like paint, hardware, or accessories.
Transform Your Kitchen with Confidence
Modern kitchen design isn’t about following every trend or spending a fortune on premium materials. It’s about understanding how you actually use your space and making thoughtful choices that improve both function and aesthetics.
These 10 ideas represent the strategies that have worked consistently across dozens of kitchens—my own and those I’ve helped others create. Some require significant investment, like waterfall islands or new countertops. Others, like smart storage solutions or better lighting, deliver dramatic impact for under $1,000.
The key is starting with changes that solve your biggest frustrations. If you spend ten minutes every morning looking for coffee supplies, appliance garages and smart storage matter more than expensive countertops. If your kitchen feels dark and cramped, investing in lighting and light-reflecting materials creates more impact than new cabinets.
I’ve made expensive mistakes so you don’t have to. That $420 I wasted on porous backsplash tiles taught me to prioritize durability. The cheap hardware that wore off in four months showed me that quality matters in items you touch daily. The open shelving beside my range that collected grease proved that not every Pinterest idea works in real life.
Start with one or two ideas that excite you most. Live with those changes for a few months before adding more. The best kitchens evolve gradually, allowing you to learn what works for your specific cooking style and daily routines.
Your kitchen should make you want to cook, eat, and gather with people you care about. Whether you’re working with a $2,000 budget or planning a complete renovation, these modern kitchen ideas provide the foundation for creating a space that’s both beautiful and genuinely functional for years to come.
Ready to start your kitchen transformation? Pick the idea that solves your biggest daily frustration and begin there. Small changes create momentum for bigger ones, and before you know it, you’ll have the modern kitchen you’ve been dreaming about—one that actually works for how you live.